How to Lay Particle Board Flooring in a Japanese Homestyle
Particle board flooring, often referred to as OSB (oriented strand board), is a popular choice for flooring in Japanese homestyle properties. It is a cost-effective, durable, and versatile material that can be easily installed. While it may not possess the same aesthetic appeal as hardwood or tile, particle board flooring offers a practical and functional solution for various spaces, particularly in homes with a minimalist or contemporary style.
This article will guide you through the process of laying particle board flooring in a Japanese homestyle setting, covering the essential steps and considerations for achieving a successful installation. By following these guidelines, you can create a sturdy and visually appealing floor that complements the overall design of your Japanese-inspired home.
Prepare the Subfloor
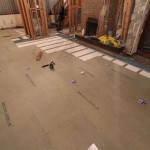
Before laying the particle board flooring, it is crucial to prepare the subfloor properly. This step ensures a level and stable base for the flooring, preventing any future issues with warping or unevenness. The subfloor preparation process involves the following:
- Inspect the Subfloor: Thoroughly inspect the existing subfloor for any damage, cracks, or unevenness. Repair any significant flaws using patching compound or plywood.
- Level the Subfloor: Achieve a level subfloor using a self-leveling compound or shims. This ensures that the particle board flooring is installed seamlessly and without any gaps or bumps.
- Moisture Barrier: Install a moisture barrier, such as a polyethylene sheet, over the subfloor. This prevents moisture damage to the particle board and helps maintain the integrity of the flooring for a longer duration.
Layout the Particle Board Flooring
Once the subfloor is prepared, you can begin laying the particle board flooring. This step involves careful planning and precise measurements to ensure a clean and professional installation. Follow these steps for a successful layout:
- Measure the Room: Accurately measure the dimensions of the room to determine the required amount of particle board flooring. Allow for a slight margin for cutting and waste.
- Establish a Starting Point: Select a starting point for the flooring installation, preferably against a wall or a prominent feature in the room. This ensures a visually appealing and balanced layout.
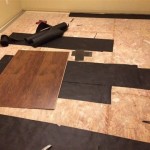
- Create a Pattern: Decide on a pattern for laying the particle board panels, considering the overall design of the room and the desired aesthetic. Staggering the joints can create a more visually appealing and sturdy installation.
Install the Particle Board Flooring
With the subfloor prepared and the particle board panels laid out, you can begin the installation process. This step requires careful handling and precise cutting to ensure a seamless and professional finish. The following steps outline the installation process:
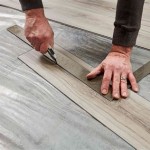
- Secure the First Panel: Secure the first particle board panel to the subfloor using construction adhesive and screws. Apply the adhesive evenly to the subfloor and position the panel firmly. Drive screws through the panel and into the subfloor at regular intervals.
- Install Subsequent Panels: Install subsequent panels by aligning them with the previous panel, ensuring that the joints are staggered. Use the adhesive and screws to secure each panel to the subfloor.
- Finish Edges: Carefully trim and cut the particle board panels to fit around doors, windows, and other obstacles in the room. Ensure that the cuts are clean and precise to maintain a professional look.
Finishing Touches: Adding Japanese Style
After installing the particle board flooring, you can add finishing touches to enhance the Japanese homestyle aesthetic. This step involves adding decorative elements that complement the flooring and the overall design of the room. Consider these options:
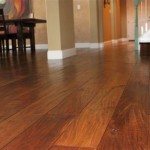
- Natural Finishes: Apply a natural oil or wax finish to the particle board flooring to enhance its natural wood grain and create a warm, rustic look. This option also offers excellent protection against scratches and spills.
- Tatami Mats: Incorporate tatami mats in specific areas of the room, such as the seating or sleeping area. These traditional Japanese mats elevate the homestyle aesthetic and create a feeling of tranquility and serenity.
- Shoji Screens: Utilize shoji screens to partition the room or create a distinct separation between different areas. These traditional Japanese screens add a touch of elegance and provide privacy while maintaining a sense of openness.
Laying particle board flooring in a Japanese homestyle can be a rewarding and fulfilling project. By following the steps outlined in this article, you can achieve a durable and visually appealing floor that complements the overall design of your home. Remember to prioritize proper subfloor preparation, meticulous layout, and careful installation to ensure a professional and long-lasting result. With a little effort and attention to detail, you can create a space that reflects the unique beauty of Japanese homestyle design.

Zen Home Ideas Minimalistic Living The Japanese Way

Zen Home Ideas Minimalistic Living The Japanese Way

Adding Floor And Wall Coverings To Homestyler

Zen Home Ideas Minimalistic Living The Japanese Way

Homestyler Space Planning Tutorial

15 Japanese Flexi Room Furniture Decor Guide Home Singapore

15 Japanese Flexi Room Furniture Decor Guide Home Singapore

طابل باس بتصميم خاص مقاسات وأفكار ديكور

Kitchen Use The Custom Furniture Feature And Design An Ideal Activity Homestyler Forum

How To Install A Laminate Flooring Paoson Blog Home Diy Tips
See Also