How to Install Tongue and Groove Wood Flooring on Concrete
Installing tongue and groove wood flooring on concrete is a popular choice for homeowners seeking a natural and elegant look. However, the process requires specific steps to ensure a successful and long-lasting installation. This article outlines the essential steps, tools, and considerations for installing tongue and groove wood flooring on concrete.
Preparing the Concrete Subfloor
A properly prepared concrete subfloor is crucial for a successful installation. Concrete subfloors must be level, smooth, and clean. Any imperfections or irregularities can transfer to the wood flooring, resulting in an uneven and unstable floor. Here are the steps:
- Remove Existing Flooring: If there is existing flooring, carefully remove it, paying attention to any potential damage to the concrete subfloor.
- Clean the Concrete: Thoroughly clean the concrete subfloor, removing debris, dirt, and dust using a vacuum cleaner or a broom. It is vital to remove any residue from adhesives, paint, or coatings.
- Level the Concrete: Uneven concrete can create problems with the installation. Apply a self-leveling compound to fill any gaps or dips, ensuring a smooth and even surface. Allow the compound to dry completely before proceeding.
- Moisture Barrier: Install a moisture barrier, such as a polyethylene sheet, over the concrete subfloor to prevent moisture from affecting the wood flooring. This is particularly crucial in areas with high humidity levels.
Installing the Underlayment
Underlayment provides a buffer between the concrete subfloor and the wood flooring, reducing noise, adding insulation, and improving overall comfort. Choose an underlayment appropriate for the type of wood flooring being installed.
- Select the Right Underlayment: There are various types of underlayment, such as foam, rubber, or cork. Consider the specific needs of your project, such as sound reduction or insulation requirements, when choosing the appropriate underlayment.
- Install the Underlayment: Roll out the underlayment, ensuring it fully covers the entire area. Secure the edges with staples or tape, ensuring there are no gaps or overlaps.
Installing the Tongue and Groove Flooring
Once the subfloor and underlayment are prepared, you can begin installing the tongue and groove wood flooring. This process involves carefully aligning and securing the wood planks together.
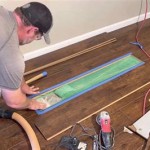
- Start at the Wall: Begin installation in a corner of the room, leaving a gap between the first row of planks and the wall to allow for expansion and contraction. This gap is typically ¼ inch.
- Align the First Row: Align the first row of planks along the wall, ensuring their tongues are facing the wall. Use a tapping block and mallet to gently tap the planks into place, ensuring they are flush with each other.
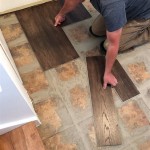
- Interlock the Planks: The tongue and groove system allows the planks to interlock, forming a secure and tight fit. Use a tapping block to gently tap the planks together, ensuring a snug connection.
- Spacing and Expansion: Maintain a consistent spacing between the planks and walls to allow for expansion and contraction due to temperature and humidity changes..
- Secure the Planks: Use flooring nails or staples to secure the planks to the underlayment, ensuring they are driven straight and below the surface of the wood.
- Continue Installation: Continue installing the planks, row by row, ensuring they align with each other and are properly secured.
Finishing Touches
Once the tongue and groove wood flooring is installed, it is essential to complete the finishing touches to enhance appearance and protection.
- Trim and Cut: Cut planks to fit around obstacles or corners, using a saw with a fine blade for precise cuts.
- Sand and Finish: Smooth the surface of the floor by sanding it with a fine-grit sandpaper. Apply a sealant or finish to protect the wood from wear and tear, enhancing durability and longevity.
- Install Transition Strips: Use transition strips to seamlessly connect the wood flooring to other flooring types, such as tile or carpet, creating a smooth and even transition.
- Baseboards: Install baseboards around the perimeter of the room, concealing the expansion gaps and providing a finished look to the flooring installation.

Installing Engineered Hardwood On Concrete Twenty Oak

Installing Hardwood Floors On Concrete Subfloors

Installing Wood Flooring Over Concrete Diy

5 Essential Tips For Tongue And Groove Flooring District Floor

Tongue Groove Flooring Installation On Underlay Start To Finish

Installing Engineered Hardwood On Concrete Twenty Oak

How To Install Tongue And Groove Flooring Blog

How To Install Oak Hardwood Floors Young House Love

Can You Put Wood Flooring Over A Concrete Slab Instead Of Using Cement Board Quora

How To Install Lock Engineered Hardwood Flooring
See Also