How To Install Vinyl Plank Flooring On Wood
Vinyl plank flooring has become increasingly popular due to its durability, affordability, and ease of installation. It’s a versatile material that can be installed over various subfloors, including wood. When you choose to install vinyl plank flooring over a wood subfloor, you are choosing a flooring option that is both attractive and practical. Whether you are a seasoned DIYer or a novice, this article will guide you through the process of installing vinyl plank flooring over wood.
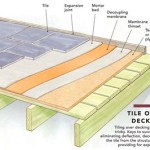
Prepare the Subfloor
A well-prepared subfloor is crucial for a successful vinyl plank installation. Before you start laying the planks, ensure your wood subfloor meets the following criteria:
- Level: A level subfloor is essential for preventing unevenness in your new vinyl plank floor. Use a level to check for any dips or bumps and use a sander, wood filler, or shims to level out the surface.
- Dry and Stable: Moisture can damage vinyl planks and cause them to warp, so ensure your wood subfloor is completely dry. If there is any suspicion of moisture problems, consider a moisture barrier or a moisture-resistant underlayment.
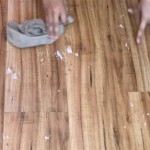
- Free of Debris: Remove any debris, dirt, or loose pieces of wood from the subfloor. This will ensure a smooth and even surface for the vinyl planks.
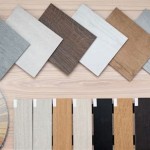
Choose the Right Underlayment
Underlayment serves various purposes, including adding comfort, insulation, moisture protection, sound reduction, and a smooth surface. Select an underlayment that suits your specific needs and the type of vinyl plank you are installing. Here are some options:
- Foam Underlayment: This type of underlayment provides cushioning and sound reduction. It's a popular choice for providing comfort and reducing noise from foot traffic.
- Cork Underlayment: Cork underlayment is another popular option for its sound-absorbing properties. It can also provide insulation and some moisture resistance.
- Felt Underlayment: Felt underlayment is often used for its durability and moisture protection. It also provides a smooth surface for the vinyl planks.
Before installing the underlayment, measure your subfloor to determine how much you need. Then, cut the underlayment to size and lay it down, ensuring it covers the entire area to be installed. Overlap sections of underlayment by at least 2 inches to avoid gaps and ensure proper coverage.
Installing the Vinyl Plank Flooring
With the subfloor prepared and underlayment installed, you are ready to begin installing the vinyl plank flooring. Different vinyl plank manufacturers use different methods for installation, but most require a tongue-and-groove system. Here are the general steps for installation:
- Start in a Corner: Begin installing your first row in a corner of the room, ensuring the edge sits flush with the wall. Leave a ¼-inch expansion gap between the wall and the first board.
- Align and Secure: Align the next board’s tongue with the groove of the previous board, pressing firmly to secure them together. Use a tapping block to ensure a tight fit and to prevent damage to the plank edges.
- Stagger the Seams: Stagger the seams between rows of planks to ensure a stronger and more visually appealing installation. The goal is to prevent seams from lining up in a straight line.
- Cut as Needed: As you move to the walls or other obstacles, you will likely need to cut planks to fit. Use a utility knife or a circular saw with a fine-tooth blade to carefully cut the flooring to size.
- Use Transition Strips: Use transition strips to create a smooth transition between the vinyl plank flooring and other flooring types, like carpet or tile.
- Trim Around Obstacles: When working around obstacles, like pipes or vents, use a utility knife or a jigsaw to cut the planks to fit precisely.
As you install your vinyl plank flooring, be sure to check your work for level and alignment. Use a level to ensure the flooring is even. You should also make sure the planks are aligned with each other; otherwise, gaps and unevenness may occur.
Finishing the Installation
After installing the last row of planks, you will need to finish the installation by adding trim pieces, molding, and baseboards. Securely fasten the trim to the wall to create a finished look.
Lastly, remove any protective film from the vinyl planks. Carefully clean the new floor with a damp mop to remove any dust or debris. You can now enjoy your new vinyl plank flooring.

20 Tips For A Great Vinyl Plank Flooring Installation

How To Install Vinyl Plank Flooring Anything

10 Beginner Mistakes Installing Vinyl Plank Flooring

Installing Vinyl Plank Flooring How To Fixthisbuildthat

A Beginner S Guide To Installing Vinyl Plank Flooring Dumpsters Com

Installing Vinyl Plank Flooring For Beginners Anika S Diy Life

How To Install Laminate Or Vinyl Plank Flooring Over Old Hardwood

How To Install Vinyl Flooring Planks

Lvp Flooring Installation How To Install Luxury Vinyl Plank In A Basement Diy

How To Install Floating Vinyl Plank Flooring In 5 Easy Steps Riverbend Interiors
See Also