How To Put Vinyl Flooring On Rough Concrete Slabs
Vinyl flooring is a popular choice for homeowners for a variety of reasons, including its durability, affordability, and ease of installation. However, one challenge that can arise is installing vinyl flooring on rough concrete slabs. These slabs often have uneven surfaces, cracks, and other imperfections that can make it difficult to achieve a smooth, professional-looking finish. In this article, we will explore the necessary steps to successfully install vinyl flooring on rough concrete slabs, ensuring a high-quality outcome.
Preparing the Concrete Slab
Proper preparation of the concrete slab is paramount for successful vinyl flooring installation. This involves addressing any imperfections and ensuring a smooth, level surface. The following steps are essential:
1.
Clean the Slab:
Begin by thoroughly cleaning the slab using a broom and dustpan to remove all loose debris, dust, and dirt. Use a damp mop to remove any remaining dirt or grime. Ensure the slab is completely dry before proceeding.2.
Repair Cracks and Uneven Areas:
Cracks and uneven areas should be repaired using a concrete patching compound or epoxy. Apply the patching compound according to the manufacturer's instructions, allowing it to cure completely before moving on to the next step.3.
Level the Slab:
If the slab has significant unevenness, a self-leveling compound can be used to create a smooth, level surface. This compound is poured onto the slab and allowed to level out before drying. Follow the manufacturer's instructions for application and drying times.4.
Prime the Slab:
Priming the concrete slab helps create a better bond between the vinyl flooring and the subfloor. Use a concrete primer specifically designed for vinyl flooring installation. Apply the primer evenly to the entire surface, allowing it to dry completely before continuing.Installing an Underlayment
Once the concrete slab has been adequately prepared, installing an underlayment is essential for achieving a smooth and comfortable finish. The underlayment serves as a barrier between the concrete slab and the vinyl flooring, offering several benefits:
1.
Reduces Noise:
Underlayment effectively dampens sound transmission, minimizing noise from foot traffic and reducing the overall noise level in the room. This is particularly beneficial in areas where noise reduction is a concern.2.
Enhances Comfort:
The cushioning provided by underlayment adds a layer of comfort to the vinyl flooring, making it more comfortable to walk on. This is especially important in rooms where people will be walking or standing for extended periods.3.
Provides Insulation:
Some underlayment products offer insulation properties, helping to regulate temperature and reduce heat transfer. This can improve the overall comfort of the room.4.
Protects the Vinyl Flooring:
Underlayment can also protect the vinyl flooring from damage caused by bumps or scratches. This extends the life of the flooring and helps maintain its appearance.There are different types of underlayment available, such as foam, cork, and rubber. The best choice will depend on your specific needs and budget. Consult with a flooring specialist for guidance on selecting the appropriate underlayment for your project.
Installing the Vinyl Flooring
With the concrete slab prepared and the underlayment in place, the final step is installing the vinyl flooring. Vinyl flooring comes in various styles, including tiles, planks, and sheets. The installation process will vary slightly depending on the chosen style.
For tile and plank vinyl flooring, the installation typically involves the following steps:
1.
Measure and Cut:
Carefully measure the room and cut the vinyl tiles or planks to size using a utility knife or a specialized vinyl flooring cutter. Ensure the cuts are precise to create clean, seamless transitions.2.
Apply Adhesive:
Depending on the type of vinyl flooring chosen, adhesive may be required. If so, apply the adhesive to the subfloor according to the manufacturer's instructions. Allow the adhesive to dry slightly before proceeding.3.
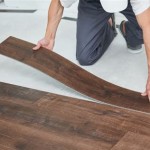
Install the Flooring:
Install the vinyl tiles or planks one by one, ensuring they are properly aligned and secured to the subfloor. Use a rubber mallet to gently tap the tiles or planks into place.4.
Trim and Finish:
Once all the tiles or planks are installed, trim any excess material around the perimeter of the room. Use a transition strip or molding to create a smooth transition between the vinyl flooring and other flooring types.For sheet vinyl flooring, the installation process involves laying the sheet directly onto the prepared subfloor. The edges of the sheet are usually secured with adhesive or a tack strip. Ensure the sheet is properly installed and aligned before securing it permanently.
After the vinyl flooring is installed, give it time to settle and cure according to the manufacturer's recommendations. Avoid walking on the flooring during this time to allow the adhesive to bond properly.

How To Prepare A Concrete Floor For Vinyl Flooring Parrys

Vinyl Plank Flooring On Uneven Concrete

Vinyl Plank Flooring On Uneven Concrete

Easy Ways To Install Vinyl Plank Flooring On Concrete

10 Beginner Mistakes Installing Vinyl Plank Flooring

Guide To Lay Vinyl Flooring Over Floorboards

Lvp Flooring Installation Over Concrete Subfloor Full Instructional Builds By Maz Flooret

How To Install Glue Down Vinyl Plank Flooring Bathroom Concrete Floor

How Do You Fit Luxury Vinyl Tiles Floormart

Installing Ceramic Tile Over Vinyl Flooring On Concrete 2025 Today S Homeowner
See Also