A Comprehensive Guide to Installing Pergo XP Flooring: A Step-by-Step Approach
Installing Pergo XP flooring can significantly enhance the aesthetics and functionality of your home. This article provides a detailed step-by-step guide to ensure a successful installation.
Step 1: Preparation
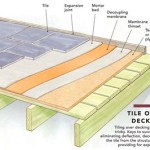
Begin by clearing the installation area of all furniture, fixtures, and baseboards. Ensure the subfloor is level and smooth. Use a moisture barrier to protect the flooring from moisture damage. Cut the planks to length, factoring in expansion gaps of approximately 1/4 inch.
Step 2: Dry-Fit the Planks
Arrange the planks in the desired pattern without clicking them together. This dry-fit allows you to visualize the final layout and make any adjustments as needed. Number the planks for easy reassembly.
Step 3: Start Installation
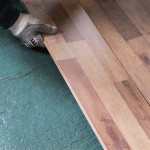
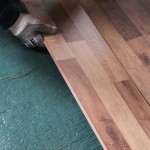
Begin laying the planks along the longest wall, leaving expansion gaps. Use spacers to maintain consistency. Tap the planks together using a tapping block and hammer, ensuring a tight fit without damaging the edges.
Step 4: Continue Laying the Rows
Continue adding rows, alternating the starting plank for staggered joints. Measure and cut the planks as necessary to fit around obstacles and maintain a 90-degree angle with the walls.
Step 5: Trim and Install Around Obstacles
Measure and cut the planks to fit around door frames, pipes, and other obstacles. Use a jigsaw or circular saw for precise cuts. Slide the trimmed planks into place and secure them using nails or screws.
Step 6: Tap Down and Lock
Once all the planks are installed, use the tapping block and hammer to tap down and lock the joints securely. Walk over the floor to ensure the planks are fully engaged and there are no loose connections.
Step 7: Secure the Perimeter
Install baseboards to cover the expansion gap and provide a finished look. Secure the perimeter with quarter-round moldings or transition strips to accommodate transitions to other flooring surfaces.
Step 8: Clean and Maintain
Vacuum or sweep the floor regularly to remove dust and debris. Periodically use a slightly damp mop with a Pergo-approved cleaner to maintain the finish and prevent scratches. Avoid using harsh chemicals or abrasive cleaning methods.
Additional Tips
- Use a vapor barrier underlayment for additional moisture protection.
- Acclimate the flooring to the room temperature for at least 48 hours before installation.
- Do not install the flooring over radiant heat systems.
- Allow 24 hours for the flooring to settle before placing heavy furniture or appliances on it.
- Refer to the manufacturer's instructions for specific guidelines and warranty information.

Step By Guide On How To Install Hybrid Flooring Parrys

Laminate Flooring Installation A Step By Guide

How To Install Pergo Flooring Easy Diy From Start Finish

How To Install Pergo Flooring Easy Diy From Start Finish

How To Install Laminate Flooring On Staircase Step By Guide

How To Install Pergo Flooring Easy Diy From Start Finish

The Ultimate Guide To Installing Laminate Flooring Parrys

Installing Laminate Flooring For The First Time Crafted Work

How To Install Laminate Flooring Step By Guide

How To Lay Laminate Flooring Installation Guide Factory Direct
See Also