A Step-By-Step Guide to Installing Vinyl Plank Flooring
Vinyl plank flooring is growing in popularity due to its durability, affordability, and ease of installation. If you're considering installing vinyl plank flooring in your home, here's a step-by-step guide to help you get the job done right.
Step 1: Preparation
Before you begin installing vinyl plank flooring, it's important to prepare the subfloor. The subfloor should be flat, smooth, and free of any debris or imperfections. If the subfloor is not level, it can cause the vinyl planks to buckle or warp over time.
Step 2: Acclimate the Vinyl Planks
Once you have prepared the subfloor, it's important to let the vinyl planks acclimate to the room where they will be installed. This will help to prevent the planks from expanding or contracting later on. To acclimate the vinyl planks, simply place them in the room where they will be installed and let them sit for at least 24 hours before beginning the installation.
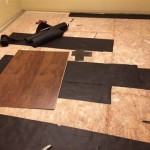
Step 3: Start in the Center of the Room
When you begin installing the vinyl planks, it's best to start in the center of the room. This will help to ensure that the planks are evenly spaced and aligned. To start in the center of the room, measure the width of the room and divide it in half. Then, snap a chalk line down the center of the room. This will give you a guide to follow as you install the vinyl planks.
Step 4: Install the First Row
Once you have snapped a chalk line down the center of the room, you can begin installing the first row of vinyl planks. Start by placing one plank in the center of the room, against the chalk line. Then, snap the next plank into place, making sure that the edges are tightly aligned. Continue snapping planks into place until you reach the end of the row.
Step 5: Continue Installing Rows
Once you have installed the first row, you can continue installing rows of vinyl planks, working your way out from the center of the room. As you install the rows, be sure to stagger the joints between the planks. This will help to create a more stable and durable floor.
Step 6: Cut Planks to Fit
As you reach the edges of the room, you will need to cut vinyl planks to fit. To do this, use a utility knife to score the plank along the cut line. Then, snap the plank in half along the score line. You can then use the cut plank to fill in the space at the edge of the room.
Step 7: Finish the Installation
Once you have installed all of the vinyl planks, you can finish the installation by adding baseboards and moldings. Baseboards and moldings will help to conceal the edges of the vinyl planks and give the floor a more finished look.

A Beginner S Guide To Installing Vinyl Plank Flooring Dumpsters Com

Your Step By Guide How To Install Luxury Vinyl Plank Wc Supply Whole Cabinet

Installing Vinyl Plank Flooring Step By Guide Homeserve Usa

Step By Guide For Hybrid Flooring Installation The Guys

How To Install Laminate Flooring For Beginners

Installing Vinyl Floors A Do It Yourself Guide The Honeycomb Home

Simple To Use Step By Guide For Installing Vinyl Plank Everywhere

Diy Vinyl Flooring A Guide On How To Install In Singapore

How To Install Vinyl Plank Flooring Few Simple Steps Guide

A Complete Guide How To Stagger Vinyl Plank Flooring Whole Cabinet Supply
See Also