A Step-By-Step Guide to Installing Vinyl Plank Flooring on Stairs
Installing vinyl plank flooring on stairs can be a daunting task, but with careful planning and a bit of patience, it's a project that can be completed successfully. By following these step-by-step instructions, you can transform your stairs with a durable and stylish new flooring.
Materials You'll Need:
* Vinyl plank flooring * Stair treads * Stair risers * Underlayment * Adhesive * Measuring tape * Pencil * Utility knife * Jigsaw or circular saw * Pry bar * Hammer * Finishing nails * Caulking gun * CaulkStep 1: Prepare the Stairs
Begin by removing any existing flooring or carpeting from the stairs. Clean the stairs thoroughly and make sure they are dry and free of dirt and debris. Inspect the stairs for any uneven or damaged areas, and make necessary repairs.
Step 2: Install the Underlayment
Cut underlayment to fit each stair tread and riser. Place the underlayment on the stairs, ensuring that it is flat and secure. Secure the underlayment with adhesive or staples.
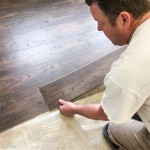
Step 3: Measure and Cut the Vinyl Planks
Measure the length and width of each stair tread and riser. Use a pencil to mark the measurements on the vinyl plank flooring. Use a utility knife or jigsaw to cut the planks to size.
Step 4: Install the Stair Treads
Apply adhesive to the back of each stair tread. Place the tread on the stair, starting from the bottom step and working your way up. Use a pry bar to gently tap the tread into place. Secure the tread with finishing nails, driving them through the tread and into the subfloor.
Step 5: Install the Stair Risers
Apply adhesive to the back of each stair riser. Place the riser on the stair, aligning it with the top edge of the tread below. Secure the riser with finishing nails.
Step 6: Caulk the Seams
Once all of the planks are installed, apply caulk to all of the seams. This will help to seal the flooring and prevent moisture from seeping in.
Step 7: Clean the Floor
Once the caulk has dried, clean the flooring with a damp mop. Be sure to remove any excess adhesive or caulk.
Additional Tips:
* Use a level to ensure that each tread and riser is level. * Allow the adhesive to dry completely before using the stairs. * If you are installing vinyl plank flooring on curved stairs, you may need to make custom cuts. * Be careful when cutting and installing the flooring to avoid damaging the planks.
How To Install Vinyl Plank Flooring On Stairs In 6 Steps Inc

Vinyl Plank Flooring On Stairs Your Total Guide Floorings

How To Install Vinyl Plank Flooring On Stairs Step By Tutorial

Step By Guide For Installing Laminate Flooring On Stairs

How To Install Vinyl Plank Flooring On Stairs Step By Tutorial

How To Install Laminate Flooring On Stairs Direct Wood

Step By Guide To Installing Vinyl Flooring On Your Stairs Kyinbridges Com

How To Install Vinyl Plank Flooring On Stairs In 6 Steps Inc

How To Install Laminate On Stairs Step By For Beginners

How To Install Vinyl Flooring On Stairs An Installation Guide
See Also