A Comprehensive Guide to Installing Wood Laminate Flooring: A Step-by-Step Journey
Transforming your living space with the rich and sophisticated look of wood laminate flooring can be an incredibly rewarding experience. This detailed step-by-step guide will empower you to confidently tackle this project and achieve a professional-looking outcome in your home.
Step 1: Preparation and Planning
Meticulous planning is crucial for a successful installation. Begin by measuring the room's dimensions and calculating the square footage required for the flooring. Allow for 10% extra for cuts and waste. Next, remove all baseboards, door casings, and furniture from the room and ensure the subfloor is level, dry, and free of any imperfections.
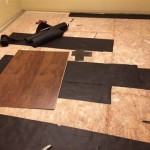
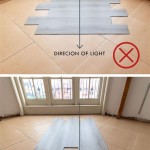
Step 2: Acclimation and Positioning
To prevent buckling or warping, allow the laminate flooring planks to acclimate to the room's temperature and humidity for at least 48 hours. Arrange the planks in a staggered pattern to minimize the appearance of seams and create a more natural look.
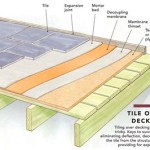
Step 3: Underlayment Installation
A suitable underlayment is essential for soundproofing, moisture protection, and providing a smooth base for the laminate flooring. Roll out the underlayment across the subfloor, ensuring it is smooth and overlaps the edges by 2 inches. Use duct tape to secure the seams.
Step 4: First Row Installation
Start installing the first row of laminate planks along the longest wall. Insert a 3/8-inch spacer against the wall to maintain an expansion gap. Angle the first plank slightly and tap it into place using a tapping block and hammer. Continue adding planks, tapping them together tightly.
Step 5: Continuing Installation
For subsequent rows, insert the end of the first plank into the groove of the last plank in the previous row. Tap the plank into place, ensuring it is level and flush with the previous row. Repeat this process until you reach the opposite wall.
Step 6: Cutting Planks
When you encounter obstacles or need to cut planks to fit, use a miter saw or jigsaw. Measure and mark the cut line carefully, then make a clean cut. Ensure the cut edge is facing the wall to conceal it.
Step 7: Installation Around Obstacles
To install laminate flooring around obstacles such as pipes or door frames, measure and cut the planks accordingly. Use a pry bar to carefully remove the planks around the obstacle, make the necessary cuts, and reinsert them. Secure them with a small amount of glue.
Step 8: Baseboards and Moldings
Once the laminate flooring is installed, reattach the baseboards and door casings. Use a caulk gun to seal any gaps between the flooring and the moldings. Trim the excess caulk with a utility knife.
Tips for a Smooth Installation:
- Use a tapping block to protect the laminate flooring from damage while tapping it into place.
- Stagger the seams of the planks by at least 6 inches.
- Clean the floor thoroughly before installing the underlayment and laminate planks.
- Allow for a 3/8-inch expansion gap around the perimeter of the room.
- Use a level to ensure the floor is level throughout the installation.

Laminate Flooring Installation A Step By Guide

6 Steps For Installing Laminate Flooring The Home

How To Install Laminate Flooring Step By Guide

Step By Guide For Hybrid Flooring Installation The Guys

How To Install Laminate Flooring On Staircase Step By Guide

Laminate Flooring Installation Guide Step By Instructions

How To Install Laminate Flooring Easy Diy Guide

Installing Vinyl Plank Flooring Step By Guide Homeserve Usa

6 Steps For Installing Laminate Flooring The Home

Hardwood Flooring Installation Step By Forbes Home
See Also