The Best Way to Lay Garage Floor Tiles
A garage floor is often neglected, with a focus on the vehicle parked inside. However, a well-maintained and aesthetically pleasing garage floor can greatly enhance the overall appearance and functionality of the space. Garage floor tiles offer an excellent solution for creating a durable, easy-to-clean, and visually appealing surface. Laying these tiles effectively requires careful planning and execution. This article will guide you through the best way to lay garage floor tiles, ensuring a successful project.
1. Preparation is Key: Getting Ready for Installation
Before embarking on the tile installation process, thorough preparation is crucial. This stage encompasses several steps that will lay the groundwork for a smooth and successful project:
a. Cleaning the Existing Floor:
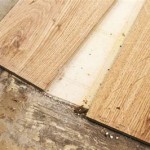
Begin by thoroughly cleaning the existing garage floor. Sweep away any loose debris, dirt, or grime. For stubborn stains, use a degreaser or cleaning agent specifically designed for concrete surfaces. Ensure the floor is completely dry before proceeding.b. Assessing the Existing Floor:
Evaluate the condition of the existing floor. Examine for any cracks, unevenness, or moisture issues. If significant issues exist, address them before installing the tiles. Cracks may need to be repaired with a concrete patching compound, and unevenness can be leveled with a self-leveling concrete mixture.c. Providing a Smooth Surface:
If the surface is uneven, consider using a self-leveling compound to create a smooth and even surface. This will ensure the tiles sit level and prevent unevenness or potential future issues.d. Establishing a Foundation:
Determine the type of subfloor material you have. If it's concrete, ensure it is sound and free from cracks or movement. If the garage floor is wooden, it should be inspected for rot or warping and be adequately supported.2. Choosing the Right Tiles: Selecting the Ideal Material
Garage floor tiles are available in a wide range of materials, each with its own advantages and disadvantages. Selecting the right type of tile is crucial for achieving the desired result and ensuring durability:
a. Concrete Tiles:
Often the most affordable option, concrete tiles offer good durability and resistance to heavy loads. They come in various colors and textures.b. Epoxy Tiles:
Epoxy tiles are durable, stain-resistant, and easy to clean. They also come in a range of colors and patterns.c. Vinyl Tiles:
Vinyl tiles are a popular choice due to their affordability, ease of installation, and attractive appearance. They offer a variety of colors, patterns, and textures, mimicking the look of other materials.d. Rubber Tiles:
Rubber tiles are known for their comfort, impact absorption, and sound deadening properties. They are a good option for garages used for exercise or other activities that require a softer surface.When choosing tiles, consider the intended use of your garage. If you'll be using it for heavy-duty tasks, choose durable tiles, such as concrete or epoxy. For lighter use, vinyl or rubber tiles can be suitable choices.
3. Laying the Tiles: Techniques for a Professional Finish
Once you've selected the tiles, you're ready to begin the installation process. Proper laying techniques play a vital role in achieving a seamless and aesthetically pleasing finish:
a. Planning the Layout:
Start by planning your tile layout. Consider the dimensions of your garage and the size of the tiles. You may want to create a grid pattern or a more randomized pattern.b. Measuring and Cutting:
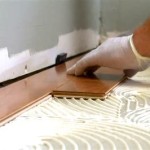
Measure the area you need to cover and cut the tiles accordingly to fit. Using a tile cutter or wet saw provides precision for clean cuts.c. Applying Adhesive:
Apply the appropriate tile adhesive to the floor in sections. Use a notched trowel to evenly distribute the adhesive, ensuring proper contact between the tile and the substrate.d. Laying the Tiles:
Start laying the tiles in your chosen pattern, paying attention to spacing and alignment. Use spacers to maintain consistent grout lines.e. Grouting:
Once the adhesive has dried, grout the tiles to fill in the spaces between them. Choose a grout color that complements your tiles.f. Sealing:
After the grout has dried, seal it to protect it from stains and moisture. This will help maintain the appearance of your tile floor for years to come.Following these steps will help you achieve professional-looking results and a durable garage floor tile installation.

How To Install Plastic Garage Flooring Raised Tile Floor Guide

How To Install Garage Floor Tiles Step By The Diy Playbook

Before After Superman Inspired Garage Floor Flexspec

How To Install Garage Floor Tiles Step By The Diy Playbook

How To Install Interlocking Garage Floor Tiles Locktile Pvc Tileslocktile

Installing Garage Floor Tiles Step By Rubi Blog Usa

Garage Floor Installation Guide Tiles Rolls And

Porcelain Tile The Ideal Surface For Garage Flooring Vault Custom Design

How To Install Garage Floor Tiles The Ultimate Flooring

Garage Flooring Ideas The Home
See Also