Can You Put Vinyl Flooring on Walls?
Vinyl flooring has become a popular choice for homeowners due to its durability, water resistance, and affordability. Its versatility has led many to wonder about its potential applications beyond the floor. This article explores the viability of using vinyl flooring on walls, examining the benefits, drawbacks, and installation process.
Benefits of Using Vinyl Flooring on Walls
Applying vinyl flooring to walls offers several advantages. Its inherent water resistance makes it an ideal choice for areas prone to moisture, such as bathrooms, kitchens, and laundry rooms. Vinyl’s durability makes it resistant to scratches and scuffs, making it suitable for high-traffic areas or homes with children and pets. Furthermore, vinyl flooring comes in a wide variety of styles and colors, allowing homeowners to achieve diverse aesthetic looks, mimicking the appearance of wood, stone, or tile at a fraction of the cost.
Beyond aesthetics and durability, vinyl flooring on walls provides a seamless, easy-to-clean surface. Unlike traditional wall materials, vinyl flooring does not require grout, eliminating the potential for mold and mildew growth in the grout lines. Cleaning involves simply wiping down the surface with a damp cloth, making maintenance straightforward and efficient.
Challenges and Considerations for Wall Application
While vinyl flooring offers numerous benefits for wall applications, certain challenges need consideration. The primary concern is weight. Vinyl flooring, particularly thicker planks or tiles designed for high-traffic areas, can be significantly heavier than traditional wall coverings. This added weight requires a strong, stable substrate capable of supporting the load. Standard drywall may be sufficient for thinner vinyl products, but thicker options may necessitate the use of a more robust backing, such as plywood.
Another consideration is the wall’s surface texture. Vinyl flooring adheres best to smooth, even surfaces. Textured walls, such as those with a heavy knockdown texture, may require extensive preparation, including sanding or skim coating, to ensure proper adhesion. Imperfect preparation can lead to air bubbles, uneven seams, and eventual peeling.
Adhesive selection is also crucial. Using the wrong adhesive can result in poor bonding, leading to the vinyl separating from the wall. It's essential to choose an adhesive specifically designed for vinyl flooring and appropriate for the chosen substrate. Manufacturers often recommend specific adhesives for their products, and consulting their guidelines is highly recommended.
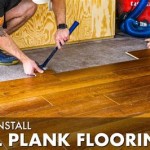
Installation Process for Vinyl Flooring on Walls
Proper installation is key to the longevity and appearance of vinyl flooring on walls. The first step involves thorough surface preparation. The wall must be clean, dry, and free of any dust, debris, or loose paint. As mentioned previously, textured walls may require additional preparation to create a smooth, even surface.
Once the wall is prepared, the next step is to apply the adhesive. Following the manufacturer’s instructions, apply the adhesive evenly to the wall using a notched trowel. The size of the notches will depend on the specific vinyl flooring product and the adhesive being used.
Carefully position the vinyl flooring onto the adhesive, ensuring proper alignment. Use a roller or other firm object to press the vinyl firmly against the wall, eliminating any air bubbles. Maintain consistent pressure to ensure a strong bond. For plank-style vinyl flooring, ensure tight seams between planks to prevent moisture infiltration and maintain a seamless appearance.
For larger wall sections, it may be necessary to cut the vinyl flooring to size. Use a sharp utility knife or scoring tool to ensure clean, accurate cuts. When working around corners or obstacles, precise measurements and careful cutting are crucial for a professional finish.
After installing all the vinyl flooring, allow sufficient drying time according to the adhesive manufacturer’s instructions. Avoid touching or disturbing the installed vinyl during this period to ensure proper bonding. Once the adhesive is fully cured, the wall is ready for use.
Finally, finishing touches, such as trim or molding, can be added to conceal edges and create a polished, professional look. These finishing details not only enhance the aesthetic appeal but also provide added protection against moisture infiltration along the edges of the installation.
In summary, while applying vinyl flooring to walls offers numerous advantages, careful consideration of the challenges and meticulous attention to the installation process are crucial for a successful outcome. By following the appropriate steps and choosing the correct materials, homeowners can enjoy the benefits of this versatile and durable material in a variety of applications beyond the floor.

How To Install Vinyl Plank Flooring On Walls Europine

Install Vinyl Plank From A Hallway Into Room No Transition Strip

How To Install Vinyl Plank Flooring On Walls Europine

Vinyl Plank Installation Tips For Doorways Halls Walls And Closets

How To Install Laminate Planks Vertically On A Wall

Can I Install Vinyl Flooring On Walls

Installing Luxury Vinyl Floors Over Engineered Hardwood Honey Built Home

Dos And Don Ts For Installing Vinyl Plank Floors In The Bathroom Advice Homeowners

A Beginner S Guide To Installing Vinyl Plank Flooring Dumpsters Com

How To Install Vinyl Plank Flooring In A Bathroom Fixthisbuildthat
See Also