Can You Paint Hardwood Floors Without Sanding? A Comprehensive Guide
Painting hardwood floors offers an affordable and transformative option for homeowners looking to update their interior spaces. The prospect of avoiding sanding, a traditionally labor-intensive and dusty process, makes the idea even more appealing. While painting hardwood floors without sanding is possible, it's crucial to understand the specific requirements and potential limitations to achieve a durable and visually pleasing result.
The success of painting hardwood floors without sanding hinges on meticulous surface preparation and the use of appropriate materials. Cutting corners in these critical steps can lead to paint peeling, chipping, and ultimately, a less-than-satisfactory outcome. This article provides a comprehensive guide to the process, outlining the necessary steps, highlighting key considerations, and offering practical advice for achieving a professional finish without the need for sanding.
The Importance of Surface Preparation
Surface preparation is the cornerstone of any successful paint job, and this holds particularly true when dealing with hardwood floors. Unlike walls, floors are subjected to significant wear and tear, including foot traffic, furniture movement, and potential spills. Without proper surface preparation, the paint will struggle to adhere correctly, leading to premature failure. The primary goal of surface preparation is to create a clean, dull, and slightly textured surface that promotes optimal paint adhesion.
The initial step involves thoroughly cleaning the floor to remove all traces of dirt, grime, grease, and any existing coatings. Sweeping or vacuuming alone is insufficient; a deep cleaning with a pH-neutral cleaner specifically designed for wood floors is essential. Avoid using harsh chemicals or abrasive cleaners, as these can damage the wood and compromise the adhesion of the paint. After cleaning, rinse the floor thoroughly with clean water to remove any residual cleaner and allow it to dry completely.
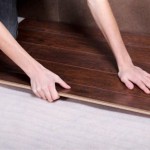
Once the floor is clean and dry, a deglossing agent is used to dull the existing finish. These agents, often referred to as liquid sanders or deglossers, work by chemically etching the surface, creating a slightly rough texture that paint can grab onto. Apply the deglossing agent according to the manufacturer's instructions, typically using a clean cloth or mop. Ensure even coverage, paying particular attention to areas with a high gloss finish. Allow the deglossing agent to sit for the recommended time, then wipe away any residue with a clean, damp cloth. The floor should now have a noticeably duller appearance.
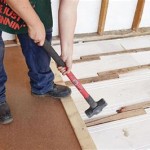
In cases where the existing finish is severely damaged, peeling, or has multiple layers of old paint, a more aggressive approach may be necessary beyond just a deglosser. Scraping off loose paint and using a chemical stripper to remove stubborn coatings may be required before proceeding with the deglossing process. This ensures a more uniform surface for the paint to adhere to.
Finally, inspect the floor for any imperfections, such as scratches, dents, or nail holes. Fill these imperfections with a wood filler specifically designed for flooring. Allow the filler to dry completely according to the manufacturer's instructions, then sand the filled areas smooth with fine-grit sandpaper (typically 220-grit). Remove all sanding dust with a tack cloth to ensure a clean surface before applying paint.
Selecting the Right Paint and Primer
Choosing the appropriate paint and primer is just as critical as proper surface preparation. Not all paints are created equal, and using the wrong type can result in a finish that is prone to chipping, scratching, and fading. For hardwood floors, a high-quality paint specifically formulated for floors is recommended. These paints are typically more durable and resistant to abrasion than standard wall paints.
Two primary types of paint are commonly used for hardwood floors: oil-based and water-based polyurethane paints. Oil-based paints offer excellent durability and a smooth, hard finish. However, they have a longer drying time, emit strong odors, and require mineral spirits for cleanup. Water-based polyurethane paints are a more environmentally friendly option, with low VOCs, faster drying times, and easy cleanup with soap and water. They also offer good durability and a slightly more flexible finish, which can be beneficial in preventing cracking.
Before applying the paint, a primer is essential. The primer serves several important functions: it seals the wood, creating a uniform surface for the paint to adhere to; it blocks stains and tannins from bleeding through the paint; and it improves the adhesion of the paint, resulting in a more durable finish. Choose a primer that is specifically designed for use with the chosen paint type. For example, if using a water-based polyurethane paint, use a water-based primer.
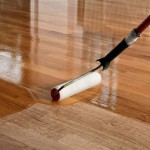
Apply the primer in thin, even coats, following the manufacturer's instructions. Allow the primer to dry completely before applying the paint. Lightly sand the primed surface with fine-grit sandpaper to create a smooth surface for the paint to adhere to. Remove all sanding dust with a tack cloth before painting.
Consider tinted primers. If the desired paint color is significantly different from the existing floor color, a tinted primer can help to achieve better coverage and reduce the number of coats of paint required. Choose a tint that is close to the final paint color.
When selecting paint, consider the sheen level. Higher sheen levels, such as gloss or semi-gloss, are more durable and easier to clean but can also highlight imperfections in the floor. Lower sheen levels, such as matte or satin, are more forgiving and offer a softer look but may be less resistant to stains and scuffs. A satin or semi-gloss finish is generally recommended for hardwood floors, striking a balance between durability and aesthetics.
Application Techniques and Post-Painting Care
Proper application techniques are crucial for achieving a smooth, even, and professional-looking finish. Use high-quality brushes and rollers designed for use with the chosen paint type. A short-nap roller is generally recommended for floors, as it will help to minimize stippling and create a smoother finish.
Start by cutting in along the edges of the room with a brush. This creates a clean, defined edge and prevents the roller from bumping into the walls. Then, use the roller to apply the paint to the main area of the floor. Work in small sections, overlapping each pass slightly to ensure even coverage. Apply the paint in thin, even coats, avoiding thick or excessive application, which can lead to drips, runs, and uneven drying.
Allow each coat of paint to dry completely according to the manufacturer's instructions before applying the next coat. Lightly sand the painted surface with fine-grit sandpaper between coats to remove any imperfections and create a smoother surface for the subsequent coat to adhere to. Remove all sanding dust with a tack cloth before painting. Typically, two to three coats of paint are required to achieve full coverage and a durable finish.
After applying the final coat of paint, allow it to cure completely before exposing the floor to heavy traffic. Curing times can vary depending on the paint type, humidity, and temperature. Consult the manufacturer's instructions for specific curing recommendations. Avoid placing furniture or rugs on the floor until it is fully cured.
Once the paint is fully cured, regular maintenance is essential to prolong the lifespan of the finish. Sweep or vacuum the floor regularly to remove dirt and debris. Clean spills immediately with a damp cloth to prevent staining. Avoid using harsh chemicals or abrasive cleaners, as these can damage the paint. Consider using area rugs in high-traffic areas to protect the floor from wear and tear. Applying felt pads to the legs of furniture will also help to prevent scratches and scuffs.
In conclusion, painting hardwood floors without sanding is a viable option for homeowners seeking a cost-effective and less labor-intensive way to update their floors. However, meticulous surface preparation, careful selection of paint and primer, and proper application techniques are essential for achieving a durable and visually appealing result. By following the guidelines outlined in this article, homeowners can successfully paint their hardwood floors without sanding and enjoy a refreshed and revitalized living space.

How To Paint Wood Floors Without Sanding The Heathered Nest

How To Paint Wood Floors Without Sanding The Heathered Nest

How To Paint Your Wood Floors No Sanding Trust Me My Priming Durable Inexpensive Method

Paint Whitewash Hardwood Floors Without Sanding

How To Paint Wood Floors Without Sanding The Heathered Nest

How To Paint A Wooden Floor Without Sanding Easy Step By

Refinish Hardwood Floors Without Sanding Paint And Glue Removal

How To Paint Wood Floors 5 Easy Steps B Vintage Style

9 Easy Steps To Paint Wood Floors Sanding

9 Easy Steps To Paint Wood Floors Sanding
See Also