Can You Replace a Damaged Laminate Floor Board?
Damaged laminate flooring can detract from a room's aesthetic and potentially lead to further issues if left unaddressed. Fortunately, replacing a single damaged laminate board is often possible, offering a cost-effective solution compared to replacing the entire floor. This process, while requiring patience and precision, can be accomplished by homeowners with moderate DIY skills.
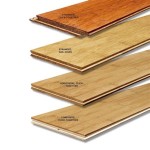
Several factors influence the feasibility and complexity of replacing a laminate board. The availability of replacement boards is paramount. Discontinued styles may pose a challenge, necessitating a search for salvaged pieces or considering alternative repair methods. The location of the damaged board also plays a role. Boards situated in the middle of the floor present a more significant undertaking than those near the edges.
Before beginning the replacement process, one must gather the necessary tools. These typically include a tapping block, pull bar, pry bar, utility knife, measuring tape, safety glasses, and a hammer. A circular saw or jigsaw may also be required, depending on the board's location. Having the correct tools readily available streamlines the process and minimizes potential disruptions.
The first step involves carefully removing the damaged board. For boards near the edge of the floor, a pry bar can be used to gently lift the board, disengaging the locking mechanism. However, for centrally located boards, a more intricate approach is required. This involves scoring the damaged board with a utility knife along the length of the planks, being careful not to damage the surrounding boards. The scored sections are then carefully broken and removed piece by piece using a chisel and hammer. This process requires precision to avoid impacting adjacent boards.
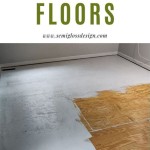
Once the damaged board is removed, the underlying subfloor should be inspected for any damage or debris. Any necessary repairs or cleaning should be completed before installing the new board. This ensures a stable and level surface for the replacement and prevents future issues.
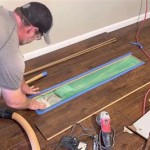
Preparing the replacement board is the next crucial step. The locking mechanism of the new board often needs modification to allow for installation in the existing floor. This typically involves trimming the bottom lip or tongue of the new board using a utility knife or saw. Precise measurements are essential to ensure a proper fit.
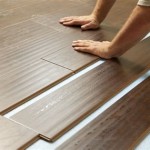
Installing the replacement board requires careful maneuvering. The prepared board is angled and slid into place, engaging the locking mechanism with the adjacent boards. A tapping block and hammer are used to gently tap the board into its final position, ensuring a flush and secure fit. Avoid excessive force to prevent damaging the new board or surrounding planks.
After the replacement board is installed, it's crucial to inspect the surrounding area for any gaps or unevenness. Minor adjustments may be necessary to ensure a seamless transition between the new and existing boards. A tapping block can be used to gently adjust the position of the board, while a pull bar helps ensure a tight fit against adjacent planks.
Several challenges can arise during the replacement process. Difficulty removing the damaged board is a common issue, especially for centrally located planks. Patience and precision are essential to avoid damaging surrounding boards. Finding a matching replacement board can also be problematic for discontinued styles, requiring resourceful searching or exploring alternative repair solutions.
Alternatives to full board replacement exist for minor damage. Repair kits designed for laminate flooring can address scratches, chips, and minor dents. These kits typically involve filling the damaged area with a color-matched putty and then blending it seamlessly with the surrounding surface. While effective for minor imperfections, these kits may not be suitable for extensive damage.
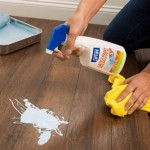
Preventing future damage is key to maintaining the longevity of laminate flooring. Using protective mats under furniture can minimize scratches and dents. Regular cleaning with appropriate laminate floor cleaners helps prevent buildup that can dull the finish. Promptly addressing spills prevents moisture damage, which can warp or discolor the boards.
Properly maintaining laminate flooring is essential for preserving its appearance and functionality. Regular sweeping or vacuuming removes dirt and debris that can scratch the surface. Avoid using abrasive cleaners or excessive moisture, as these can damage the protective layer of the flooring. Following manufacturer recommendations for cleaning and maintenance ensures the longevity of the laminate floor.
While replacing a damaged laminate board can be a DIY project, professional assistance may be beneficial in certain situations. For extensive damage or complex installations, consulting a flooring professional can ensure a proper and efficient repair. Professionals possess the experience and specialized tools to handle intricate replacements, minimizing the risk of further damage.

Laminate Floor Repair Diy Family Handyman

How To Fix A De Laminated Board Without Removing The

How To Replace Damaged Flooring Plank Diy

How To Replace Warped Water Damaged Laminate Floor Boards

Replace A Damaged Board In Laminate Floor Rw Supply Design

How To Repair Damaged Laminate Floor Checkatrade

How To Replace A Damaged Hardwood Floor Board Diy Family Handyman

Replacing A Damaged Laminate Floor Board Can I Do It Without Taking The Whole Up

How To Replace A Damaged Laminate Board That S In The Middle Of Floor

How To Repair Laminate Flooring The Home
See Also