Can You Replace a Damaged Laminate Floor Board? A Comprehensive Guide
Laminate flooring offers an attractive, durable, and cost-effective alternative to traditional hardwood. However, accidents happen, and individual boards can become damaged. Fortunately, replacing a single damaged laminate plank is often possible, saving the cost and effort of a complete floor replacement. This article provides a comprehensive guide to replacing a damaged laminate floor board.
Understanding Laminate Flooring Construction
Laminate flooring is constructed in layers, including a wear layer, decorative layer, core layer, and backing layer. Understanding this layered structure is crucial for successful board replacement. The planks typically interlock using a tongue-and-groove system, allowing for a floating floor installation, which does not require gluing or nailing to the subfloor.
Assessing the Damage
Before attempting a replacement, assess the extent of the damage. Minor scratches or surface imperfections may be repairable with specialized laminate repair kits. However, deep gouges, chips, burns, or water damage typically necessitate replacing the entire board.
Gathering the Necessary Tools and Materials
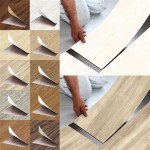
Having the right tools and materials on hand is essential for a smooth replacement process. The following items are typically required: * Replacement laminate plank: Ensure the plank matches the existing flooring in color, pattern, and thickness. * Laminate pull bar: This tool is essential for removing planks without damaging adjacent boards. * Tapping block: Used in conjunction with the pull bar to loosen and remove planks. * Hammer: For gently tapping the new plank into place. * Safety glasses: Eye protection is crucial throughout the process. * Utility knife: For scoring and cutting the damaged board. * Circular saw (optional): Can be used for cutting the damaged board. * Measuring tape: Accurate measurements ensure a proper fit. * Pencil: For marking cutting lines.
Step-by-Step Guide to Replacing a Damaged Laminate Plank
Replacing a damaged laminate plank involves several key steps. Careful execution of each step will ensure a professional-looking repair.
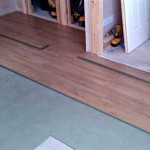
Step 1: Isolating the Damaged Plank
Remove any furniture or objects surrounding the damaged plank. Use the pull bar and tapping block to carefully disconnect the planks adjacent to the damaged board. Start at the edge of the room and work towards the damaged area. Be mindful of the tongue-and-groove system to avoid damaging surrounding planks.
Step 2: Removing the Damaged Plank
Once the surrounding planks are loosened, use the utility knife or circular saw to score the damaged plank into several sections. This will make it easier to remove the sections piece by piece. Use the pull bar and tapping block to carefully lift and remove the damaged sections.
Step 3: Preparing the New Plank
After removing the damaged plank, you may need to remove the tongue and groove edges from the new plank to fit it into the existing opening. Use a utility knife or saw to carefully trim these edges. Test the fit of the new plank in the opening before applying adhesive. Ensure a snug but not overly tight fit.
Step 4: Installing the New Plank
Apply a small amount of laminate flooring adhesive to the tongue and groove edges of the new plank. Carefully insert the new plank into the opening, aligning it with the surrounding planks. Use the tapping block and hammer to gently tap the new plank into place, ensuring a flush fit. Wipe away any excess adhesive immediately.
Step 5: Final Steps
Once the new plank is in place, re-connect the previously removed adjacent planks. Ensure all planks are securely interlocked and lying flush. Allow the adhesive to dry completely according to the manufacturer's instructions before placing furniture or walking on the repaired area.
Troubleshooting Common Issues
While replacing a laminate plank is generally straightforward, some common issues may arise. Here are a few troubleshooting tips:
Tight Fit
If the new plank seems too tight to fit, double-check that the tongue and groove edges have been properly trimmed. Slightly shaving down these edges using a fine-toothed saw or sandpaper can help achieve a snug fit.
Gaps Between Planks
If gaps appear between the new plank and surrounding boards, ensure the planks are fully interlocked and lying flush. Gently tapping the planks with a tapping block and hammer can help close small gaps.
Chipped Edges
Be cautious when handling planks to avoid chipping the edges. Use the tapping block and pull bar correctly to minimize the risk of damage. If chipping does occur, touch-up kits can be used to conceal minor imperfections.
Maintaining Your Laminate Flooring
Regular maintenance can extend the life of your laminate flooring and prevent future damage. Sweep or vacuum frequently to remove dirt and debris. Clean up spills immediately to prevent water damage. Use a damp mop with a laminate floor cleaner for periodic cleaning. Avoid using abrasive cleaners or scouring pads, as these can damage the flooring surface.
Finding Replacement Planks
Locating matching replacement planks can sometimes be challenging. Check with the original flooring retailer or manufacturer. If the flooring is discontinued, online retailers or salvage yards may be alternative sources. Keep a few extra planks from the original installation for future repairs.

How To Replace A Damaged Laminate Board That S In The Middle Of Floor

Laminate Floor Repair Diy Family Handyman

How To Replace Damaged Flooring Plank Diy

Replace A Damaged Board In Laminate Floor Rw Supply Design

How To Repair Laminate Flooring The Home

How To Replace A Damaged Hardwood Floor Board Diy Family Handyman

How To Repair Damaged Laminate Floor Checkatrade

How To Repair Laminate Flooring The Home

How To Fix A De Laminated Board Without Removing The

How To Repair Laminate Flooring The Home
See Also