DIY Laminate Flooring on Concrete: A Step-by-Step Guide
Installing laminate flooring on concrete can be a rewarding home improvement project, adding warmth and style to your space. While it may seem daunting, with the right tools and a bit of patience, you can achieve a professional-looking finish. Follow these steps to ensure a successful installation.
Materials You'll Need:
- Laminate flooring planks
- Vapor barrier
- Underlayment
- Tapping block
- Pull bar
- Spacers
- Circular saw or miter saw
- Measuring tape
- Pencil or marking tool
Step 1: Prepare the Concrete Subfloor
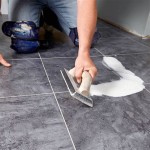
Thoroughly clean the concrete floor to remove any dirt, dust, or debris. Fill any cracks or holes with concrete patch, and allow it to dry completely.
Step 2: Install the Vapor Barrier
Lay down a vapor barrier over the concrete subfloor, ensuring that it overlaps by at least 6 inches at the seams. Secure it with duct tape.
Step 3: Install the Underlayment
Install the underlayment on top of the vapor barrier. It provides cushioning and reduces sound transmission. Use an appropriate underlayment for concrete floors, such as a dense foam or cork underlayment.
Step 4: Determine Starting Point and Layout
Decide on the starting point for your flooring installation, typically the longest wall. Measure and mark the center point of the room, and begin laying the planks perpendicular to the longest wall.
Step 5: Install the First Row
Align the first plank along the starting point, leaving a small gap (approx. 1/4 inch) from the wall to allow for expansion. Use spacers to maintain even spacing between the planks and the wall.
Step 6: Tap in the Planks
Position the next plank alongside the first plank and tap it together using a tapping block. Strike the tapping block perpendicular to the joint, ensuring that the planks are securely locked together.
Step 7: Continue Installing Rows
Repeat the process for each subsequent row, offsetting the end joints of the planks by at least 6 inches. Use a pull bar to tighten the joints and achieve a seamless appearance.
Step 8: Cut Planks for Perimeter
Measure and cut the planks to fit around the perimeter of the room, using a circular saw or miter saw. Cut the planks slightly shorter than the actual measurement to allow for expansion.
Step 9: Trim Excess Underlayment and Vapor Barrier
Once all the planks are installed, trim any excess underlayment or vapor barrier that extends beyond the flooring. Use a utility knife to cut them flush with the edge of the planks.
Step 10: Install Trim and Moldings
Install baseboards, quarter-round moldings, or transition strips around the perimeter to cover any gaps between the flooring and the walls or other surfaces.
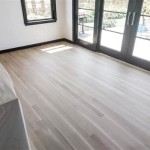
Congratulations! You have successfully installed laminate flooring on concrete. With proper care and maintenance, your new flooring will provide years of beauty and durability.

Installing Laminate Flooring Over Concrete The Ultimate Guide Aa Floors

Laminate Flooring Over Concrete Diy Install Home Pros

Laminate Flooring On Concrete Basement Floors Expert Installation Guide Csg Renovation

The Ultimate Guide To Installing Laminate Flooring Parrys

How To Lay Laminate Flooring On Concrete Howtospecialist Build Step By Diy Plans Laying Installing

Vinyl Plank Flooring Interior Design Fynes Designs

How To Prepare A Concrete Floor For Vinyl Flooring Parrys

Laminate Floor Installation For Beginners 9 Clever Tips

How To Install Laminate Flooring On Concrete Making Maanita

Installing Your Laminate Floor
See Also