Engineered Flooring Installation on Concrete Slab: Essential Considerations for a Durable Floor
Engineered flooring, renowned for its durability and versatility, offers an exceptional flooring solution for concrete slab subfloors. However, achieving a successful installation requires a thorough understanding of the essential aspects involved. This comprehensive guide will delve into the critical considerations for a flawless engineered flooring installation on concrete slabs, ensuring a lasting and visually stunning floor.
1. Concrete Moisture Testing: A Critical Pre-Installation Step
Prior to commencing the installation, it is imperative to conduct moisture testing of the concrete slab. Excessive moisture can compromise the flooring's stability, leading to buckling, warping, or delamination. Utilize a calcium chloride test kit or a relative humidity meter to accurately assess the moisture levels. If the moisture content exceeds the manufacturer's recommended threshold, a vapor barrier must be installed to prevent moisture from migrating into the flooring.
2. Preparation of the Concrete Surface: Ensuring a Level Foundation
A smooth and level concrete surface is essential for a successful installation. Inspect the slab for unevenness or defects such as cracks or depressions. Address any imperfections using a concrete leveling compound or grinder to create a flat and stable surface. Remove any dust or debris from the slab to ensure proper adhesion of the adhesive or underlayment.
3. Selecting the Right Adhesive: A Strong Bond for a Lasting Floor
The selection of the appropriate adhesive is paramount for a secure and durable flooring installation. Consult the flooring manufacturer's recommendations for compatible adhesives specifically designed for concrete subfloors. Choose an adhesive that provides strong bonding strength, moisture resistance, and flexibility to accommodate potential movement in the concrete slab.
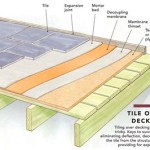
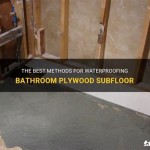
4. Moisture Barrier Installation: Preventing Moisture Penetration
In areas prone to high humidity or moisture, such as kitchens, bathrooms, or basements, the installation of a moisture barrier is crucial. This barrier acts as a protective layer, preventing moisture from penetrating the flooring and causing damage. Utilize a polyethylene film or a self-adhesive moisture barrier underlayment that meets the manufacturer's specifications.
5. Underlayment Considerations: Enhanced Comfort and Sound Reduction
An underlayment installed between the concrete slab and the engineered flooring provides several benefits. It enhances underfoot comfort, dampens noise, and compensates for minor imperfections in the concrete surface. Choose an underlayment that is compatible with the flooring and its adhesive and provides the desired level of cushioning and sound reduction.
6. Acclimation: Allowing the Flooring to Adjust
Before installing the engineered flooring, allow it to acclimate to the indoor environment for a specific period recommended by the manufacturer. This process allows the flooring to gradually adjust to the temperature and humidity levels, reducing the risk of buckling or gaps after installation.
7. Installation Techniques: Precision and Detail for a Flawless Finish
Follow the manufacturer's installation instructions carefully to ensure a flawless outcome. Begin by spreading the adhesive evenly across the concrete slab and adhering the flooring planks according to the specified pattern. Utilize spacers to maintain consistent gaps between the planks and ensure a uniform appearance. For a professional finish, consider using a tapping block or roller to firmly secure the flooring to the adhesive.
8. Expansion Gaps: Allowing for Movement
Engineered flooring expands and contracts in response to changes in temperature and humidity. To accommodate this natural movement, leave a small expansion gap around the perimeter of the room and around fixed objects such as columns or walls. This gap allows for the flooring to expand without causing buckling or damage.
Conclusion
Engineered flooring installation on concrete slab requires meticulous attention to detail and adherence to industry best practices. By considering the essential aspects outlined above, including moisture testing, surface preparation, adhesive selection, moisture barrier installation, underlayment considerations, acclimation, installation techniques, and expansion gaps, you can create a durable, visually stunning, and long-lasting engineered flooring installation that will enhance the beauty and functionality of your space.

Q A Solid Wood Floors Over Concrete Slabs Jlc

Hardwood Over Concrete Auten Wideplank Flooring

Ask Fred How Do I Install Wood Floor Below Grade Schedule

8 Awesome Wood Floor Over Concrete Gallery Solid Hardwood Floors Diy Installation

Guide How To Install Hardwoods On A Concrete Subfloor

Installing Engineered Hardwood On Concrete Twenty Oak

Bsi 082 Walking The Plank Buildingscience Com

Getting It Right Wood Flooring Over A Concrete Subfloor Page 2 Of 3 Construction Specifier

How Do I Install A Hardwood Floor On Concrete Slab The Carpet Guys

How To Install Wood Floors On Concrete Quora
See Also