Engineered Hardwood Flooring: A Guide to Glue-Down Installation
Engineered hardwood flooring is a popular choice for homeowners who want the beauty and durability of hardwood without the high cost and maintenance. Engineered hardwood is made from a thin layer of real hardwood glued to a plywood or HDF (high-density fiberboard) core. This construction makes engineered hardwood more stable than solid hardwood, and it is less likely to warp or buckle. Glue-down installation is a common method for installing engineered hardwood flooring. This method involves gluing the planks directly to the subfloor using a specially formulated adhesive.
Glue-down installation is a good option for subfloors that are smooth, level, and dry. It is also a good choice for areas that are subject to moisture, such as kitchens and bathrooms. Glue-down installation can be a DIY project, but it is important to follow the manufacturer's instructions carefully to ensure a successful installation.
Benefits of Glue-Down Installation
- Secure and durable: Glue-down installation creates a strong bond between the engineered hardwood planks and the subfloor, making it more secure and durable than other installation methods.
- Moisture-resistant: The adhesive used in glue-down installation helps to seal the joints between the planks, making it more resistant to moisture. This makes glue-down installation a good choice for areas that are subject to moisture, such as kitchens and bathrooms.
- Sound-dampening: The adhesive used in glue-down installation helps to absorb sound, making it a good choice for areas where noise reduction is desired.
Tools and Materials for Glue-Down Installation
- Engineered hardwood flooring
- Glue-down adhesive
- Notched trowel
- Spacers
- Measuring tape
- Pencil
- Hammer or tapping block
Step-by-Step Glue-Down Installation Instructions
- Prepare the subfloor. The subfloor must be smooth, level, and dry. If the subfloor is not level, you will need to level it using a self-leveling compound.
- Lay out the engineered hardwood planks. Start by laying out the planks in a dry fit to determine the best layout. Make sure to leave a 1/4-inch gap around the perimeter of the room for expansion.
- Apply the adhesive. Using a notched trowel, apply the adhesive to the subfloor. Be sure to follow the manufacturer's instructions for the specific adhesive you are using.
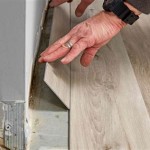
- Install the engineered hardwood planks. Starting in one corner of the room, install the engineered hardwood planks one by one. Be sure to press the planks firmly into the adhesive and use spacers to ensure even spacing.
- Tap the planks into place. Use a hammer or tapping block to tap the planks into place. Be sure to tap lightly and evenly to avoid damaging the planks.
- Allow the adhesive to dry. Allow the adhesive to dry completely before walking on the floor or placing furniture on it. The drying time will vary depending on the adhesive you are using.
Tips for a Successful Glue-Down Installation
- Follow the manufacturer's instructions carefully.
- Use a high-quality adhesive.
- Make sure the subfloor is smooth, level, and dry.
- Leave a 1/4-inch gap around the perimeter of the room for expansion.
- Press the planks firmly into the adhesive.
- Use spacers to ensure even spacing.
- Tap the planks into place lightly and evenly.
- Allow the adhesive to dry completely before walking on the floor or placing furniture on it.

How To Glue Down Engineered Wood Flooring Direct

How To Install An Engineered Hardwood Floor

How To Install Diy Glue Down Engineered Hardwood Flooring

Can You Glue Down Solid Wood Flooring Hardwood Guide Reallyfloors America S Est

Pros Cons Of Glue Down Flooring Installation Floorset

Installation Methods For Wooden Floor Craftedforlife

Engineered Hardwood Floors Installation Floor Refinishing New Jersey Repair Sanding

How To Install Lock Engineered Hardwood Flooring

Glue Down Vs Floating Wood Floor Installation Finfloor

Installing Engineered Hardwood On Concrete Twenty Oak
See Also

