```html
Everything You Need To Know About Wood Flooring Installation
Wood flooring remains a popular choice for homeowners seeking durability, beauty, and enhanced home value. However, a successful wood flooring installation requires careful planning, meticulous execution, and a thorough understanding of the various factors involved. This article provides a comprehensive overview of everything one needs to know about wood flooring installation, from selecting the right type of wood to addressing potential challenges.
Types of Wood Flooring and Their Considerations
The first step in wood flooring installation is choosing the appropriate type of wood. This decision is influenced by factors such as budget, aesthetics, traffic levels, and the existing subfloor. Two primary categories of wood flooring exist: solid wood and engineered wood.
Solid Wood Flooring: Solid wood flooring consists of planks milled from a single piece of timber. It's a classic choice known for its durability and longevity. Solid wood can be sanded and refinished multiple times, extending its lifespan considerably. However, solid wood is susceptible to expansion and contraction due to changes in humidity and temperature. Therefore, it's crucial to acclimate solid wood flooring to the installation environment before installation. Solid wood is typically recommended for above-grade installations where moisture levels are controlled.
Engineered Wood Flooring: Engineered wood flooring is constructed from multiple layers of wood veneer bonded together. The top layer, or wear layer, is typically a hardwood species, providing the desired aesthetic. Engineered wood is more dimensionally stable than solid wood, meaning it's less prone to expansion and contraction. This makes it a suitable option for basements and other areas where moisture levels may fluctuate. Engineered wood flooring is also available in a wider range of widths and lengths compared to solid wood, and often costs less. The number of times engineered wood can be refinished depends on the thickness of the wear layer.
Beyond solid and engineered wood, several wood species offer distinct characteristics. Oak, maple, and hickory are popular choices for their durability and availability. Exotic species like Brazilian cherry and bamboo offer unique aesthetics but may require specific installation techniques and maintenance.
Preparing the Subfloor for Wood Flooring Installation
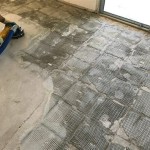
A stable and level subfloor is essential for a successful wood flooring installation. Any imperfections in the subfloor can lead to uneven flooring, squeaks, and premature wear. The most common types of subfloors are concrete and plywood.
Concrete Subfloors: Concrete subfloors must be thoroughly cleaned and free of debris before installation. Moisture testing is crucial to ensure the concrete is sufficiently dry. Excess moisture can cause wood flooring to warp and buckle. Moisture meters can be used to measure the moisture content of the concrete. If moisture levels are high, a moisture barrier must be installed before installing the wood flooring. Self-leveling compounds can be used to correct minor imperfections in the concrete surface. In some cases, a plywood subfloor may be floated over the concrete to create a more suitable surface for wood flooring installation.
Plywood Subfloors: Plywood subfloors should be inspected for damage, such as delamination or rot. Damaged sections must be replaced before installation. The plywood should be securely fastened to the joists below. Any loose boards should be re-nailed or screwed down. The surface of the plywood should be sanded smooth to remove any imperfections. A level should be used to check for high and low spots. Shims can be used to level any uneven areas. It's important to ensure the plywood is the correct thickness for the type of wood flooring being installed. The National Wood Flooring Association (NWFA) provides guidelines for subfloor requirements based on the type of wood flooring and joist spacing.
Regardless of the subfloor type, it must be clean, dry, and level before proceeding with wood flooring installation.
Wood Flooring Installation Methods: Nail-Down, Glue-Down, and Floating
The method used to install wood flooring can significantly impact its performance and longevity. The choice of installation method depends on the type of wood flooring, the subfloor, and the homeowner's preferences. The three primary installation methods are nail-down, glue-down, and floating.
Nail-Down Installation: Nail-down installation is typically used for solid wood flooring installed over a wood subfloor. The wood flooring planks are nailed directly to the subfloor using a flooring nailer. This method provides a very secure and stable installation. However, it's not suitable for concrete subfloors unless a plywood subfloor is first installed. It requires specialized tools, including a flooring nailer and a tapping block. Considerations must be made for expansion gaps around the perimeter of the room to allow for natural movement of the wood.
Glue-Down Installation: Glue-down installation involves adhering the wood flooring planks directly to the subfloor with a special adhesive. This method can be used for both solid and engineered wood flooring. It's suitable for concrete subfloors and can provide a quiet, solid feel underfoot. The type of adhesive used is crucial for a successful glue-down installation. The adhesive must be compatible with the wood flooring and the subfloor. It's important to follow the manufacturer's instructions carefully when applying the adhesive. Ensure proper ventilation during installation due to fumes from the adhesives.
Floating Installation: Floating installation involves connecting the wood flooring planks together without attaching them to the subfloor. The planks are typically connected using a tongue-and-groove system. A thin foam underlayment is placed between the wood flooring and the subfloor to provide cushioning and sound insulation. Floating installation is a relatively quick and easy method, making it a popular choice for DIYers. It's suitable for both concrete and wood subfloors. Engineered wood flooring is often installed using the floating method. Expansion gaps are also crucial in floating installations to allow for movement.
Acclimation of Wood Flooring
Acclimation is a critical step in wood flooring installation that is often overlooked. Acclimation refers to the process of allowing the wood flooring to adjust to the temperature and humidity of the installation environment. Failure to properly acclimate wood flooring can lead to problems such as warping, cupping, and gapping.
The acclimation period varies depending on the type of wood flooring, the local climate, and the time of year. Solid wood flooring typically requires a longer acclimation period than engineered wood flooring. The manufacturer's instructions should be consulted for specific acclimation recommendations. In general, wood flooring should be acclimated for at least three to five days. The wood flooring should be stored in the room where it will be installed. The boxes of wood flooring should be opened to allow for air circulation. The temperature and humidity of the room should be maintained at normal living conditions during the acclimation period.
Addressing Common Problems During Wood Flooring Installation
Even with careful planning, problems can arise during wood flooring installation. Being prepared to address these issues can help ensure a successful outcome.
Uneven Subfloor: As previously mentioned, an uneven subfloor can cause problems such as squeaks and uneven flooring. Self-leveling compounds can be used to correct minor imperfections in concrete subfloors. Shims can be used to level uneven areas in plywood subfloors.
Moisture Issues: Excessive moisture can cause wood flooring to warp and buckle. Moisture testing should be performed on concrete subfloors before installation. Moisture barriers should be installed if moisture levels are high. The installation environment should be properly ventilated.
Gaps Between Planks: Gaps between planks can occur if the wood flooring is not properly acclimated or if the subfloor is not stable. Properly acclimating the wood flooring and ensuring a stable subfloor can help prevent gaps. Wood filler can be used to fill small gaps.
Squeaks: Squeaks can be caused by loose subfloor boards or by the wood flooring rubbing against the subfloor. Re-nailing or screwing down loose subfloor boards can eliminate squeaks. Applying talcum powder between the wood flooring and the subfloor can also help reduce squeaks.
Post-Installation Care and Maintenance
Proper care and maintenance are crucial for extending the life of wood flooring. Regular cleaning and preventative measures can help maintain the beauty and durability of the floor.
Sweep or vacuum the wood flooring regularly to remove dirt and debris. Use a microfiber mop and a wood floor cleaner to clean the floor as needed. Avoid using excessive water, as this can damage the wood. Place mats at entrances to trap dirt and moisture. Use felt pads under furniture legs to prevent scratches. Avoid wearing shoes with high heels or cleats. Protect the floor from direct sunlight, as this can cause fading. Maintain proper humidity levels in the home to prevent excessive expansion or contraction of the wood.
```
Determining The Direction To Lay Install Hardwood Laminate Or Luxury Vinyl Plank Flooring

How To Install Laminate Flooring For Beginners

How To Install Lock Engineered Hardwood Flooring

Engineered Hardwood Vs Laminate Flooring

The Ultimate Guide To Installing Engineered Hardwood Flooring

How To Install Lock Engineered Hardwood Flooring

How To Install Lock Engineered Hardwood Flooring

Installing Hardwood Flooring For The First Time How To Install Wood Floors

A Beginner S Guide To Installing Vinyl Plank Flooring Dumpsters Com

Wood Flooring Everything You Need To Know Tarkett
See Also