How Do You Install Luxury Vinyl Plank Flooring On Concrete?
Luxury vinyl plank (LVP) flooring offers a compelling combination of durability, aesthetics, and ease of installation, making it a popular choice for homeowners. Concrete subfloors provide a stable and robust base for LVP, but proper preparation and installation are crucial for a successful outcome. This article outlines the necessary steps for installing LVP flooring on a concrete slab.
Assessing the Concrete Subfloor: Before beginning any installation, the concrete subfloor must be thoroughly inspected. Existing flooring, adhesives, or coatings need to be removed completely. The slab should be level, with no significant cracks or imperfections. Variations in height greater than 3/16” within a 10-foot radius or 1/4” within a 6-foot radius require leveling. Moisture is another critical factor. Excess moisture can lead to warping, buckling, and mold growth. A calcium chloride test or a relative humidity test using a concrete moisture meter can accurately measure moisture levels. These tests should be performed according to the manufacturer’s instructions.
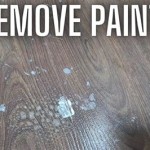
Preparing the Concrete Surface: Once the concrete has been deemed structurally sound and dry, the surface needs to be prepared for LVP installation. Any cracks or imperfections should be filled using a suitable concrete patching compound, allowing ample drying time according to the manufacturer's recommendations. The entire surface should be cleaned thoroughly to remove dust, debris, and any remaining adhesive residue. A heavy-duty floor scraper and a powerful vacuum are recommended for this task.
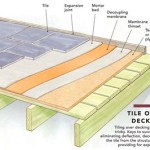
Moisture Mitigation: Even if the concrete tests within acceptable moisture limits, applying a moisture barrier is a preventative measure against potential future issues. A concrete sealer or a specialized moisture-mitigating membrane can be applied to the entire surface, following the manufacturer’s instructions carefully. Allowing the sealer or membrane to dry completely before proceeding with the installation is essential.
Choosing an Underlayment: An underlayment is typically recommended for LVP installations on concrete. It provides several benefits, including cushioning for comfort, sound insulation, and a minor degree of thermal insulation. Furthermore, the underlayment can help smooth out minor imperfections in the concrete surface and provide a more consistent base for the LVP. Choose an underlayment specifically designed for use with LVP flooring and follow the manufacturer's instructions for installation.
Acclimating the LVP: Before installation, the LVP planks need to acclimate to the room's temperature and humidity. This process allows the material to adjust and minimizes the risk of expansion or contraction after installation. Most manufacturers recommend acclimating the LVP for at least 48 hours in the room where it will be installed. The boxes should be laid flat and unopened, allowing air to circulate around them.
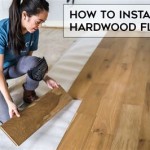
Installing the LVP: LVP flooring typically utilizes a click-lock system for installation, simplifying the process. It is crucial to follow the manufacturer's specific instructions for the chosen LVP product. Generally, the installation begins in a corner of the room, working outward. Spacers are used to maintain a consistent gap between the flooring and the walls, allowing for natural expansion and contraction. Each plank is carefully clicked into the adjacent plank, ensuring a tight and secure fit. A tapping block and rubber mallet can be used to gently tap the planks into place without damaging them.
Cutting and Fitting LVP: Doorways, corners, and other irregular areas will necessitate cutting the LVP planks. A utility knife or a specialized vinyl flooring cutter can be used for this purpose. Measure carefully and mark the cutting line precisely before making the cut. For intricate cuts around pipes or other obstacles, a jigsaw or a coping saw may be required.
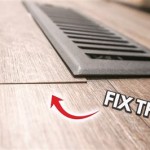
Finishing Touches: Once the entire floor has been installed, the spacers are removed. Baseboards or quarter-round molding can be installed around the perimeter of the room to conceal the expansion gap and provide a finished look. Transition strips are used to create a smooth transition between the LVP flooring and other flooring materials in adjacent rooms.
Maintenance and Care: Proper maintenance will extend the lifespan of the LVP flooring. Regular sweeping or vacuuming will remove dirt and debris. Periodically cleaning the floor with a damp mop using a manufacturer-recommended cleaning solution will maintain its appearance and prevent damage. Avoid using abrasive cleaners or excessive water, as this can damage the flooring. Protective furniture pads should be placed under furniture legs to prevent scratches and dents.

How To Prepare A Concrete Floor For Vinyl Flooring Parrys

Tips For Installing Vinyl Plank Over Concrete Floors Lemon Thistle

How To Install Vinyl Plank Flooring On Concrete Step By Tutorial

Installing Luxury Vinyl Plank Over Concrete Your Next Summer Diy Project

Tips For Installing Vinyl Plank Over Concrete Floors Lemon Thistle

10 Beginner Mistakes Installing Vinyl Plank Flooring

How To Install Luxury Vinyl Flooring On Concrete Honey Built Home

Laying Vinyl Planks The Right Way Expert Guide By Fantastic Handyman

Lvp Flooring Installation How To Install Luxury Vinyl Plank In A Basement Diy

How To Level A Concrete Floor For Vinyl Plank Artsy Pretty Plants
See Also