How to Install Vinyl Plank Flooring in Multiple Rooms
Installing vinyl plank flooring in multiple rooms can be a DIY-friendly project with the right preparation and execution. By following these comprehensive steps, you can achieve a professional finish and create a beautiful and durable flooring solution for your home.
Planning and Preparation:
1. Measure the square footage of each room, factoring in any closets or alcoves that will be floored. 2. Purchase enough flooring to cover the total area, with 5-10% extra for waste. 3. Select an underlayment that provides soundproofing, moisture resistance, and cushioning. 4. Gather necessary tools: utility knife, hammer, spacers, straight edge, and a tapping block.
Subfloor Preparation:
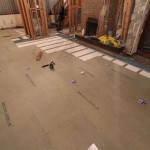
1. Remove existing flooring, baseboards, and any other obstructions. 2. Check the subfloor for flatness and levelness using a straightedge and level. 3. Repair any uneven areas, gaps, or major damage with leveling compound or plywood patches. 4. Clean the subfloor thoroughly, removing any debris, dirt, or wax that could interfere with adhesion.
Underlayment Installation:
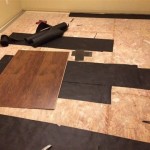
1. Roll out the underlayment, starting from a corner and working your way across the room. 2. Overlap the seams by 2-3 inches and tape them together using underlayment tape. 3. Trim the underlayment to fit around obstacles, such as doorways and closets.
Vinyl Plank Installation:
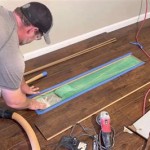
1. Determine the starting point for your installation, typically the longest wall or a prominent feature in the room. 2. Start laying the vinyl planks from the corner of the starting point, snapping them together at the tongue and groove edges. 3. Use spacers to maintain a consistent gap of 1/4 inch around the perimeter of the room. 4. As you reach obstacles, measure and cut planks to fit around them, then snap them into place.
Trim and Transition Installations:
1. Install baseboards once the vinyl flooring is complete. 2. For doorways and room transitions, use transition strips or moldings to create a smooth and uniform appearance. 3. Cut the planks to fit and insert them into the transition strips or moldings, ensuring a secure fit.
Finishing Touches:
1. Clean the floor thoroughly using a damp mop or vacuum cleaner. 2. Apply a no-wax acrylic finish to protect the flooring and enhance its shine. 3. Admire your newly installed vinyl plank flooring in multiple rooms, enjoying the beauty and functionality it brings to your home.

Vinyl Plank Flooring In Multiple Rooms Hallways

Which Direction To Lay Vinyl Plank Flooring In Multiple Rooms Step By Guide 2024

Vinyl Plank Flooring Installation Tricks Direction To Lay In Multiple Rooms

Determining The Direction To Lay Install Hardwood Laminate Or Luxury Vinyl Plank Flooring

Installing Planks Into Multiple Rooms Laminate And Vinyl Plank Installation Part 2

Vinyl Plank Flooring Direction In Connecting Rooms Home Improvement Stack Exchange

How To Install Vinyl Plank Flooring Like A Pro

Choosing Which Direction To Lay Vinyl Plank Flooring Install Today Reallyfloors America S Est Hardwood

Installing Laminate Flooring Across Multiple Rooms With No Transistion

Installing Vinyl Plank Flooring How To Fixthisbuildthat
See Also