How to Remove Engineered Wood Flooring Adhesive
Removing adhesive from engineered wood flooring is a task that requires patience, precision, and the right tools. Engineered wood flooring, known for its stability and aesthetic appeal, is often installed using a variety of adhesives. These adhesives, designed for strong bonding, can present a challenge when flooring needs to be removed or replaced. The removal process must be approached carefully to avoid damaging the underlying subfloor or the engineered wood itself, should it be intended for reuse. Several factors influence the complexity of the adhesive removal process, including the type of adhesive used, the age of the adhesive, and the type of subfloor.
The consequences of improper adhesive removal can range from aesthetic imperfections, like scratched or gouged subfloors, to structural issues if the subfloor integrity is compromised. Therefore, a thorough understanding of the methods available and the precautions necessary is crucial for a successful adhesive removal project. This article provides a comprehensive guide to removing adhesive from engineered wood flooring, covering various techniques and emphasizing the importance of safety and preparation.
Identifying the Adhesive Type
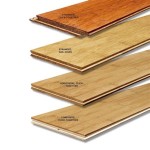
Before attempting to remove any adhesive, it is essential to identify the type of adhesive used. Different adhesives respond differently to various removal methods. Common adhesives used for engineered wood flooring include polyurethane-based adhesives, acrylic adhesives, and epoxy-based adhesives. The product data sheet for the flooring or the adhesive itself, if available, will provide this information. Failing that, a small test area can be used to determine the adhesive's characteristics and the best removal approach. For example, polyurethane adhesives often soften with heat, while acrylic adhesives may respond better to solvents. Epoxy adhesives are typically the most difficult to remove due to their high bonding strength and chemical resistance.
Visual inspection can sometimes offer clues. Polyurethane adhesives often appear as a rigid, yellowish or brownish film. Acrylic adhesives tend to be clearer or white in color and may have a slightly rubbery texture. Epoxy adhesives, which are less common for engineered wood flooring, are typically hard and glossy. However, visual identification alone is not always reliable, so consulting with a flooring professional is advisable if the adhesive type remains uncertain. Incorrectly identifying the adhesive can lead to the selection of an ineffective removal method, potentially wasting time and causing damage.
Understanding the adhesive type also informs the selection of appropriate safety measures. Some adhesives release harmful fumes when heated or exposed to certain solvents. Therefore, wearing appropriate personal protective equipment (PPE), such as respirators and gloves, is crucial, particularly when using chemical removal methods. A well-ventilated work area is also essential to minimize exposure to potentially hazardous substances.
Preparation for Adhesive Removal
Proper preparation is critical to a successful and safe adhesive removal process. This involves protecting the surrounding areas, gathering the necessary tools and materials, and ensuring adequate ventilation. The first step is to clear the area of any furniture or obstacles. Cover nearby walls and trim with plastic sheeting to protect them from splashes and debris. Use painter's tape to secure the plastic sheeting in place.
Next, assemble the necessary tools. Depending on the chosen removal method, this may include a scraper (floor scraper or putty knife), a heat gun or hair dryer, a solvent (such as mineral spirits or adhesive remover), a floor buffer with an abrasive pad, a vacuum cleaner, and safety equipment (gloves, eye protection, and a respirator). A utility knife may also be helpful for scoring the adhesive in certain areas. Having all the necessary tools readily available will streamline the removal process and prevent unnecessary delays.
Ventilation is paramount, especially when using solvents or heat. Open windows and doors to create a cross-breeze. If ventilation is limited, consider using a fan to circulate air. A respirator is essential to protect against harmful fumes, particularly when working with solvents. Wear gloves to protect skin from irritation and eye protection to prevent splashes. Before starting the removal process, read and understand the safety instructions for any solvents or chemicals being used. Store solvents in a safe place away from heat sources and open flames.
Before starting the full removal process, it is advisable to test the chosen method in an inconspicuous area. This will help determine its effectiveness and identify any potential damage to the subfloor. Apply the method to a small section of adhesive and observe the results. If the adhesive softens and can be easily removed without damaging the subfloor, the chosen method is likely suitable. If the adhesive remains resistant or the subfloor is damaged, consider trying a different approach.
Adhesive Removal Techniques
Several techniques can be employed to remove adhesive from engineered wood flooring, each with its own advantages and disadvantages. The choice of technique will depend on the type of adhesive, the size of the area, and the desired outcome. The primary techniques include mechanical removal, heat application, solvent application, and a combination of these methods.
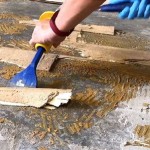
Mechanical removal involves using tools such as scrapers and floor buffers to physically remove the adhesive. A floor scraper, with its long handle and angled blade, is ideal for removing large areas of adhesive. Apply consistent pressure and work in small sections, scraping the adhesive away from the subfloor. A putty knife or smaller scraper can be used for detail work and hard-to-reach areas. When using a floor scraper, be careful not to gouge or damage the subfloor. Maintaining a consistent angle and using a sharp blade will help prevent damage.
A floor buffer with an abrasive pad can also be used for mechanical removal. Select a pad that is appropriate for the type of adhesive and the subfloor material. Start with a coarse pad and gradually move to finer pads to avoid excessive abrasion. Use the floor buffer in overlapping passes, applying consistent pressure. Vacuum the area frequently to remove dust and debris. Mechanical removal is generally effective for removing large areas of adhesive, but it can be time-consuming and may not be suitable for sensitive subfloors.
Heat application involves using a heat gun or hair dryer to soften the adhesive, making it easier to scrape away. Apply heat to a small area of adhesive for a few seconds, then immediately try to scrape it away. Be careful not to overheat the adhesive, as this can cause it to become sticky and more difficult to remove. Keep the heat gun moving to avoid scorching the subfloor. Heat application is particularly effective for polyurethane-based adhesives. However, it is important to ensure adequate ventilation, as some adhesives release harmful fumes when heated.
Solvent application involves using chemical solvents to dissolve or soften the adhesive. Common solvents used for adhesive removal include mineral spirits, adhesive remover, and acetone. Apply the solvent to a small area of adhesive and allow it to dwell for the recommended time, according to the product instructions. Then, try to scrape the adhesive away. Always wear appropriate PPE when using solvents, including gloves, eye protection, and a respirator. Ensure adequate ventilation to minimize exposure to fumes. Some solvents can damage certain types of subfloors, so it is important to test the solvent in an inconspicuous area before applying it to the entire surface. Solvent application can be effective for removing various types of adhesives, but it requires careful handling and proper safety precautions.
In some cases, a combination of these methods may be necessary. For example, heat application may be used to soften the adhesive, followed by mechanical removal with a scraper. Alternatively, solvent application may be used to loosen the adhesive, followed by mechanical removal with a floor buffer. Experimenting with different techniques and combinations will help determine the most effective approach for a particular adhesive and subfloor.
Post-Removal Procedures
After the adhesive has been removed, it is crucial to thoroughly clean the subfloor to prepare it for new flooring. Use a vacuum cleaner to remove any remaining debris, dust, and adhesive residue. A shop vacuum with a brush attachment is ideal for this purpose. Pay close attention to edges and corners, ensuring that all loose particles are removed.
Next, clean the subfloor with a mild detergent and water solution. Use a damp mop or sponge to wipe the surface, removing any remaining residue. Avoid using excessive water, as this can damage the subfloor. Allow the subfloor to dry completely before installing new flooring. Check the subfloor for any damage, such as cracks, holes, or unevenness. Repair any damage before proceeding with the new flooring installation. Fill cracks and holes with a patching compound designed for subfloors. Level any uneven areas with a self-leveling compound.
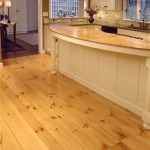
Once the subfloor is clean, dry, and properly prepared, it is ready for the installation of new flooring. Follow the manufacturer's instructions for installing the new flooring, including the recommended adhesive and installation techniques. A properly prepared subfloor will ensure a successful and long-lasting flooring installation.
Disposal of Waste Materials
Proper disposal of waste materials is an important aspect of the adhesive removal process. Adhesives and solvents can be hazardous materials and should be disposed of in accordance with local regulations. Check with the local waste management authority for specific guidelines on disposing of adhesives, solvents, and contaminated materials. Do not dispose of these materials in regular household trash. Instead, take them to a designated hazardous waste disposal facility.
Used abrasive pads, scrapers, and other tools that have been contaminated with adhesive should also be disposed of properly. Wrap these items in plastic bags and dispose of them according to local regulations. Empty solvent containers should be rinsed out with water and allowed to dry completely before being recycled or disposed of. Follow the manufacturer's instructions for disposing of empty solvent containers.
By following these guidelines for proper disposal of waste materials, the environmental impact of the adhesive removal process can be minimized.

How To Remove Glued Wood Flooring And Engineered On Concrete

How To Remove Glued Wood Flooring Easy Diy Steps Faqs And Abbotts At Home

How To Remove Glued Wood Flooring Easy Diy Steps Faqs And Abbotts At Home

Removing Glue Residue From Hardwood Floors After Installer Left Like This

How To Remove Engineered Hardwood Floor Without Damage

Wood Floor Removal Glued Down Jbl Flooring

How To Remove Glued Wood Flooring Easy Diy Steps Faqs And Abbotts At Home

How To Remove Glue From Wood Floors Pete S

How To Remove Glued Wood Flooring Easy Diy Steps Faqs And Abbotts At Home

How To Remove Engineered Hardwood Floor Without Damage
See Also