How Do You Remove Laminate Flooring Without Damaging It?
Laminate flooring offers a durable and stylish alternative to traditional hardwood flooring, but its popularity also means that homeowners often find themselves wanting to replace it down the line. Whether you're undertaking a full renovation or simply refreshing a room's aesthetic, removing laminate flooring without damage is crucial for maximizing reuse or resale value. This guide provides a comprehensive approach to safely and efficiently remove laminate flooring, preserving its condition for future use.
Preparation is Key: Assessing and Planning
Before embarking on the removal process, careful preparation is essential. Begin by assessing the laminate flooring's condition. Consider the following factors:
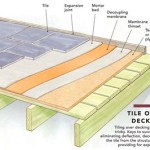
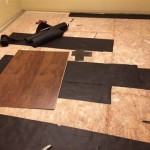
- Installation method: Laminate flooring can be installed using various methods, including click-lock, glue-down, or staple-down. Understanding the installation method is crucial for choosing the appropriate removal technique.
- Subfloor condition: Inspect the subfloor beneath the laminate flooring for potential damage or moisture issues. Addressing any subfloor problems before removing the laminate is important to prevent further complications.
- Laminate thickness and quality: Thicker and higher-quality laminate flooring might require more effort to remove but is more likely to survive the process intact.
After assessing the situation, plan accordingly. Gather the necessary tools, including:
- A pry bar or laminate flooring removal tool
- A hammer
- A utility knife or saw
- A pair of safety glasses and gloves
- A drop cloth for protecting the surrounding area
Removing Laminate Flooring: A Step-by-Step Guide
Once you've gathered the necessary tools and considered the necessary precautions, you can begin the removal process. Here's a detailed step-by-step guide:
- Start in a corner: Identify a corner of the room with no walls or obstacles hindering access. This will provide a starting point for prying up the first laminate plank.
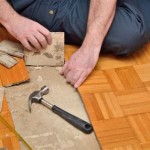
- Pry up the first plank: Using a pry bar or laminate removal tool, gently insert the tool between the first plank and the adjacent wall or baseboard. Apply steady pressure to lift the plank slightly.
- Remove the plank: Once the plank is slightly lifted, use a hammer to tap the pry bar to gain leverage and remove the plank completely. Avoid applying excessive force, as this may damage the plank.
- Continue removing planks: Work your way across the room, removing each plank in a similar fashion. Be cautious as you approach transitions or doorways, ensuring you don't damage the surrounding flooring.
- Handle click-lock planks: For click-lock laminate flooring, the planks are typically held together by a tongue-and-groove system. Use a pry bar to separate the planks by gently pulling the tongue away from the groove.
- Remove glue-down planks: For glue-down laminate flooring, use a utility knife or saw to carefully cut the adhesive that holds the planks to the subfloor. Be sure to cut along the edge of the plank, avoiding damage to the underlying subfloor.
- Remove remaining staples: For staple-down laminate flooring, use a hammer and nail puller to remove the staples holding the planks in place.
- Inspect and clean: After removing each plank, inspect it for any signs of damage. Thoroughly clean each plank to remove any debris or glue residue before storing it safely for future use.
- Work slowly and carefully: Avoid rushing the removal process, as this increases the risk of damaging the planks.
- Use proper tools: Utilizing appropriate tools, such as specialized laminate flooring removal tools, minimizes the risk of scratching or damaging the planks.
- Prioritize plank integrity: Focus on separating the planks gently and avoid excessive force that could cause warping, dents, or cracks.
- Clean and store properly: Thoroughly clean the salvaged planks, using a damp cloth and mild detergent to remove any residue. Store the planks flat in a dry, well-ventilated area to prevent warping or moisture damage.
Tips for Preserving the Laminate:
To maximize the chances of salvaging your laminate flooring for future use, follow these additional tips:
Remember that the success of removing laminate flooring without damage relies on careful planning, proper tools, and considerate execution. Following these steps and tips will help ensure that your laminate flooring remains in good condition for future use, whether it's for a future project or resale.

How To Remove Laminate Flooring

How To Remove Laminate Flooring Without Damaging It

How To Remove Laminate Flooring In 6 Easy Steps

How To Remove Tongue And Groove Flooring Without Damage Hint It S Counter Intuitive

How To Remove Laminate Flooring

How To Safely Remove Quarter Round Trim Without Damaging Anything

How To Remove Laminate Flooring In 6 Easy Steps

Removing L And Stick Vinyl Floors 1 Year Later How To Remove Without Damage

How To Clean Floating Timber Floors Without Damaging Them

Do You Have To Remove Laminate Floors For Water Restoration Re Pro
See Also