How Do You Remove Laminate Flooring Without Damaging It To The Floor?
Laminate flooring remains a popular choice for homeowners due to its durability, affordability, and ease of installation. However, situations may arise where you need to remove the laminate flooring, such as when renovating, replacing worn-out planks, or installing a new floor covering. Removing laminate flooring without damaging the subfloor beneath is crucial to ensure a smooth transition for your next flooring project. This article offers practical tips and steps to help you safely detach laminate flooring while preserving the integrity of the underlying surface.
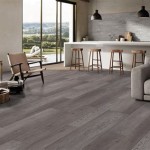
Understanding the Structure of Laminate Flooring
Laminate flooring consists of multiple layers pressed together to create a durable and resilient surface. The top layer is a wear layer that provides resistance to scratches, dents, and stains. The core layer is made of high-density fiberboard (HDF) or medium-density fiberboard (MDF) that provides structural support. Finally, a backing layer at the bottom helps stabilize the flooring and prevents moisture from seeping in. Understanding this structure allows you to employ the appropriate techniques for safe removal.
Essential Tools and Supplies
Before embarking on the removal process, ensure you have the necessary tools and supplies:
- Pry bar: A sturdy pry bar is essential for lifting laminate planks. Choose one with a flat, wide blade to help prevent damage to the flooring.
- Hammer: A hammer is useful for tapping the pry bar into place and separating the planks.
- Utility knife: A utility knife is necessary for cutting through the laminate and any adhesive that may be present.
- Safety glasses: Protect your eyes from flying debris.
- Work gloves: Wear gloves to avoid splinters and potential injury.
- Vacuum cleaner: Clean up debris and dust after removing the laminate.
- Bucket and cleaning solution: For wiping down the subfloor and removing any remaining adhesive.
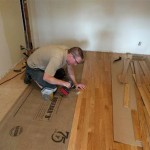
Step-by-Step Guide to Removing Laminate Flooring
Follow these steps to remove laminate flooring without damaging the subfloor:
- Prepare the Room: Clear the room of furniture and belongings. If possible, remove any baseboards or moldings that might hinder the removal process.
- Identify the Starting Point: Locate a plank near a wall or in a corner. This plank typically has a lip or groove that allows for easier removal.
- Pry Up the First Plank: Place the pry bar under the first plank, positioning the blade between the plank edge and the subfloor. Use the hammer to delicately tap the end of the pry bar, gently lifting the plank.
- Remove the Remaining Planks: Once you have successfully pried up the first plank, work your way across the floor, removing each plank in the same manner. The planks should come up relatively easily, but if they become stuck, use the pry bar to gently pry them loose.
- Separate Planks: If the laminate planks are attached to each other with a locking system, use the pry bar to gently separate the locking mechanism and remove the planks individually. Do not force the planks apart, as this can cause them to crack or chip.
- Clean Up: Once all the planks have been removed, clean up any debris and dust. Vacuum the subfloor and use a damp cloth to wipe away any remaining adhesive.
- Inspect the Subfloor: Carefully inspect the subfloor for any damage. Repair or replace damaged sections before installing new flooring.
Additional Tips for Safe and Efficient Removal
Consider these additional tips for a smoother and safer removal process:
- Start from the Corners: Begin removing laminate flooring from corners or edges, as these areas typically have fewer fasteners and provide easier access.
- Avoid Excessive Force: Use gentle and controlled force when using the pry bar. Excessive force can damage the subfloor or the laminate planks themselves, leading to unnecessary waste.
- Protect Your Hands: Wear gloves while removing laminate flooring to protect your hands from splinters and rough edges.
- Work in Sections: If your room is large, work in smaller sections for easier removal and better organization.
- Dispose of Materials Properly: Check with your local waste management facility for proper disposal guidelines for used laminate flooring, especially if it contains harmful chemicals or adhesive residues.
Removing laminate flooring without damaging the underlying subfloor requires careful planning and execution. By following these steps and tips, you can efficiently and responsibly remove your laminate flooring, ensuring a smooth transition for any future flooring project.

How To Remove Laminate Flooring

How To Remove Laminate Flooring

How To Remove Tongue And Groove Flooring Without Damage Hint It S Counter Intuitive

Dismantling Home Laminate Flooring In Singapore When To Remove And How Replace It

How To Safely Remove Quarter Round Trim Without Damaging Anything

How To Remove Laminate Flooring In 6 Easy Steps

How To Remove Laminate Flooring Without Damaging It

How To Remove Carpeting Without Damaging The Hardwood Floors Underneath

How To Remove Vinyl Flooring The Home

How To Remove A Single Piece Of Hardwood Flooring The Art Doing Stuff
See Also