How To Change A Damaged Laminate Floor Board
Laminate flooring offers an attractive and durable surface for homes and businesses. However, accidents happen, and individual boards can become damaged, requiring replacement. This article outlines the process of replacing a single damaged laminate floorboard, allowing for a seamless repair without needing to replace the entire floor. This repair process is generally suitable for damage affecting one or a few boards, not extensive areas.
Tools and Materials Needed
Before beginning the repair, gather the necessary tools and materials. This preparation ensures a smooth and efficient repair process. Having everything at hand minimizes interruptions and contributes to a successful outcome.
- Replacement Laminate Plank: Ensure this plank matches the existing flooring in color, style, and thickness.
- Circular Saw or Jigsaw with Laminate Cutting Blade:
- Oscillating Multi-Tool with Cutting Blade:
- Hammer:
- Pull Bar:
- Tapping Block:
- Safety Glasses:
- Measuring Tape:
- Pencil:
- Wood Glue (optional):
Preparing the Damaged Board for Removal
The first step involves carefully cutting out the damaged section of the laminate plank. This process requires precision to avoid damaging surrounding boards. Implementing the correct cutting techniques minimizes the risk of further damage and ensures a clean removal of the affected area.
- Using a circular saw or jigsaw fitted with a laminate cutting blade, make several parallel cuts along the length of the damaged board, staying within the damaged area.
- Using an oscillating multi-tool with a cutting blade, carefully cut along the edges of the damaged area to separate it from the adjacent planks.
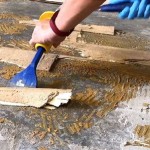
- Remove the cut pieces using a small pry bar or chisel, working cautiously to avoid damaging adjacent boards.
Removing the Damaged Board
Once the damaged area is isolated, the remaining sections of the damaged board must be removed. This involves carefully separating the board from the locking mechanism of the surrounding planks. A delicate approach is essential to avoid causing further damage to the flooring.
- Carefully insert the pull bar under the edge of the remaining sections of the damaged board.
- Gently tap the pull bar with a hammer, working along the length of the board to loosen it from adjacent planks.
- Once loosened, lift the remaining sections of the damaged board.
Preparing the Replacement Board
The replacement board must be prepared to fit seamlessly into the vacated space. Accurate measurements and precise cuts are crucial for a proper fit. This step also involves removing the bottom lip of the locking mechanism to allow for insertion into the existing floor.
- Measure the dimensions of the area where the damaged board was removed.
- Cut the replacement board to the correct size, leaving a small gap for expansion (approximately 1/4 inch on all sides). It’s better to cut slightly large and trim down as needed.
- Using a utility knife or the oscillating multi-tool, carefully remove the bottom lip of the locking mechanism along the long edges of the replacement board. This will allow it to slide into place.
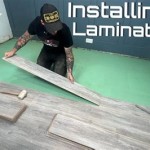
Installing the Replacement Board
Installing the replacement board requires careful alignment and gentle pressure to engage the locking mechanism. A tapping block helps protect the edges of the board and ensures a secure fit. Properly installing the replacement board ensures stability and a flush finish with the surrounding flooring.
- Apply a small amount of wood glue to the cut edges of the existing flooring (optional, but can provide extra stability).
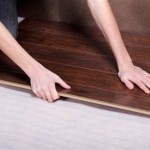
- Angle the replacement board and slide the tongue edge into the groove of the adjacent board.
- Lower the board into place, ensuring it is flush with the surrounding flooring.
- Use a tapping block and hammer to gently tap the replacement board into place, engaging the locking mechanism.
Finishing the Repair
After the replacement board is secured, a final inspection is necessary to ensure a smooth and even surface. Addressing any minor imperfections completes the repair and restores the integrity of the flooring.
- Inspect the replaced board to ensure it is level and flush with the surrounding floor.
- Clean up any dust or debris from the repair.

Laminate Floor Repair Diy Family Handyman

How To Replace A Damaged Laminate Board That S In The Middle Of Floor

How To Fix A De Laminated Board Without Removing The

Replace A Damaged Board In Laminate Floor Rw Supply Design

Replace A Damaged Board In Laminate Floor Rw Supply Design

How To Replace A Damaged Hardwood Floor Board Diy Family Handyman

How To Replace Damaged Flooring Plank Diy

Replace A Damaged Board In Laminate Floor Rw Supply Design

How To Repair Damaged Laminate Floor Checkatrade

How To Replace Warped Water Damaged Laminate Floor Boards
See Also