How To Change A Laminate Floor Board
Damaged laminate flooring can detract from a room's aesthetic. Fortunately, replacing individual planks is often a manageable DIY project, eliminating the need for a complete floor replacement. This article outlines the process of changing a single laminate floorboard.
1. Gather Necessary Tools and Materials
Before beginning, assemble the necessary tools and materials. These typically include a pull bar, tapping block, rubber mallet, utility knife, measuring tape, safety glasses, and a replacement plank matching the existing flooring. Having everything readily available streamlines the process and prevents interruptions.
2. Prepare the Work Area
Clear the area surrounding the damaged plank. Remove any furniture, rugs, or other obstacles that might interfere with the repair process. This clear workspace provides ample room to maneuver tools and reduces the risk of accidents.
3. Cut Out the Damaged Plank
Score the damaged plank using a utility knife. Create several deep cuts along the length of the plank, being careful not to damage adjacent boards. These cuts weaken the plank, making it easier to remove in sections. Using a chisel and hammer, carefully break apart the scored sections of the damaged plank. Work from the center outwards, minimizing stress on surrounding boards.
4. Remove the Damaged Sections
Once the damaged plank is scored and broken, carefully remove the pieces. A small pry bar can be useful for lifting out stubborn sections. Take care not to damage the tongue-and-groove locking mechanisms of the surrounding planks. If pieces are firmly lodged, use the pull bar and tapping block to gently pry them loose.
5. Prepare the Replacement Plank
Measure the removed plank and cut the replacement plank to the same dimensions. Precise measurements are critical for a seamless fit. Using the old plank as a template can ensure accuracy. Remove the bottom lip of the groove on the long side of the replacement plank. This allows the new plank to slide into place under the existing boards. A utility knife can be used for this purpose. For planks located at the edge of the room, the tongue side may need to be removed instead.
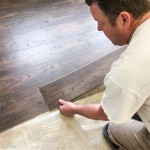
6. Install the Replacement Plank
Apply a small amount of wood glue to the cut edges of the existing planks where the new plank will be inserted. This helps secure the replacement and prevent squeaking. Carefully angle the replacement plank and slide the tongue edge into the groove of the adjacent board. Lower the plank into position and press firmly to engage the locking mechanism. Use a tapping block and rubber mallet to gently tap the plank into place, ensuring a flush fit with the surrounding flooring. Avoid striking the plank directly with the mallet, as this can damage the surface.
7. Clean the Area
Once the replacement plank is securely in place, clean the area. Remove any dust, debris, or excess glue. This restores the aesthetic appeal of the floor and completes the repair process.
8. Allow Time for the Adhesive to Cure
If wood glue was used, allow sufficient time for it to dry and cure completely before placing heavy furniture or walking directly on the repaired area. Refer to the glue manufacturer's instructions for the recommended curing time. This ensures a strong and lasting repair.
Important Considerations:
Understanding the specific locking mechanism of your laminate flooring simplifies the replacement process. Different brands and styles may have variations in their locking systems. Consulting the manufacturer's instructions provides valuable guidance.
For planks located near walls, the use of a pull bar and tapping block is crucial for maneuvering the replacement plank into position.
Maintaining a consistent tapping force when securing the replacement plank prevents damage to the surrounding boards and ensures a level surface.
Having extra replacement planks on hand is advisable in case of unforeseen issues during the repair process.
By following these steps and taking appropriate precautions, individuals can successfully replace a damaged laminate floorboard, restoring the beauty and functionality of their flooring without the expense and disruption of a full replacement.

Laminate Floor Repair Diy Family Handyman

How To Replace Damaged Flooring Plank Diy

How To Do A Laminate Board Replacement On Floor Step By

How To Replace Lock Vinyl Flooring

How To Fix A De Laminated Board Without Removing The

How To Replace A Damaged Laminate Board That S In The Middle Of Floor

Replace A Damaged Board In Laminate Floor Rw Supply Design

How To Replace Warped Water Damaged Laminate Floor Boards

How To Repair Laminate Flooring The Home

How To Replace A Damaged Hardwood Floor Board Diy Family Handyman
See Also