How to Fix Broken Floor Joists
Floor joists are the backbone of a home's structural integrity, providing support for the flooring and the weight of everything above. When a floor joist breaks, it can lead to significant problems, including sagging floors, bouncy spots, and even structural instability. Addressing a broken floor joist promptly and effectively is crucial for maintaining the safety and value of a property. This article provides a comprehensive guide on how to fix broken floor joists, covering assessment, preparation, and repair techniques.
Assessing the Damage and Identifying the Cause
Before attempting any repairs, a thorough assessment of the damage is essential. This involves identifying the location and extent of the break, determining the cause of the failure, and evaluating the condition of the surrounding joists. A comprehensive assessment allows for the selection of the most appropriate repair method and prevents future problems.
Begin by locating the broken joist. This typically involves accessing the underside of the floor, such as in a basement or crawl space. Inspect the floor above for signs of sagging or bouncing, which can indicate the location of the affected joist. Once located, examine the break closely. Note whether the joist is cracked, splintered, or completely severed. Determine the length and depth of the damage.
Identifying the cause of the break is critical for preventing future failures. Common causes include:
- Moisture Damage: Leaks, high humidity, and inadequate ventilation can lead to rot and decay, weakening the wood and making it susceptible to breakage. Look for signs of water damage, such as staining, mold, or soft, spongy wood.
- Insect Infestation: Termites, carpenter ants, and other wood-boring insects can tunnel through the joist, compromising its structural integrity. Inspect the joist for small holes, sawdust, or signs of insect activity.
- Overloading: Excessive weight placed on the floor above can overstress the joist, leading to cracking or breaking. This is particularly common in areas with heavy furniture, appliances, or storage.
- Improper Notching or Drilling: Cutting large notches or holes in the joist to accommodate plumbing or electrical wiring can significantly weaken it. Examine the joist for any improperly placed or sized notches or holes.
- Age and Deterioration: Over time, wood can naturally weaken and degrade, making it more prone to breakage. This is especially true in older homes with untreated lumber.
Once the cause of the break has been determined, assess the condition of the surrounding joists. Look for any signs of similar damage, such as cracks, rot, or insect infestation. Addressing these issues proactively can prevent further problems in the future.
Safety considerations are paramount during the assessment. Wear appropriate personal protective equipment (PPE), including safety glasses, gloves, and a dust mask. Ensure adequate lighting and ventilation in the work area. If working in a crawl space, be aware of potential hazards such as pests, mold, and standing water. If electrical wiring or plumbing is present near the damaged joist, take extra precautions to avoid contact.
Preparing for the Repair
Proper preparation is essential for a successful and durable repair. This involves gathering the necessary tools and materials, supporting the damaged joist, and cleaning the work area.
The following tools and materials are typically required for repairing a broken floor joist:
- Lumber: Select lumber of the same dimensions and grade as the existing joist. Pressure-treated lumber is recommended if moisture is a concern.
- Screws or Nails: Use high-quality construction screws or nails that are long enough to penetrate the joist and sister or support structure adequately.
- Construction Adhesive: Apply construction adhesive to the mating surfaces to enhance bonding strength.
- Measuring Tape: Used for accurate measurements of the broken joist and replacement lumber.
- Circular Saw or Hand Saw: Needed for cutting the replacement lumber to the correct length.
- Drill or Impact Driver: Required for driving screws or nails.
- Level: Used to ensure that the repaired joist is level.
- Hammer: Needed for driving nails (if using).
- Safety Glasses, Gloves, and Dust Mask: Essential for personal protection.
- Support Posts and Beam: Used to temporarily support the floor joists during the repair.
Before starting the repair, it is crucial to provide temporary support to the damaged joist and the surrounding floor structure. This will prevent further sagging or movement and ensure the safety of the work area. A common method is to use adjustable support posts (also known as jack posts) and a temporary beam.
Position the support posts directly beneath the damaged joist and any adjacent joists that may be affected. The beam should span multiple joists and distribute the load evenly. Gradually raise the support posts until the floor is level and the weight is adequately supported. It is important to avoid lifting the floor too much, as this could cause damage to the surrounding structure.
Clear the work area of any obstructions, such as debris, insulation, or wiring. This will provide ample space to work and prevent accidents. Use a wire brush or scraper to remove any loose debris or rust from the joist. If the joist is damp, allow it to dry thoroughly before proceeding with the repair. Good ventilation is essential to facilitate drying.
Repair Techniques: Sistering and Reinforcement
There are several techniques for repairing broken floor joists, each with its own advantages and disadvantages. The most common methods are sistering and reinforcement. Sistering involves attaching a new joist alongside the damaged one to provide additional support. Reinforcement involves adding reinforcing materials to the existing joist to strengthen it. The choice of technique depends on the severity of the damage, the accessibility of the joist, and the desired level of repair.
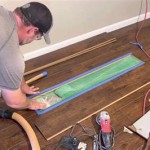
Sistering is a widely used method for repairing broken floor joists. It involves attaching a new joist, known as a "sister joist," alongside the damaged joist to provide additional support. This technique is effective for repairing cracks, splits, and minor breaks.
To sister a floor joist, follow these steps:
- Measure and Cut the Sister Joist: Measure the length of the damaged joist and cut a new joist to the same length. Ensure that the sister joist is the same dimensions and grade as the existing joist.
- Apply Construction Adhesive: Apply a generous bead of construction adhesive to the side of the damaged joist that will be in contact with the sister joist.
- Position the Sister Joist: Position the sister joist alongside the damaged joist, aligning the top and bottom edges. Ensure that the sister joist is flush with the existing joist.
- Fasten the Sister Joist: Secure the sister joist to the damaged joist using construction screws or nails. Space the fasteners approximately 12 inches apart along the entire length of the joist. Use longer fasteners at the ends of the joist to provide extra support. Stagger the screws or nails to prevent splitting the wood.
- Check for Level: Use a level to ensure that the repaired joist is level. If necessary, adjust the support posts to achieve a level surface.
For more severe breaks or when sistering is not feasible, reinforcement techniques can be used. This involves adding reinforcing materials, such as steel plates or flitch plates, to the existing joist to strengthen it.
Steel plates are typically attached to the sides of the joist using screws or bolts. Flitch plates are steel plates that are sandwiched between two pieces of lumber and bolted together. Reinforcement techniques are more complex than sistering and may require professional assistance.
For minor cracks or splits, epoxy repair kits can be used. These kits typically include a two-part epoxy that is mixed together and applied to the damaged area. The epoxy fills the crack and bonds the wood together, creating a strong and durable repair. Follow the manufacturer's instructions carefully when using epoxy repair kits. Ensure the work area is well-ventilated, and wear appropriate PPE.
After completing the repair, remove the temporary support posts gradually. Monitor the repaired joist for any signs of sagging or bouncing. If necessary, make adjustments to the repair or add additional support. Apply a wood preservative to the repaired area to protect it from moisture and insect damage. Seal any gaps or cracks with caulk or sealant to prevent water intrusion. If the cause of the break was moisture damage, address the source of the moisture to prevent future problems. This may involve repairing leaks, improving ventilation, or installing a vapor barrier.
Floor joists are crucial structural components, and their repair should be approached with care and attention to detail. While this guide provides a comprehensive overview of common repair techniques, complex or extensive damage may require the expertise of a qualified professional. Consulting with a structural engineer or experienced contractor can ensure that the repair is performed safely and effectively, safeguarding the structural integrity of the home.

How To Fix A Broken Joist

Fix Replace Damaged Floor Joists How To Sister A Joist

How To Repair A Butchered Floor Joist Fine Homebuilding

Fixing A Broken Floor Joist

How To Fix Sagging Floor Joists Rogue Engineer

A Quick Trick For Fixing Broken Floor Joists Fine Homebuilding

Sistering A Damaged Floor Joist

How To Repair Sagging Sloping Floors Part 2

Everything You Need To Know About Floor Joist Repair

Floor Joists Common Problems And Joist Repairs
See Also