How To Fix Damaged Floor Boards
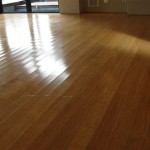
Damaged floor boards can detract significantly from the aesthetic appeal and structural integrity of a property. Whether caused by water damage, pests, heavy impact, or simply the passage of time, addressing these issues promptly is crucial to prevent further deterioration and maintain the value of the flooring. This article provides a comprehensive guide on how to identify, assess, and repair damaged floor boards, covering a range of techniques suited to different types of damage and flooring materials.
Prior to commencing any repair work, a thorough assessment of the damage is paramount. The nature, extent, and location of the damage will dictate the appropriate repair methods and materials. Careful examination will also help determine if the damage is localized or indicative of a more widespread underlying problem, such as a leaking pipe or pest infestation, which must be addressed before any cosmetic repairs are carried out.
Safety should always be the top priority when working on flooring repairs. Personal protective equipment (PPE), including safety glasses, gloves, and a dust mask, should be worn to protect against potential hazards such as flying debris, splinters, and dust. Ensure the work area is well-ventilated, especially when using adhesives, solvents, or wood fillers. Power tools should be used with caution and in accordance with the manufacturer's instructions. Before cutting or removing any boards, verify the location of any electrical wiring or plumbing in the area to avoid accidental damage or injury.
Identifying Types of Floor Board Damage
Different types of damage require different repair approaches. Common issues include scratches, dents, gouges, water stains, warping, squeaking, and complete board rot. Accurate identification is vital for implementing the correct repair strategy.
Scratches are usually superficial and confined to the surface finish. They can often be addressed with simple buffing or touch-up using a matching stain or sealant. Deeper scratches may require filling with wood filler before refinishing. Dents are caused by impact and can sometimes be raised using heat and moisture. If this is ineffective, the dent can be filled with wood filler. Gouges are more significant indentations that remove material from the board. These invariably require filling and refinishing to restore the surface.
Water stains typically indicate moisture exposure. The extent of the stain will determine the repair method. Minor stains can sometimes be removed with bleaching agents or specialized wood cleaners. More severe stains may necessitate sanding and refinishing the affected area, or replacing the entire board if the water damage has penetrated deeply.
Warping occurs when wood expands or contracts unevenly due to changes in humidity or moisture content. Mild warping can sometimes be reversed by controlling the environment and allowing the wood to return to its original shape. Severe warping usually requires board replacement.
Squeaking floorboards are often caused by loose nails or screws, or by boards rubbing against each other or the subfloor. Identifying the source of the squeak is crucial for effective repair. This may involve tightening fasteners, adding shims between the subfloor and floorboards, or lubricating the contact points.
Board rot, often caused by prolonged exposure to moisture or pest infestation, is the most severe form of damage. Affected boards become soft, crumbly, and structurally unsound. Replacement of the rotted boards is almost always necessary. It is imperative to address the underlying cause of the rot to prevent recurrence.
Essential Tools and Materials
The tools and materials required for floor board repair will vary depending on the type of damage and the flooring material. However, certain items are commonly needed for most repair projects. Having the correct tools and materials on hand will streamline the repair process and ensure a professional-looking outcome.
Essential hand tools include a hammer, pry bar, chisel, wood saw (both hand saw and potentially a circular saw or oscillating tool), screwdriver (both Phillips and flathead), measuring tape, pencil, and putty knife. For sanding, sandpaper in various grits (coarse, medium, and fine) is necessary, along with a sanding block or electric sander. If using an electric sander, a dust collector or shop vacuum is highly recommended.
For removing nails or screws, a nail set and screw extractor can be helpful. A wood filler or epoxy filler is essential for repairing scratches, dents, and gouges. Wood glue is necessary for bonding loose boards or reattaching trim. Stains, sealants, and finishes are needed to match the existing flooring and protect the repaired area.
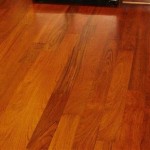
Replacement floorboards should be of the same species, dimensions, and milling profile as the existing boards. Matching the grain pattern and color is important for a seamless repair. If original boards are unavailable, carefully select a replacement that closely resembles the existing flooring and consider staining it to match.
Additional materials that may be required include shims (for leveling), construction adhesive (for securing boards to the subfloor), and cleaning supplies (such as mineral spirits or denatured alcohol) for preparing the surface for repair.
Step-by-step Repair Techniques
The following outlines several common floor board repair techniques. These techniques should be adapted to suit the specific type of damage and flooring material.
Repairing Scratches: For minor scratches, cleaning the affected area with a mild detergent and water is the first step. Once dry, apply a touch-up stain or sealant that matches the existing finish. Lightly buff the area with a fine-grit sandpaper to blend the repair with the surrounding surface. For deeper scratches, apply wood filler to the scratch, allow it to dry completely, and then sand it smooth. Apply a stain or sealant to match the existing finish.
Repairing Dents: Place a damp cloth over the dented area and apply heat with an iron. The steam will help the wood fibers swell and potentially raise the dent. If the dent remains, fill it with wood filler, allow it to dry, sand it smooth, and apply a matching stain or finish.
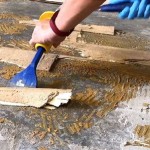
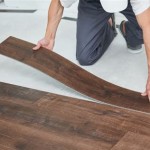
Replacing a Damaged Board: This process involves several steps. First, carefully remove the damaged board using a pry bar and chisel. If the board is tongue-and-groove, score along the edges with a utility knife to prevent damaging adjacent boards. Cut the replacement board to the correct length, ensuring it fits snugly in the space. Apply wood glue to the subfloor and the edges of the replacement board. Secure the board with finishing nails or screws, countersinking the fasteners and filling the holes with wood filler. Sand the filled areas smooth and apply a stain and finish to match the surrounding flooring.
Addressing Squeaky Floors: Locate the source of the squeak by walking over the area and listening carefully. If the squeak is caused by loose nails or screws, tighten them or replace them with longer fasteners. If the squeak is caused by boards rubbing against each other or the subfloor, insert shims between the boards and the subfloor to provide support. Lubricating the contact points with powdered graphite or talcum powder can also reduce friction and eliminate the squeak.
Repairing Water Damage: First, address the source of the moisture to prevent further damage. Allow the affected area to dry completely before beginning any repairs. Remove any loose or damaged wood. For minor water stains, try cleaning the area with a specialized wood cleaner or bleaching agent. For more severe stains or warped boards, sanding and refinishing the area may be necessary, or the entire board may need replacement.
When dealing with adhesives, always use products that are specifically designed for flooring applications and follow the manufacturer's instructions carefully. Proper ventilation is essential when working with adhesives and solvents.
Achieving a seamless repair often requires careful attention to detail and patience. Matching the stain and finish to the existing flooring can be challenging, so it is advisable to test the color on a scrap piece of wood before applying it to the repaired area. Applying multiple thin coats of finish is generally preferable to applying a single thick coat, as this can help prevent runs and ensure an even appearance. Allow each coat to dry completely before applying the next.
If the damage is extensive or the repair is beyond one's skill level, it is prudent to consult with a professional flooring contractor. Attempting to perform complex repairs without the necessary knowledge and experience can lead to further damage and potentially costly mistakes. A qualified contractor will have the expertise and tools to properly assess the damage, recommend the appropriate repair solution, and ensure a durable and aesthetically pleasing result.

How To Replace Damaged Floor Boards

How To Repair Floorboards Ideas Advice B Q

How To Safely Repair Floor Boards Help Advice Leader Floors

Floorboard Repairs

How To Replace Damaged Hardwood Floorboards Dans Le Lakehouse

How Do You Repair A Damaged Wooden Floor Parquet Flooring Best In Singapore

How To Fix A De Laminated Board Without Removing The

Removing Replacing A Damaged Hardwood Flooring Board

How To Repair Floorboards Ideas Advice B Q

How To Repair Hardwood Floors The Craftsman Blog
See Also