How To Glue Vinyl Plank Flooring On Concrete Floors Without Sanding
Installing vinyl plank flooring offers a durable and aesthetically pleasing flooring solution for various spaces. Gluing vinyl planks directly onto concrete floors provides a stable and long-lasting installation. While sanding is often recommended to prepare concrete surfaces, it is possible to successfully glue vinyl plank flooring without this step, provided specific preparation and adhesive techniques are employed. This article details the process of gluing vinyl plank flooring onto concrete floors without sanding, emphasizing crucial steps for a successful and durable outcome.
The primary objective of preparing a concrete floor for vinyl plank installation, regardless of whether sanding is included, is to establish a clean, level, and structurally sound surface that promotes optimal adhesive bonding. This preparation ensures the vinyl planks adhere properly, preventing issues like bubbling, peeling, or unevenness after installation. A thorough understanding of the concrete's condition and appropriate preparation methods is essential for achieving a satisfactory outcome.
Key Point 1: Thorough Cleaning and Moisture Testing
The initial and most critical step in preparing a concrete floor for vinyl plank installation without sanding is a comprehensive cleaning process. This process aims to remove any contaminants that could interfere with the adhesive's ability to bond effectively. These contaminants include dust, dirt, grease, paint, old adhesive residue, and any other foreign materials present on the concrete surface.
Start by sweeping the entire concrete floor thoroughly to remove loose debris. Subsequently, use a vacuum cleaner with a brush attachment to extract any remaining fine particles. For stubborn dirt or grease, a degreasing solution designed for concrete floors is necessary. Follow the manufacturer's instructions for dilution and application. Use a scrub brush or mop to agitate the degreaser and then rinse the floor thoroughly with clean water. Allow the concrete floor ample time to dry completely. This drying period can vary depending on humidity and temperature, but typically requires at least 24 to 48 hours.
Following the cleaning process, moisture testing is paramount. Concrete floors are susceptible to moisture migration from the ground beneath, which can severely compromise the adhesive bond and lead to flooring failure. Several methods exist for testing moisture levels in concrete. A common method involves taping a square of clear plastic sheeting (approximately 18x18 inches) to the concrete floor using moisture-resistant tape. Seal all edges of the plastic tightly to the concrete. Leave the plastic in place for 24 to 72 hours. After the specified period, inspect the underside of the plastic for condensation. Also, check the concrete floor where the plastic was taped for any darkening. The presence of condensation or darkening indicates excessive moisture levels. Acceptable moisture levels are typically determined by the adhesive manufacturer and should be consulted prior to proceeding. If moisture levels are above acceptable limits, mitigation strategies such as applying a moisture barrier or addressing the source of the moisture intrusion are necessary before installing the vinyl plank flooring.
Another method uses a concrete moisture meter. This device provides a quantitative measurement of the moisture content within the concrete. Refer to the adhesive manufacturer's specifications to determine the acceptable moisture range for optimal bonding. If the moisture content exceeds the specified range, implement moisture mitigation measures.
Ignoring moisture issues can lead to significant problems down the line, including adhesive failure, mold growth, and warping of the vinyl planks. Addressing moisture concerns proactively is crucial for a successful and long-lasting installation.
Key Point 2: Leveling the Concrete Surface
Even without sanding, achieving a level concrete surface is crucial for a professional and durable vinyl plank installation. While sanding can help smooth minor imperfections, it is not the primary method for addressing significant unevenness. Large dips, cracks, or high spots will telegraph through the vinyl plank flooring, resulting in an uneven and potentially unstable surface.
The first step in leveling the concrete floor is to conduct a thorough inspection to identify any irregularities. Use a long, straight edge (at least 8 feet in length) and a level to check for dips, high spots, and cracks. Mark these areas clearly with a pencil or marker. For minor dips and imperfections (less than ¼ inch), a self-leveling compound can be used. This compound is a pourable mixture that spreads evenly across the surface, filling in low spots and creating a level plane. Follow the manufacturer's instructions carefully regarding mixing ratios, application thickness, and drying time.
For larger dips or cracks (greater than ¼ inch), a concrete patching compound is required. This compound is typically a thicker mixture that can be troweled into the affected areas. Apply the patching compound in thin layers, allowing each layer to dry completely before applying the next. This prevents shrinkage and cracking of the patch. Use a trowel to feather the edges of the patch, blending it seamlessly with the surrounding concrete surface.
For high spots, grinding may be necessary, though the goal is to avoid extensive sanding. If a high spot is relatively small, a hand scraper or a concrete chisel can be used to carefully remove the excess material. For larger high spots, a concrete grinder with a diamond grinding wheel may be required, but focus only on the high spot rather than grinding the entire floor. Exercise caution to avoid creating excessive dust and wear appropriate safety gear, including a dust mask and eye protection. The use of a vacuum attached to the grinder can help minimize dust dispersion.
After applying the self-leveling compound or patching compound, allow it to cure completely according to the manufacturer's instructions. Once cured, re-inspect the surface with a straight edge and level to ensure it is level and smooth. If necessary, repeat the process to address any remaining imperfections. A level and smooth concrete surface is essential for ensuring the vinyl plank flooring lays flat and adheres properly, preventing future issues with movement or instability.
Key Point 3: Selecting the Appropriate Adhesive and Application Technique
Choosing the correct adhesive and employing proper application techniques are crucial for a successful glue-down vinyl plank installation, especially when foregoing sanding. The adhesive must be specifically formulated for adhering vinyl plank flooring to concrete substrates and must be compatible with the specific type of vinyl plank flooring being installed.
Consult the vinyl plank flooring manufacturer's recommendations for the most suitable adhesive. Different types of vinyl plank flooring may require different types of adhesives to ensure optimal bonding. Common types of adhesives used for vinyl plank flooring include pressure-sensitive adhesives, wet-set adhesives, and hybrid adhesives. Pressure-sensitive adhesives allow for repositioning of the planks during the initial installation phase, while wet-set adhesives require immediate and permanent placement. Hybrid adhesives offer a combination of these properties. Carefully review the adhesive's specifications, including open time (the time between adhesive application and plank placement), working time (the time during which the adhesive remains workable), and curing time (the time required for the adhesive to fully harden).
Before applying the adhesive, ensure the concrete floor is clean, dry, and free of any debris. Use the recommended trowel size and type specified by the adhesive manufacturer. The trowel creates ridges in the adhesive, which provide channels for air to escape and ensure proper bonding. Apply the adhesive evenly across the concrete surface, working in manageable sections (typically the width of a few rows of planks). Avoid applying adhesive to too large an area at once, as it may begin to dry before the planks are installed.
Place the vinyl planks carefully onto the adhesive, aligning them according to the desired pattern. Press each plank firmly into the adhesive to ensure full contact. Use a hand roller or a flooring roller to apply even pressure across the entire surface of the plank, further promoting adhesion. Remove any excess adhesive from the surface of the planks immediately using a damp cloth or sponge. Work methodically, row by row, ensuring proper alignment and tight seams between the planks. Follow the adhesive manufacturer's instructions regarding curing time before allowing foot traffic on the newly installed floor. Protect the floor from heavy furniture or equipment during the curing process.
Consider using a premium-grade adhesive known for its high bond strength and resistance to moisture. These adhesives often contain additives that enhance their performance, particularly in challenging environments. It is always advisable to conduct a small test area to assess the adhesive's compatibility with the concrete substrate and the vinyl plank flooring before proceeding with the entire installation. This test area can help identify any potential issues with adhesion, curing time, or discoloration.
By meticulously following these steps – thorough cleaning and moisture testing, leveling the concrete surface, and selecting the appropriate adhesive and application technique – it is possible to successfully glue vinyl plank flooring onto concrete floors without sanding. Proper preparation and adherence to manufacturer's recommendations are essential for achieving a durable and aesthetically pleasing flooring installation.

How To Prepare A Concrete Floor For Vinyl Flooring Parrys

How To Install Vinyl Flooring On Concrete

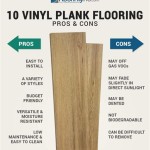
Pros Cons Of Glue Down Flooring Installation Floorset

How To Install Engineered Wood Flooring On Concrete

How To Prepare Concrete For Vinyl Flooring Pwm S

A Beginner S Guide To Installing Vinyl Plank Flooring Dumpsters Com

Laying Vinyl Planks The Right Way Expert Guide By Fantastic Handyman

Glue Wood Flooring To A Concrete Slab Fine Homebuilding

How To Repair Luxury Vinyl Plank Flooring The Palette Muse

Installing Vinyl Plank Flooring Step By Guide
See Also