Essential Aspects of How To Install Engineered Hardwood Flooring Glue
Installing engineered hardwood flooring using glue is a popular choice for homeowners due to its durability, ease of maintenance, and wide range of style options. Follow these essential aspects to ensure a successful installation:
Materials and Tools
- Engineered hardwood flooring
- Wood glue specifically designed for engineered hardwood flooring
- Notched trowel
- Spreader
- Tape measure
- Chalk line
- Circular saw or miter saw
- Nail gun
- Safety glasses
- Gloves
Preparation
Before installing the glue, prepare the subfloor by ensuring it is level, flat, and free of debris. If necessary, use self-leveling compound or plywood to achieve a smooth surface.
Laying the Floor
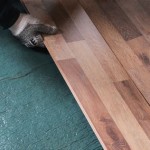
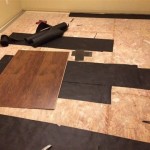
Start from a corner of the room and lay the first row of planks along one wall. Use a chalk line to ensure the planks are straight. Apply glue to the subfloor using a notched trowel, then place the planks on top and press them firmly into place. Use a spacer to maintain a consistent gap between the planks.
Spreading the Glue
Use a spreader to ensure an even distribution of glue on the subfloor. Holding the spreader at a 45-degree angle, apply the glue to the subfloor in sections that are approximately 2 feet wide by 3 feet long.
Installing the Planks
Once the glue is spread, lift a plank from the box and apply a thin bead of glue to the tongue and groove edges. Carefully drop the plank into place on the subfloor and press it down firmly to activate the glue. Use a tapping block and hammer to ensure a snug fit.
Securing the Floor
To enhance stability, use a nail gun to secure the planks to the subfloor. Drive nails through the tongue of the plank at an angle of 45 degrees. Space the nails approximately 6-8 inches apart along the length of the plank.
Finishing Touches
After all the planks are installed, remove the spacers and allow the glue to cure for the recommended time specified by the manufacturer. Then, trim any excess glue around the edges of the room and install baseboards to conceal the expansion gap.
Tips for a Successful Installation
- Read and follow the manufacturer's instructions carefully.
- Acclimate the flooring to the room temperature for several days before installation.
- Wear safety glasses and gloves during the installation process.
- Work in small sections to avoid the glue drying out before you can install the planks.
- Use a level to ensure the floor is even throughout the installation.
- Allow the glue to cure completely before walking on or moving furniture onto the floor.

How To Fit Engineered Wood Flooring Manufacturer

Engineered Hardwood Floors Installation Floor Refinishing New Jersey Repair Sanding

Engineered Hardwood Floors Installation Floor Refinishing New Jersey Repair Sanding

How To Install Diy Glue Down Engineered Hardwood Flooring

How To Glue Down Engineered Wood Flooring Direct

Pros Cons Of Glue Down Flooring Installation Floorset

How To Install Lock Engineered Hardwood Flooring

How To Fit Engineered Wood Flooring Manufacturer

Can You Glue Down Solid Wood Flooring Hardwood Guide Reallyfloors America S Est

How To Install Lock Engineered Hardwood Flooring
See Also