How To Install Glue Down Vinyl Plank Flooring On Wood Subfloor
Glue-down vinyl plank flooring offers a durable, stylish, and relatively easy-to-install option for homeowners looking to upgrade their floors. With a proper understanding of the installation process, you can successfully install glue-down vinyl plank flooring on a wood subfloor, achieving a seamless and long-lasting finish.
This article will guide you through the essential steps involved in installing glue-down vinyl plank flooring on a wood subfloor. We'll delve into the materials needed, the preparation of the subfloor, and the installation process itself. By following these guidelines, you can ensure a successful installation and enjoy the benefits of your new vinyl plank flooring.
Prepare the Subfloor
A well-prepared subfloor is crucial for a successful glue-down vinyl plank installation. Here's how to make sure your subfloor is ready:
-
Clean the subfloor:
Remove any debris, dust, and dirt. Sweep, vacuum, or use a damp mop to clean the subfloor thoroughly. -
Check for moisture:
Glue-down vinyl flooring requires a dry subfloor. Use a moisture meter to ensure the subfloor's moisture content is within the manufacturer's recommended range. -
Level the subfloor:
An uneven subfloor can lead to uneven flooring and instability. Use a leveling compound or shims to correct any significant dips or bumps. -
Repair damaged areas:
Fix any cracks, gaps, or loose boards in the subfloor. Use wood filler or patching compound to fill in gaps and secure loose boards with screws or nails. -
Prime the subfloor:
Apply a primer specifically designed for wood subfloors. This promotes adhesion and ensures a smooth surface for the flooring.
Gather Necessary Materials
Before starting the installation, gather the following materials:
-
Vinyl plank flooring:
Calculate the required amount of flooring, taking into account the room's dimensions and any waste factors. -
Construction adhesive:
Choose an adhesive specifically designed for glue-down vinyl plank flooring. Read the manufacturer's instructions carefully. -
Notched trowel:
Use a notched trowel to apply adhesive evenly to the subfloor. -
Measuring tape and straight edge:
For accurate cutting and layout. -
Utility knife:
For cutting vinyl planks. -
Tapping block and mallet:
To tap the planks into place. -
Spacer wedges:
To maintain consistent spacing between planks. -
Safety equipment:
Wear safety glasses, gloves, and a dust mask during the installation.
Installing the Vinyl Plank Flooring
With your subfloor prepared and materials at hand, you can begin installing your glue-down vinyl plank flooring. Here are detailed instructions:
-
Start in a corner:
Begin in a corner of the room and work your way outward. Place the first plank against the wall, leaving a small expansion gap (typically ¼ inch) between the plank and the wall. -
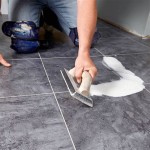
Apply adhesive:
Using the notched trowel, apply a thin layer of adhesive to the subfloor in the area where you will install the plank. Apply adhesive to the back of the plank. -
Secure the plank:
Carefully place the plank on the subfloor, pressing down firmly to ensure good adhesion. You can use a tapping block and mallet to tap the plank into place. -
Continue installation:
Install subsequent planks, aligning them with the previous planks and maintaining the expansion gap along the walls. -
Cut planks as needed:
Measure and cut planks to fit around obstacles, doorways, or corners using a utility knife. You can use a straight edge as a guide for accurate cuts. -
Stagger joints:
To avoid having seams line up in adjacent rows, stagger the ends of the planks. This helps create a more visually appealing and stable floor. -
Maintain spacing:
Use spacer wedges to maintain a consistent expansion gap along walls and between planks. -
Allow for curing:
Once the installation is complete, allow the adhesive to cure for the time specified by the manufacturer. This ensures proper adhesion and a durable floor.
Additional Considerations
Here are some additional points to keep in mind for a successful installation:
-
Read the manufacturer's instructions:
Always refer to the manufacturer's instructions for specific installation recommendations regarding adhesive type, curing time, and other important details. -
Ventilation:
Ensure adequate ventilation in the room during and after installation to allow the adhesive to cure properly. -
Temperature and humidity:
Pay attention to the temperature and humidity levels in the room. Ideal conditions for installing glue-down vinyl plank flooring typically range from 65°F to 85°F and 40% to 60% humidity. -
Professional assistance:
If you are unsure about any aspect of the installation process, consider seeking professional assistance from a flooring installer.
Remember, a well-prepared subfloor, the right materials, and careful installation techniques are key to a successful glue-down vinyl plank flooring installation. By following the steps outlined above, you can enjoy a beautiful and durable flooring solution that will enhance your home's aesthetics for years to come.

Post Nbl Express Eco Flooring

How To Install Gluedown Flooring

How To Install Glue Down Vinyl Plank

Deal Floors Step By Glue Down Vinyl Plank Installation Guide Flooring Blog Ideal In Dallas Fort Worth

How To Install Plank Vinyl Glue Down

Install Glue Down Vinyl Plank Flooring On A Wood Sub Floor Doityourself Com

A Beginner S Guide To Installing Vinyl Plank Flooring Dumpsters Com

How To Install Vinyl Plank Flooring The Home

Floating Vinyl Plank Flooring Vs Glue Down 99cent Floor

How To Install Glue Down Luxury Vinyl Plank Flooring On Osb Sub Floor
See Also