How To Install Laminate Floor Tiles
Laminate flooring offers an attractive, durable, and cost-effective alternative to hardwood or tile. Its click-and-lock installation system makes it a popular choice for DIY enthusiasts. This guide provides a comprehensive overview of the installation process.
Preparation is Key: Gathering Tools and Materials
Before beginning the installation, gather the necessary tools and materials. These typically include laminate flooring, underlayment, measuring tape, utility knife, tapping block, pull bar, spacers, saw (circular saw, jigsaw, or miter saw), safety glasses, and a moisture meter.
Acclimating the Flooring
Laminate flooring needs to acclimate to the room's temperature and humidity for a period specified by the manufacturer. This typically ranges from 48 to 72 hours. Unpack the flooring and lay the planks flat in the room where they will be installed. This prevents warping and buckling after installation.
Assessing the Subfloor
The subfloor must be clean, level, and dry. Sweep or vacuum the subfloor thoroughly to remove any debris. Use a leveling compound to address any unevenness exceeding 3/16” over a 10-foot span. A moisture meter can be used to check for excess moisture. Moisture levels should be within the manufacturer's recommended range.
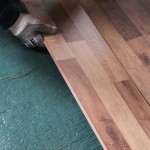
Installing the Underlayment
Underlayment provides cushioning, sound insulation, and a moisture barrier. Roll out the underlayment, ensuring the seams butt together tightly. Secure the seams with underlayment tape. Trim any excess underlayment using a utility knife.
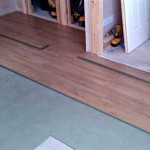
Beginning the Installation: The First Row
Begin installing the laminate flooring in a corner of the room, working from left to right. Place spacers between the wall and the first row of planks to maintain a consistent expansion gap. This gap allows the flooring to expand and contract with changes in temperature and humidity. The recommended gap size is typically ¼ inch.
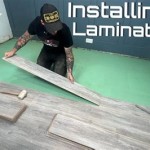
Connecting the Planks: Click and Lock
Laminate flooring utilizes a click-and-lock system for easy installation. Angle the long edge of the next plank into the groove of the previous plank and press down until it clicks into place. Use a tapping block and hammer to gently tap the planks together, ensuring a tight seam. Continue this process across the first row.
Subsequent Rows: Staggering the Seams
To enhance the visual appeal and structural integrity of the floor, stagger the seams between rows. Start the second row with a cutoff piece from the first row, ensuring the seam is at least 6 inches away from the seam in the previous row. Continue this pattern for the remaining rows.
Cutting the Planks
When reaching the end of a row, or when fitting around obstacles like door frames, measure and mark the plank for cutting. Use a saw to make precise cuts. Remember to wear safety glasses when operating power tools.
Utilizing the Pull Bar
For the last few rows, it may be difficult to angle and click the planks into place. A pull bar is designed to pull the planks tight against the wall. Insert the pull bar into the expansion gap and gently tap it with a hammer to secure the final planks.
Finishing Touches: Transitions and Moldings
Transition moldings are used to bridge the gap between laminate flooring and other flooring surfaces, such as carpeting or tile. They create a smooth and professional finish. Install transition moldings according to the manufacturer's instructions.
Doorway Transitions
Use T-moldings to transition between laminate flooring in adjoining rooms or to create a smooth transition between rooms with different floor heights. Carefully measure and cut the T-molding to fit the doorway, securing it in place with adhesive or screws.
Wall Moldings: Baseboards and Quarter Round
Install baseboards or quarter-round molding along the walls to conceal the expansion gap and provide a finished look. Nail the molding to the wall, not the flooring, to allow for the flooring to expand and contract freely.
Post-Installation Care and Maintenance
Regular sweeping or vacuuming will keep the laminate flooring clean and free from debris. Use a damp mop for occasional cleaning. Avoid using excessive water, as it can damage the flooring. Follow the manufacturer's recommendations for cleaning products and maintenance procedures.

How To Install Laminate Flooring For Beginners

Our Step By Guide For Laying Laminate Flooring

How To Install Vinyl Plank Tiles In A Bathroom

Can You Put Laminate Flooring Over Tile Twenty Oak

Diy Install Laminate Flooring With A Pattern Tile

How To Install Laminate Over A Tile Floor 2025 Today S Homeowner

Can You Put Laminate Flooring Over Ceramic Tiles Mellowpine

Wickes How To Lay Laminate Flooring

What S The Easiest Flooring To Install America

How To Install Laminate Flooring Shanty 2 Chic
See Also