How to Install Lifeproof Vinyl Plank Flooring in a Bathroom
Installing Lifeproof vinyl plank flooring in a bathroom is a great way to add style and durability to your space. Lifeproof flooring is 100% waterproof, making it an excellent choice for bathrooms, laundry rooms, and other areas prone to moisture. It is also easy to clean and maintain, making it a great option for busy families.
Here are the steps on how to install Lifeproof vinyl plank flooring in a bathroom:
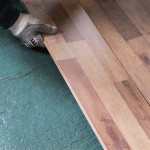
1. Prepare the Subfloor
The first step is to prepare the subfloor. The subfloor must be level, flat, and free of any debris. If the subfloor is not level, you will need to level it using a self-leveling compound. If the subfloor is not flat, you will need to sand it down until it is smooth. Once the subfloor is prepared, you can begin installing the flooring.
2. Install the Underlayment
The next step is to install the underlayment. The underlayment will help to cushion the flooring and reduce noise. It will also help to prevent moisture from seeping into the subfloor. There are several different types of underlayment available, so be sure to choose one that is appropriate for your needs.
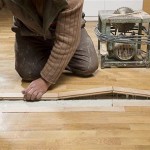
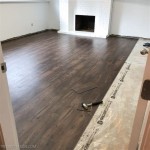
3. Install the Vinyl Plank Flooring
Now you can begin installing the vinyl plank flooring. Start by laying out the planks in a dry fit to ensure that they fit properly. Once you are satisfied with the layout, you can begin gluing the planks down. Be sure to use a high-quality adhesive that is specifically designed for vinyl plank flooring.
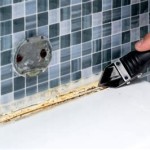
4. Trim the Flooring
Once the flooring is installed, you will need to trim it to fit around the edges of the room. You can use a utility knife to score the flooring and then snap it off. Be sure to wear safety glasses when trimming the flooring.
5. Install the Moldings
The final step is to install the moldings. The moldings will help to finish off the look of the flooring and protect the edges from damage. There are several different types of moldings available, so be sure to choose ones that match the style of your bathroom.
Tips for Installing Lifeproof Vinyl Plank Flooring in a Bathroom
Here are a few tips for installing Lifeproof vinyl plank flooring in a bathroom:
- Be sure to read the manufacturer's instructions carefully before beginning the installation.
- Use a level to ensure that the subfloor is level before installing the flooring.
- Install the underlayment according to the manufacturer's instructions.
- Use a high-quality adhesive that is specifically designed for vinyl plank flooring.
- Trim the flooring to fit around the edges of the room using a utility knife.
- Install the moldings to finish off the look of the flooring and protect the edges from damage.
By following these steps, you can install Lifeproof vinyl plank flooring in your bathroom and enjoy its beauty and durability for years to come.

Installing Vinyl Plank Flooring Lifeproof Waterproof Rigid Core Sustain My Craft Habit

How To Install Vinyl Plank Flooring In A Bathroom Fixthisbuildthat

How To Install Vinyl Plank Flooring In A Bathroom

How To Install Vinyl Plank Flooring In A Bathroom As Beginner Home Renovation

Lifeproof Vinyl Floor Installation Perfect For Kitchens Bathrooms

Installing Vinyl Plank Flooring Lifeproof Waterproof Rigid Core Sustain My Craft Habit

Lifeproof Vinyl Floor Installation Perfect For Kitchens Bathrooms

Installing Vinyl Plank Flooring Lifeproof Waterproof Rigid Core Sustain My Craft Habit

How To Install Vinyl Plank Flooring In A Bathroom

How To Install Vinyl Plank Flooring In A Bathroom Fixthisbuildthat
See Also