How to Install Lifeproof Vinyl Plank Flooring on Concrete
Installing Lifeproof vinyl plank flooring on concrete is a relatively easy and straightforward project that can be completed in a weekend. Vinyl plank flooring is a great option for concrete subfloors because it is durable, waterproof, and easy to clean. It is also a great way to add a touch of style to your home.
Before you begin, you will need to gather the following materials:
* Lifeproof vinyl plank flooring * Underlayment * Moisture barrier * Transition strips * Moldings * Utility knife * Measuring tape * Square * Level * Hammer * Nails * Tape measureOnce you have gathered your materials, you can begin the installation process.
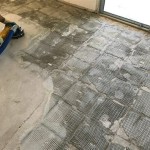
Step 1: Prepare the Concrete Subfloor
The first step is to prepare the concrete subfloor. This involves cleaning the floor to remove any dirt or debris and making sure that the floor is level. If the floor is not level, you will need to level it using a self-leveling compound.
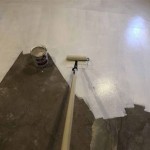
Step 2: Install the Moisture Barrier
Once the subfloor is prepared, you will need to install a moisture barrier. A moisture barrier will help to protect the vinyl plank flooring from moisture damage. To install the moisture barrier, simply roll it out over the subfloor and tape the seams together.
Step 3: Install the Underlayment
The next step is to install the underlayment. The underlayment will help to cushion the vinyl plank flooring and reduce noise. To install the underlayment, simply roll it out over the moisture barrier and tape the seams together.
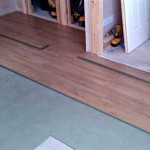
Step 4: Install the Vinyl Plank Flooring
Now it's time to install the vinyl plank flooring. To do this, simply start at one corner of the room and work your way out. Be sure to stagger the joints of the planks so that they do not line up. As you install the planks, tap them together with a hammer until they are flush. You can also use a tapping block to protect the surface of the planks.
Step 5: Install the Transition Strips and Moldings
Once the vinyl plank flooring is installed, you will need to install the transition strips and moldings. Transition strips are used to cover the joints between the vinyl plank flooring and other flooring surfaces, such as carpet or tile. Moldings are used to add a finishing touch to the installation. To install the transition strips and moldings, simply cut them to size and nail them into place.
Step 6: Enjoy Your New Floor!
Your new Lifeproof vinyl plank flooring is now installed and ready to enjoy! Be sure to follow the manufacturer's care instructions to keep your floor looking its best for years to come.

Why We Chose Lifeproof Vinyl Flooring And How To Install It

How To Install Lifeproof Flooring The Home

Tips For Installing Vinyl Plank Over Concrete Floors Lemon Thistle

How To Install Lifeproof Flooring The Home

Why We Chose Lifeproof Vinyl Flooring And How To Install It

How To Install Lifeproof Flooring The Home

Lifeproof Luxury Vinyl Plank Flooring Installation And Subfloor Preparation Tips

Installing Vinyl Plank Flooring How To Fixthisbuildthat

Installing Lifeproof Vinyl Plank Flooring Our Diy Guide Exquisitely Unremarkable

How To Install Vinyl Or Laminate Floors In A Basement Over Concrete Slab
See Also