How To Install Luxury Vinyl Plank Flooring On Wood Subfloor
Luxury vinyl plank flooring (LVP) is a popular choice for homeowners due to its durability, waterproof nature, and stylish appearance. It can mimic the look of natural wood, stone, or tile, offering a range of design options. If you have a wood subfloor, installing LVP is a DIY project that can enhance your home's aesthetics and value.
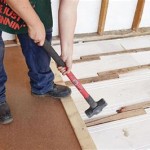
Before embarking on the installation process, it is crucial to ensure that the subfloor is in good condition. Any unevenness, gaps, or loose boards can affect the final results. If necessary, repair or replace damaged subfloor sections.
Preparing the Subfloor
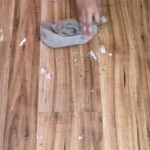
The first step is to thoroughly clean the subfloor, removing dust, dirt, and debris. It is also essential to check for any moisture issues. Moisture can cause warping and damage to the LVP. If moisture is present, address the source and allow the subfloor to dry completely before proceeding.
Next, assess the flatness of the subfloor. You can use a straight edge and a level to check for any significant dips or bumps. If the subfloor is uneven, you can use a leveling compound to create a smooth surface. Ensure the leveling compound is compatible with your subfloor and fully cured before installing the LVP.
Laying Down the Underlayment
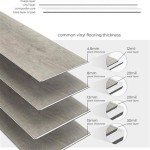
An underlayment is an essential component of LVP installation. It provides cushioning, sound insulation, and moisture resistance. There are various types of underlayment available, including foam, cork, and rubber. Choose an underlayment that is compatible with your LVP and subfloor.
Most LVP manufacturers recommend specific underlayments for their products. Refer to the manufacturer's instructions for the correct underlayment choice. Install the underlayment following the manufacturer's guidelines. You can use a utility knife to trim it precisely.
Installing the Luxury Vinyl Plank Flooring
Once the underlayment is installed, you're ready to begin laying the LVP planks. Begin by determining the starting point for your installation. Most often, you'll want to start from the most visible area of the room.
LVP planks typically have a click-and-lock system for installation. Follow the manufacturer's instructions for the specific interlocking mechanism. Use a tapping block to gently tap the planks together, ensuring a tight and secure fit.
As you install the planks, make sure to leave an expansion gap around the perimeter of the room. This gap is essential to allow for the expansion and contraction of the flooring due to temperature and humidity changes.
Cutting and Finishing
You will need to cut the LVP planks to fit around obstacles and in corners. Use a utility knife or a specialized LVP cutting tool for precise cutting.
Once all the planks are installed, use a trim molding to cover the expansion gap along the perimeter of the room. You can choose from various trim profiles to complement your LVP flooring.
Essential Tools for LVP Installation
To successfully install LVP flooring on a wood subfloor, you'll need the following tools:
- Measuring tape
- Utility knife or LVP cutting tool
- Tapping block
- Level
- Straight edge
- Hammer
- Safety glasses
- Gloves
- Knee pads
You may also want to consider using a moisture meter to ensure the subfloor is dry before installation.
Tips for a Successful Installation
To ensure a successful LVP installation on a wood subfloor, consider these tips:
- Start by laying out the planks in the room to visualize the layout and ensure you have enough material.
- Stager the planks to avoid repeating patterns.
- Use a pencil to mark and pre-cut planks for tight spaces.
- Check the alignment of each plank with a level.
- Leave the expansion gap around the perimeter of the room.
- Avoid walking on the installed LVP until the adhesive has fully cured.
- Use a vacuum cleaner with a brush attachment to clean the flooring after installation.
Installing luxury vinyl plank flooring on a wood subfloor can be a rewarding project, providing a beautiful and functional floor covering for your home. By following these steps and guidelines, you can achieve a professional-looking installation that enhances your living space. Remember, proper preparation and attention to detail are key to a successful outcome.

20 Tips For A Great Vinyl Plank Flooring Installation

How To Prep Wood Subfloor For Luxury Vinyl Plank Flooring Beginners Fix High And Low Spots

How To Install Glue Down Luxury Vinyl Plank Flooring On Osb Sub Floor

How To Install Waterproof Vinyl Plank Flooring Diy Installation

Preparing To Install Luxury Vinyl Flooring A How Guide

How To Install Vinyl Plank Flooring On Plywood Floor

How To Prep Your Sub Floor For Luxury Vinyl Flooring

Lvp Flooring Installation How To Install Luxury Vinyl Plank In A Basement Diy

Preparing Your Sub Floor For Luxury Vinyl Plank Flooring

Full House Luxury Vinyl Plank Flooring Install With No Transitions Lvp How To
See Also