How to Install Pergo Laminate Flooring Easily
Installing Pergo laminate flooring is a great way to upgrade your home's appearance without breaking the bank. Pergo is a high-quality laminate flooring that is durable, easy to clean, and comes in a variety of styles to match any décor. In this article, we will provide you with a step-by-step guide on how to install Pergo laminate flooring easily.
Step 1: Prepare the Subfloor
The first step is to prepare the subfloor. The subfloor must be level, smooth, and dry. If the subfloor is not level, you will need to level it using a self-leveling compound. If the subfloor is not smooth, you will need to sand it down until it is smooth. If the subfloor is not dry, you will need to dry it out using a dehumidifier.
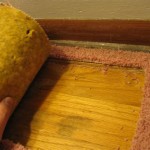
Step 2: Install the Underlayment
Once the subfloor is prepared, you will need to install the underlayment. The underlayment is a thin layer of foam or cork that helps to protect the laminate flooring from moisture and noise. The underlayment is installed by rolling it out over the subfloor and taping the seams together.
Step 3: Install the First Row of Planks
The next step is to install the first row of planks. Start by measuring the width of the room and cutting the first plank to the correct length. Then, place the first plank in the corner of the room and secure it with a nail or staple. Continue installing the first row of planks by snapping them together and securing them with nails or staples.
Step 4: Install the Remaining Rows of Planks
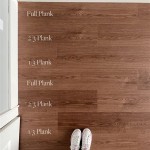
Once the first row of planks is installed, you can install the remaining rows of planks by snapping them together and securing them with nails or staples. Be sure to stagger the joints between the rows of planks to create a more durable floor.
Step 5: Trim the Planks
Once all of the planks are installed, you will need to trim the planks around the edges of the room. To do this, use a utility knife to score the planks along the edges of the room and then snap them off.
Step 6: Install the Moldings
The final step is to install the moldings. The moldings are installed around the edges of the room to cover the gaps between the planks and the wall. The moldings are installed by nailing or stapling them to the wall.
Tips for Installing Pergo Laminate Flooring
- Make sure to acclimate the planks to the room temperature for at least 24 hours before installing them.
- Use a tapping block to help you snap the planks together.
- Be sure to stagger the joints between the rows of planks.
- Trim the planks around the edges of the room using a utility knife.
- Install the moldings around the edges of the room to cover the gaps between the planks and the wall.

Floor Installation

Installing Laminate Flooring For The First Time Crafted Work

How To Install Hardwood Flooring Pergo

How To Install Pergo Flooring Easy Diy From Start Finish

How To Install Pergo Laminate Flooring

How To Install Pergo Flooring Easy Diy From Start Finish

How To Install Pergo Flooring Chapter 5 Installing Joint

Installing Laminate Flooring For The First Time Home Renovation 8 Steps With S Instructables

Installing Laminate Flooring For The First Time Home Renovation 8 Steps With S Instructables

How To Install Pergo Laminate Flooring Rock Solid Rustic
See Also