How to Install Plywood on a Concrete Floor: A Step-by-Step Guide
Transforming your concrete flooring with the warmth and versatility of plywood can elevate the aesthetics and functionality of your space. Installing plywood on concrete requires thoughtful preparation and precise execution, but the process is well within reach for dedicated DIY enthusiasts. Follow this comprehensive guide to achieve a sturdy and professional-looking plywood installation on your concrete floor.
Step 1: Gather Your Materials and Tools
Before embarking on the installation process, ensure you have all the necessary materials and tools. You will need:
*Step 2: Prepare the Concrete Surface
A smooth and level concrete surface is crucial for a successful plywood installation. Start by removing any debris, dirt, or loose material from the floor. Fill any cracks or uneven areas with a concrete leveling compound. Allow the compound to dry completely before proceeding.
Step 3: Install Underlayment (Optional)
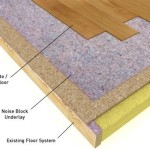
If desired, install an underlayment layer over the concrete surface. This step helps absorb sound and enhance the insulation properties of your floor. Roll out the underlayment and cut it to fit the floor space. Tape the seams to prevent it from shifting.
Step 4: Cut and Position the Plywood
Measure the concrete floor and cut the plywood panels to the desired size. Use a saw suitable for cutting plywood, such as a circular saw or a miter saw. Position the plywood panels on the prepared surface, leaving a small expansion gap around the edges. This gap will allow the plywood to expand and contract with changes in temperature and humidity.
Step 5: Secure the Plywood
Using a concrete drill bit, pre-drill pilot holes through the plywood and into the concrete. The pilot holes should be slightly smaller than the diameter of the concrete screws. Drive the screws into the pilot holes, ensuring they are flush with the surface of the plywood. Space the screws evenly throughout the plywood, typically every 6 to 8 inches.
Step 6: Check for Level and Adjust
Once the plywood is secured, use a level to check its flatness. If any uneven areas are detected, adjust the height of the screws or add shims beneath the plywood to level it out. Continue checking and adjusting until the entire plywood surface is level.
Step 7: Seal the Edges
Seal the edges of the plywood with caulk or wood filler to prevent moisture from seeping in between the plywood and the concrete. Apply the sealant to the gaps around the edges, including where the plywood meets walls or other obstacles.
Step 8: Finishing Touches
Sand any rough edges or splinters on the plywood for a smooth and professional finish. You can now install flooring or other coverings over the plywood, such as carpet, hardwood, or laminate flooring.
Tips for Success:
*
Installing Wood Flooring Over Concrete Diy

How To Install A Wood Subfloor Over Concrete Rona

Installing Wood Subfloors Over Concrete Hardwood Floors

How To Install A Barn Board Floor Over Concrete Tutorial Diy Passion

Q A Solid Wood Floors Over Concrete Slabs Jlc

Concrete Over Plywood Upgrade Wood Subfloor Into

Breakfast Room Progress Plywood Subfloor Installed Over Concrete Slab For Nail Down Solid Hardwood Flooring Addicted 2 Decorating

Breakfast Room Progress Plywood Subfloor Installed Over Concrete Slab For Nail Down Solid Hardwood Flooring Addicted 2 Decorating

How To Install A Wood Subfloor Over Concrete Rona

How To Install Concrete Over Plywood Part 1 4
See Also


