How To Install PVC Garage Floor Tiles
PVC garage floor tiles offer a durable, attractive, and easy-to-install flooring solution. They provide excellent protection against stains, impacts, and moisture, making them ideal for garage environments. This guide outlines the process of installing PVC garage floor tiles, ensuring a successful and long-lasting result.
Preparation is Key: Before beginning the installation process, proper preparation of the existing garage floor is crucial. This ensures optimal tile adhesion and prevents issues down the line.
Cleaning the Floor: The garage floor must be thoroughly cleaned to remove any dirt, debris, oil stains, or grease. A degreaser specifically designed for concrete is recommended. Allow the floor to dry completely after cleaning.
Repairing Cracks and Imperfections: Any cracks, chips, or imperfections in the concrete should be repaired using a suitable concrete patching compound. Follow the manufacturer's instructions for the patching compound and allow adequate drying time before proceeding.
Measuring and Planning: Accurate measurements of the garage floor are essential for determining the number of tiles required. Measure the length and width of the garage and multiply these figures to calculate the total square footage. Consider adding 5-10% extra to account for cuts and waste.
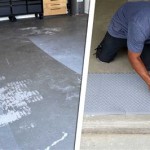
Checking for Moisture: Excess moisture can negatively impact tile adhesion. A moisture test can be performed by placing a plastic sheet on the concrete for 24 hours. Condensation under the plastic indicates potential moisture issues that need to be addressed before installation.
Gathering Necessary Tools and Materials: Having the right tools and materials readily available streamlines the installation process. Essential items include the PVC garage floor tiles, a rubber mallet, a tape measure, a level, a utility knife or tile cutter, safety glasses, and work gloves.
Starting the Installation: Once the preparatory steps are complete, the tile installation can begin. Carefully planning the layout minimizes cuts and ensures a professional finished look.
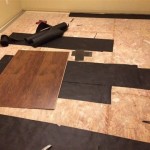
Dry Laying the Tiles: Start by dry laying a few rows of tiles to determine the best starting point and pattern. This allows for adjustments before applying any adhesive and helps visualize the final layout.
Establishing a Straight Line: A straight line should be established as a guide for the first row of tiles. This can be achieved using a chalk line or a straight edge.
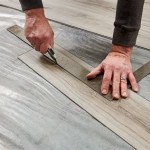
Interlocking the Tiles: Most PVC garage floor tiles feature an interlocking system. Start in a corner and work outward, carefully aligning and interlocking the tiles. A rubber mallet can be used to gently tap the tiles into place, ensuring a tight fit.
Cutting Tiles as Needed: Tiles will likely need to be cut to fit around walls, columns, or other obstacles. A utility knife or tile cutter can be used to score and snap the tiles. Ensure accurate measurements before cutting.
Addressing Difficult Areas: Areas around pipes or irregular shapes may require more intricate cutting. Cardboard templates can be helpful in achieving accurate cuts in these situations.
Continuing the Installation: Continue laying the tiles row by row, ensuring they are tightly interlocked and aligned. Regularly check for levelness and adjust as needed.
Allowing for Expansion and Contraction: PVC tiles can expand and contract slightly with temperature changes. Leave a small expansion gap (approximately ¼ inch) around the perimeter of the garage floor. This gap can be covered with baseboard or trim.
Post-Installation Considerations: Once the installation is complete, certain post-installation steps are recommended to ensure optimal performance and longevity.
Avoiding Heavy Traffic: Avoid heavy traffic or placing heavy objects on the newly installed tiles for at least 24 hours to allow the tiles to settle properly.
Regular Cleaning and Maintenance: Regular sweeping and occasional mopping with a mild detergent will keep the floor clean and maintain its appearance. Avoid harsh chemicals or abrasive cleaners that could damage the tile surface.
Addressing Spills Promptly: Spills should be cleaned up promptly to prevent staining. A damp cloth or mop is typically sufficient for most spills.
Protecting Against Heavy Objects: When placing heavy objects on the tiles, consider using protective mats or padding to prevent scratches or damage.
By following these steps, a successful and long-lasting PVC garage floor tile installation can be achieved, transforming the garage into a more functional and aesthetically pleasing space.

How To Install Plastic Garage Flooring Raised Tile Floor Guide

How To Install Garage Floor Tiles The Ultimate Flooring

How To Install Interlocking Garage Floor Tiles Locktile Pvc Tileslocktile

How To Install Pvc Garage Floor Tiles Style

Garage Floor Installation Guide Tiles Rolls And

Here S How You Fit Interlocking Garage Floor Tiles Step By Quick Easy Gftc

How Is This Garage Floor Holding Up Months After The Installation

Why Choose Pvc Flooring For Your Home Gym Garage Floor Tile Company

Flexible Pvc Garage Floor Tiles Heavy Duty Anti Slip Coin Work Tile

How To Install Warehouse Flooring Tiles
See Also