How To Install Self Adhesive Vinyl Tile Flooring On Concrete
Self-adhesive vinyl tile flooring is a great way to update your home's décor without breaking the bank. It's easy to install, even for beginners, and it can be used in any room of the house. Here's a step-by-step guide on how to install it. ### Materials you'll need: - Self-adhesive vinyl tiles - Measuring tape - Utility knife - Straight edge - Grout float or trowel - Grout ### Step 1: Prepare the concrete floor The first step is to prepare the concrete floor. Make sure the floor is clean and free of any dirt, dust, or debris. You can use a broom or vacuum cleaner to remove any loose particles. If the floor is not level, you may need to level it using a self-leveling compound. ### Step 2: Measure and mark the layout Next, you need to measure and mark the layout of the tiles. Start by measuring the length and width of the room. Then, divide the length and width by the size of the tiles to determine how many rows and columns you'll need. Mark the layout of the tiles on the floor using a pencil or chalk line. ### Step 3: Cut the tiles Once you have marked the layout, you can start cutting the tiles. Use a utility knife and a straight edge to cut the tiles to the desired size. Be careful not to cut the tiles too small, as they will not fit properly. ### Step 4: Apply the adhesive Peel off the backing of the tile and apply the adhesive to the back of the tile. Use a grout float or trowel to spread the adhesive evenly over the back of the tile. ### Step 5: Install the tiles Place the tile in the desired location and press it firmly into place. Use a roller to roll over the tile to ensure that it is securely adhered to the floor. ### Step 6: Grout the tiles Once all of the tiles have been installed, you can grout them. Use a grout float or trowel to apply the grout to the joints between the tiles. Work the grout into the joints until they are completely filled. ### Step 7: Clean the floor Once the grout has dried, you can clean the floor. Use a damp mop to wipe away any excess grout or adhesive. ### Tips for installing self-adhesive vinyl tile flooring on concrete - Make sure the concrete floor is clean and free of any dirt, dust, or debris. - Measure and mark the layout of the tiles carefully before cutting them. - Cut the tiles to the desired size using a utility knife and a straight edge. - Apply the adhesive to the back of the tile and press it firmly into place. - Use a roller to roll over the tile to ensure that it is securely adhered to the floor. - Grout the tiles using a grout float or trowel. - Clean the floor using a damp mop once the grout has dried.
How To Install L And Stick Vinyl Tile On Concrete Floor Self Installation

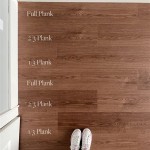
How To Install L And Stick Vinyl Tiles Houseful Of Handmade

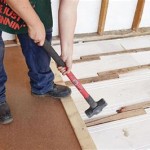
How To Prepare A Concrete Floor Lay L Stick Vinyl Flooring Help

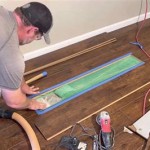
How To Install L And Stick Vinyl Plank Flooring The Nifty Nester

How To Install L And Stick Vinyl Plank Flooring Floor Preparation

Installing Vinyl Floor Tile On Cement Garage Basement

How To Install L And Stick Tiles For Basement Flooring The Home

Installing L Stick Tile On Cement Surface

How To Prepare A Concrete Floor For Vinyl Flooring Parrys

Installing Self Adhesive Vinyl Tiles Over Concrete Doityourself Com
See Also