How To Install Tile On Basement Concrete Floor
Installing tile on a basement concrete floor can significantly enhance the aesthetic appeal and functionality of the space. A well-tiled basement floor provides durability, moisture resistance, and ease of maintenance, making it a popular choice for homeowners seeking to transform their basements into livable areas.
The process, while achievable for competent DIY enthusiasts, requires careful planning, meticulous preparation, and precise execution to ensure a long-lasting and visually pleasing result. This article outlines the essential steps involved in successfully installing tile on a basement concrete floor, guiding readers through each stage of the project with detailed instructions and best practices.
Preparing the Concrete Subfloor
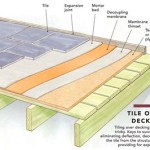
The foundation of a successful tile installation lies in the proper preparation of the concrete subfloor. A clean, level, and structurally sound surface is paramount for ensuring the tile adheres correctly and avoids issues such as cracking or unevenness in the future. This phase is arguably the most crucial, as any deficiencies in the subfloor will directly impact the final outcome.
The initial step involves thoroughly cleaning the concrete floor. This requires removing all debris, including dust, dirt, paint residue, adhesive remnants, and any other contaminants. A combination of sweeping, vacuuming, and scrubbing with a suitable cleaning solution may be necessary. For stubborn stains or adhesive, specialized cleaning agents designed for concrete preparation are available at most hardware stores.
Following the cleaning, a comprehensive inspection of the concrete floor is essential. Look for any cracks, holes, or uneven areas. Small cracks (less than 1/8 inch wide) can often be filled with a concrete crack filler specifically formulated for this purpose. Larger cracks (greater than 1/8 inch wide) may indicate structural issues and should be evaluated by a professional before proceeding. Holes and significant depressions can be filled with a concrete patching compound, following the manufacturer's instructions for application and curing time.
Leveling the concrete floor is another critical step. Even slight variations in level can lead to uneven tile installation and potential problems down the line. A self-leveling concrete compound is typically used for this purpose. This compound is mixed according to the manufacturer's instructions and poured onto the concrete floor. It will then flow and self-level, creating a smooth and even surface. Allow the self-leveling compound to cure completely before proceeding to the next stage.
After the self-leveling compound has cured, it is advisable to apply a concrete primer. The primer enhances the adhesion between the concrete floor and the thin-set mortar, which is used to set the tiles. Choose a primer specifically designed for tile installation on concrete floors and apply it according to the manufacturer's directions. The primer will also help to prevent moisture from migrating from the concrete into the tile assembly.
Laying Out the Tile
Proper layout is essential for achieving a visually appealing and professional-looking tile installation. A well-planned layout minimizes tile cuts, avoids awkward small pieces, and ensures a balanced and symmetrical appearance. This stage requires patience and careful consideration to achieve the desired aesthetic.
Begin by measuring the dimensions of the basement floor's usable area. Determine the center point of the room by finding the midpoint of each wall and drawing intersecting lines across the floor. The intersection of these lines marks the center point.
Dry-lay the tiles, starting from the center point and working outwards. This involves placing the tiles on the floor without mortar to visualize the final layout and identify any potential issues. Use tile spacers to maintain consistent grout lines between the tiles. This dry run will allow you to assess the need for cuts, adjust the layout to minimize small pieces, and ensure the overall appearance is satisfactory.
Consider the placement of full tiles and cut tiles. It is generally preferable to have full tiles in prominent areas and cut tiles along the edges or in less visible locations. If possible, adjust the starting point to minimize the need for very small tile cuts along the walls.
Mark the tile layout on the floor using a pencil or chalk. These guidelines will serve as a reference during the actual tile installation process, ensuring accurate placement and consistent grout lines.
Once the layout is finalized, carefully remove the dry-laid tiles, keeping in mind the order in which they were placed. This will help facilitate the actual installation process.
Applying Thin-Set Mortar and Setting the Tiles
The application of thin-set mortar and the subsequent setting of the tiles requires careful attention to detail and adherence to best practices. The goal is to create a strong and durable bond between the tile and the concrete subfloor, ensuring a long-lasting and aesthetically pleasing result.
Prepare the thin-set mortar according to the manufacturer's instructions. Use a mixing drill with a paddle attachment to achieve a smooth and consistent consistency. The mortar should be neither too wet nor too dry, resembling a thick peanut butter consistency.
Apply the thin-set mortar to a small section of the floor using a notched trowel. The size of the notch on the trowel will depend on the size of the tile being used. Consult the tile and thin-set mortar manufacturers' recommendations for the appropriate trowel size. Hold the trowel at a 45-degree angle and apply the mortar in a consistent direction, creating ridges.
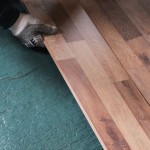
Place the tiles onto the mortar, pressing firmly and twisting slightly to ensure good contact. Use tile spacers to maintain consistent grout lines. Periodically check the tiles for levelness using a level. If a tile is not level, gently tap it with a rubber mallet to adjust its position.
Continue applying mortar and setting tiles, working in manageable sections. Avoid applying mortar to too large of an area at once, as the mortar can begin to dry out before the tiles are set. Regularly clean any excess mortar from the tile surfaces with a damp sponge.
Allow the thin-set mortar to cure completely according to the manufacturer's instructions. This typically takes 24 to 72 hours, depending on the type of mortar and the ambient temperature and humidity.
Grouting and Sealing the Tile
Grouting fills the spaces between the tiles, providing a finished look and preventing water from penetrating the tile assembly. Sealing the grout further protects it from stains and moisture damage.
Remove the tile spacers after the thin-set mortar has cured. Clean the grout lines thoroughly, removing any debris or mortar residue. Use a grout saw or a utility knife to carefully scrape away any hardened mortar.
Prepare the grout according to the manufacturer's instructions. Choose a grout color that complements the tile color. Apply the grout to the tile surface using a grout float, working it into the grout lines at a 45-degree angle. Ensure that the grout lines are completely filled.
Remove excess grout from the tile surface using a damp sponge. Rinse the sponge frequently in clean water. Avoid using too much water, as this can weaken the grout.
After the initial cleaning, allow the grout to haze over slightly. Then, use a clean, dry cloth to buff the tile surface and remove any remaining grout haze.
Allow the grout to cure completely according to the manufacturer's instructions. This typically takes 24 to 72 hours.
Once the grout has cured, apply a grout sealer to protect it from stains and moisture damage. Apply the sealer according to the manufacturer's instructions, using a brush or applicator. Allow the sealer to dry completely before using the floor.
By following these steps carefully, homeowners can successfully install tile on a basement concrete floor, creating a durable, attractive, and functional space.

How To Install Tile Over Concrete Greenbuildingadvisor
:max_bytes(150000):strip_icc()/can-you-install-tile-directly-on-concrete-1822600-04-458f7bb6c78348c1835cf8054ef36553.jpg?strip=all "How To Install Tile Over Concrete")
How To Install Tile Over Concrete

How To Install Tile In A Basement Washroom Floor On Concrete Like Pro Start Finish

How To Tile A Concrete Basement Floor The Grout Medic

Concrete Basement Floor Tiling Preparation

How To Tile Onto Concrete Floors Porcelain Super

How To Install Tiles On A Concrete Basement Floor Barana

How To Install Tiles On A Concrete Basement Floor Barana

Thermaldry Basement Flooring Systems Waterproof

How To Install L And Stick Tiles For Basement Flooring The Home
See Also