How to Install Tongue and Groove Flooring on Concrete
Tongue and groove flooring offers a versatile and aesthetically pleasing option for various spaces, particularly over concrete subfloors. This type of flooring, renowned for its interlocking design, offers ease of installation and provides a robust surface. While the process may seem daunting, with careful preparation and adherence to proper techniques, installing tongue and groove flooring on concrete can be a rewarding DIY project.
Preparing the Concrete Subfloor
A solid foundation is crucial for successful flooring installation. The concrete subfloor needs to be level, clean, and dry before proceeding. Begin by thoroughly cleaning the surface to remove any debris, dust, or contaminants. A power washer is ideal for this step, ensuring a thorough cleanse. Afterward, allow the subfloor to dry completely.
Next, assess the levelness of the concrete. A level tool will help determine any unevenness. Minor imperfections can be addressed with a self-leveling compound. Larger irregularities may require a more comprehensive leveling solution, such as cement overlay or concrete patching. Ensure the subfloor is completely dry before proceeding to the next stage.
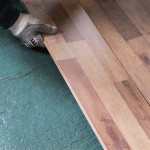
Installing a Moisture Barrier
Concrete flooring can emit moisture, which can damage wood flooring. A moisture barrier is essential to prevent moisture vapor from penetrating the subfloor and impacting the tongue and groove planks. Various types of moisture barriers are available, including:
- Polyethylene Sheeting: A cost-effective option, polyethylene sheeting acts as a barrier against moisture vapor.
- Vapor Retarders: These are more specialized moisture barriers that offer higher resistance to moisture penetration.
- Concrete Sealer: Applied directly to the concrete, a sealer creates a protective layer that prevents moisture from reaching the wood flooring.
The choice of moisture barrier depends on the specific requirements of the project and the humidity levels in the area. Carefully adhere the chosen moisture barrier to the concrete subfloor, ensuring overlaps and seams are properly sealed.
Laying the Tongue and Groove Flooring
The installation process starts with determining the layout of the flooring. For a traditional look, run the planks perpendicular to the longest wall, creating a straight line effect. However, for a more contemporary aesthetic, consider laying the planks diagonally.
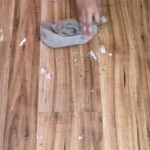
Begin installing the first row of planks along the wall furthest from the entrance. Leave a small gap - about 1/4 inch - between the first row of planks and the wall to allow for expansion and contraction. Secure the first row to the subfloor using nails or screws. When securing planks, avoid fastening them directly over the tongue.
Subsequent rows are installed by interlocking the tongue of each plank into the groove of the previous plank. Tap the planks into place using a rubber mallet, ensuring a tight fit. Maintain a consistent spacing between each plank, using spacers if necessary. Continue installing the planks, working your way across the room until you reach the opposite wall.
For the last row, you'll need to cut planks to fit the remaining space. Use a saw to trim the planks to size and ensure the last row is flush with the wall. Remember to leave a small gap between the last row and the wall to allow for expansion.
Finishing Touches
Once the tongue and groove flooring is installed, you may need to perform some finishing touches to ensure a professional and polished outcome.
For example, you may need to install transitions or moldings around the edges of the room. These serve to cover the gaps between the flooring and other surfaces, such as walls or doorways. When installing transitions and moldings, ensure that they are level and properly secured.
After the flooring is installed, it's important to apply a sealant or finish to protect the wood from scratches, stains, and moisture. Choose a sealant or finish that's compatible with the type of wood used for your tongue and groove flooring. Apply the sealant or finish according to the manufacturer's instructions.
Finally, clean the flooring thoroughly to remove any dust or debris left behind from the installation process. This will ensure that you enjoy the beauty and durability of your new tongue and groove flooring for years to come.

Installing Wood Flooring Over Concrete Diy

Installing Hardwood Floors On Concrete Subfloors

Installing Engineered Hardwood On Concrete Twenty Oak

Junckers Laying A Floor Over Batons

Q A Solid Wood Floors Over Concrete Slabs Jlc

Installing Engineered Hardwood On Concrete Twenty Oak

5 Essential Tips For Tongue And Groove Flooring District Floor

Hardwood Over Concrete Auten Wideplank Flooring

How To Install Tongue And Groove Flooring Blog

Tongue Groove Flooring Installation On Underlay Start To Finish
See Also