How To Install Vinyl Floor Tiles In Bathroom
Vinyl floor tiles are a popular choice for bathrooms because they are durable, waterproof, and easy to clean. They are also available in a wide variety of colors and styles, so you can find the perfect match for your bathroom décor.
Installing vinyl floor tiles in your bathroom is a relatively easy project that you can do yourself with a few simple tools and materials. Here are the steps on how to install vinyl floor tiles in bathroom:
1. Prepare the subfloor
The first step is to prepare the subfloor by making sure it is clean, level, and dry. If the subfloor is not level, you will need to level it using a self-leveling compound.
2. Install the underlayment
Once the subfloor is prepared, you can install the underlayment. The underlayment will help to cushion the vinyl floor tiles and make them more comfortable to walk on.
3. Lay out the tiles
Before you start installing the tiles, you will need to lay them out on the floor to make sure they fit properly. Start by laying out the tiles in the center of the room and work your way out. Make sure to leave a 1/4-inch gap around the perimeter of the room for expansion.
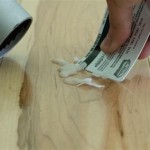
4. Apply the adhesive
Once the tiles are laid out, you can apply the adhesive. Use a notched trowel to apply the adhesive to the back of each tile. Make sure to spread the adhesive evenly and to avoid getting any on the top of the tile.
5. Install the tiles
Once the adhesive has been applied, you can start installing the tiles. Start by pressing the first tile into place in the center of the room. Then, work your way out, pressing each tile into place next to the previous one. Use a tapping block to tap the tiles into place and to ensure that they are level.
6. Trim the tiles
Once all of the tiles are installed, you will need to trim the tiles around the perimeter of the room. Use a utility knife to score the tiles and then snap them off.
7. Grout the tiles
Once the tiles are trimmed, you can grout the tiles. Use a grout float to apply the grout to the joints between the tiles. Make sure to press the grout into the joints and to remove any excess grout.
8. Seal the tiles
Once the grout has dried, you can seal the tiles. Use a tile sealer to apply a protective coating to the tiles. This will help to protect the tiles from stains and wear.
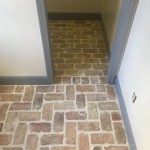
9. Enjoy your new floor!
Once the tiles are sealed, you can enjoy your new vinyl floor tiles in bathroom. Vinyl floor tiles are a durable, waterproof, and easy-to-clean choice for bathrooms. They are also available in a wide variety of colors and styles, so you can find the perfect match for your bathroom décor.

How To Install Vinyl Plank Flooring In A Bathroom

How To Install Vinyl Plank Flooring In A Bathroom Fixthisbuildthat

How To Install Vinyl Plank Floors In A Bathroom Over Tile

How To Lay Vinyl Floor In A Bathroom Dove Cottage

How To Install Sheet Vinyl Floor Decor Adventures

How To Install Vinyl Plank Flooring In A Bathroom Fixthisbuildthat

How To Install Vinyl Plank Floors In A Bathroom Over Tile

How We Installed Our Press And Stick Vinyl Floor Tiles

Install L And Stick Vinyl Floor Planks In The Bathroom More To Mrs E

How To Install Vinyl Sheet Flooring A Erfly House
See Also