How to Install Vinyl Flooring in a Bathroom
Vinyl flooring is a popular choice for bathrooms due to its water resistance, durability, and relatively affordable price point. Installing vinyl flooring in a bathroom can be a manageable DIY project, provided careful preparation and attention to detail are exercised. This article provides a comprehensive guide to installing vinyl flooring in a bathroom, covering the necessary steps from assessing the subfloor to applying the finishing touches.
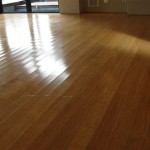
Before embarking on the installation process, it is crucial to select the appropriate type of vinyl flooring. Sheet vinyl, vinyl tile, and luxury vinyl planks (LVP) are all viable options, each possessing distinct characteristics. Sheet vinyl offers the benefit of fewer seams, minimizing the potential for water penetration. Vinyl tile provides greater design flexibility and allows for easier replacement of individual damaged tiles. LVP replicates the appearance of hardwood or stone and offers enhanced durability. The choice should be based on aesthetic preferences, budget constraints, and the specific requirements of the bathroom environment.
Proper preparation is paramount to a successful vinyl flooring installation. This includes a thorough assessment of the subfloor, ensuring it is clean, level, and free of moisture. Any existing flooring must be removed, and repairs made to any damaged or uneven areas of the subfloor. Neglecting subfloor preparation can lead to problems such as uneven flooring, bubbling, and premature wear and tear.
Key Point 1: Subfloor Preparation
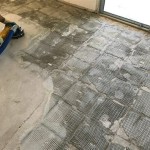
Subfloor preparation is arguably the most critical step in the entire vinyl flooring installation process. The quality of the subfloor directly impacts the longevity and appearance of the finished flooring. Begin by removing all existing flooring materials, including tiles, linoleum, or carpet. Use a scraper or pry bar to carefully lift the old flooring, taking care not to damage the subfloor beneath. Once the old flooring is removed, thoroughly inspect the subfloor for any signs of damage, such as cracks, holes, or water stains.
If cracks or holes are present, they should be filled with a cement-based patching compound. Apply the compound according to the manufacturer's instructions, ensuring it is level with the surrounding surface. Allow the patching compound to dry completely before proceeding. For larger areas of damage or unevenness, a self-leveling compound may be necessary. Self-leveling compounds are typically poured over the subfloor and allowed to spread, creating a smooth and even surface. Follow the manufacturer's instructions carefully when using self-leveling compounds, as they can set quickly and require specific application techniques.
Once any repairs are made, thoroughly clean the subfloor to remove any dust, debris, or adhesive residue. Use a vacuum cleaner or broom to sweep the entire surface, paying particular attention to corners and edges. For stubborn adhesive residue, a solvent-based adhesive remover may be necessary. Apply the adhesive remover according to the manufacturer's instructions and allow it to sit for the recommended time before scraping it away. After cleaning, ensure the subfloor is completely dry before proceeding with the vinyl flooring installation.
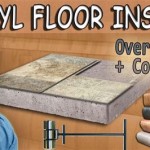
In some cases, it may be necessary to install a new underlayment over the subfloor. Underlayment provides a smooth, even surface for the vinyl flooring and can also offer added cushioning and sound insulation. Choose an underlayment specifically designed for use with vinyl flooring and install it according to the manufacturer's instructions. Typically, underlayment is rolled out and stapled or glued to the subfloor. Ensure the underlayment is properly aligned and that there are no gaps or overlaps. A properly prepared subfloor will provide a solid foundation for the vinyl flooring, ensuring a long-lasting and aesthetically pleasing result.
Moisture testing is also crucial. High moisture levels can cause adhesive failure and promote mold growth beneath the vinyl flooring. A moisture meter can be used to assess the moisture content of the subfloor. If moisture levels are elevated, remediation steps must be taken before installing the vinyl.
Measure the bathroom accurately, including any alcoves or offsets. Transfer these measurements to the vinyl flooring material, whether it is a sheet, tile, or planks. It is recommended to add a few extra inches to the measurements to account for any errors or irregularities in the room.
Key Point 2: Cutting and Fitting the Vinyl Flooring
Accurate cutting and fitting are essential for achieving a professional-looking vinyl flooring installation. The techniques used will vary depending on the type of vinyl flooring being installed, but the principles of precision and careful measurement remain the same. For sheet vinyl, it is typically necessary to create a template of the bathroom floor. This can be done using kraft paper or builder's paper. Overlap the paper sheets and tape them together to create a template that covers the entire floor area. Carefully trace the outline of the room onto the paper, paying attention to any corners, doorways, or fixtures.
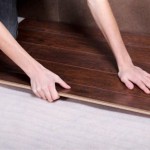
Once the template is complete, transfer it to the sheet vinyl. Place the template on the vinyl and trace the outline using a marker or pencil. Use a sharp utility knife to cut the vinyl along the traced lines. It is important to use a new blade for each cut to ensure clean and precise results. When cutting around curved surfaces, such as toilet bases or pipes, make small, incremental cuts to avoid tearing the vinyl. After cutting the vinyl, test-fit it in the bathroom to ensure it fits properly. Make any necessary adjustments before applying the adhesive.
For vinyl tiles and planks, the cutting process is slightly different. These materials are typically scored and snapped or cut with a utility knife. Use a straight edge to guide the knife and ensure clean, straight cuts. When cutting around obstacles, such as pipes or corners, use a jigsaw or coping saw for greater precision. It is often helpful to create a template of the obstacle using cardboard or paper and then transfer the template to the vinyl tile or plank. Remember to always cut slightly larger than necessary, as it is easier to trim away excess material than to add it back.
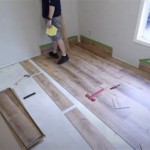
When installing vinyl tiles or planks, it is important to plan the layout carefully. Start by finding the center of the room and marking it with chalk lines. This will help ensure that the tiles or planks are aligned properly and that the pattern is symmetrical. When installing tiles, use spacers to maintain consistent gaps between each tile. For planks, follow the manufacturer's instructions regarding the recommended joint offset. This will help create a more visually appealing and structurally sound floor.
It is also crucial to consider the expansion and contraction of the vinyl flooring. Vinyl flooring can expand and contract slightly with changes in temperature and humidity. To accommodate this, it is necessary to leave a small gap around the perimeter of the room. This gap can be covered later with baseboards or quarter-round molding. By carefully cutting and fitting the vinyl flooring, you can create a seamless and professional-looking installation that will enhance the beauty and durability of your bathroom.
Ensure the cut vinyl aligns with the walls and fixtures. Any trimming should be done carefully, using a sharp utility knife. For irregular shapes around pipes or toilet flanges, utilize a template or a compass to precisely cut the vinyl. Proceed with the installation only after confirming a precise fit.
The adhesive is applied based on the manufacturer's instructions. For sheet vinyl, a full spread of adhesive is generally required, while vinyl tiles or planks may only require adhesive around the perimeter or in specific areas. Utilize a notched trowel to apply the adhesive evenly across the prepared subfloor.
Key Point 3: Applying Adhesive and Setting the Vinyl
The application of adhesive is a critical step that directly impacts the long-term performance and appearance of the vinyl flooring. The type of adhesive used will depend on the type of vinyl flooring being installed, as well as the manufacturer's recommendations. Carefully read and follow the adhesive manufacturer's instructions regarding application techniques, drying times, and safety precautions. For sheet vinyl, a full-spread adhesive is typically required. This means that the adhesive is applied to the entire surface of the subfloor, creating a strong bond between the vinyl and the underlying surface.
Use a notched trowel to spread the adhesive evenly across the subfloor. The size and shape of the notches on the trowel will determine the thickness of the adhesive layer. Consult the adhesive manufacturer's instructions to determine the appropriate trowel for the specific product being used. Apply the adhesive in a consistent and uniform manner, ensuring that there are no gaps or puddles. Once the adhesive is applied, allow it to tack up for the recommended time before placing the vinyl flooring. Tacking up refers to the process of allowing the adhesive to partially dry, becoming sticky to the touch. This allows the vinyl to bond more effectively with the adhesive.
When installing the vinyl, start at one edge of the room and gradually work your way across, pressing the vinyl firmly into the adhesive. Use a floor roller to smooth out any bubbles or wrinkles and ensure that the vinyl is fully adhered to the subfloor. Pay particular attention to the seams, ensuring that they are tightly butted together and that there are no gaps. For vinyl tiles and planks, the adhesive application may vary. Some products require a full-spread adhesive, while others only require adhesive around the perimeter or in specific areas. Follow the manufacturer's instructions carefully to ensure proper bonding.
When installing vinyl tiles or planks, start by aligning the first tile or plank with the chalk lines that were previously marked on the floor. Press the tile or plank firmly into the adhesive, ensuring that it is properly aligned and that the edges are flush with the adjacent tiles or planks. Use a rubber mallet to gently tap the tiles or planks into place, creating a tight and secure bond. Throughout the installation process, periodically check the alignment of the tiles or planks to ensure that the pattern remains consistent. Wipe away any excess adhesive immediately with a damp cloth. Allowing the adhesive to dry on the surface of the vinyl can make it difficult to remove and can damage the finish.
After the vinyl flooring is installed, allow the adhesive to cure completely before walking on the floor or placing any furniture. The curing time will vary depending on the type of adhesive used and the environmental conditions. Consult the adhesive manufacturer's instructions for specific curing recommendations. By carefully applying the adhesive and setting the vinyl flooring, you can ensure a strong, durable, and long-lasting installation that will enhance the beauty and functionality of your bathroom.
After applying the adhesive, carefully position the vinyl sheet, tile, or planks onto the adhesive. For sheet vinyl, start from one edge and gradually unroll the sheet, pressing it firmly into the adhesive. Use a floor roller to ensure a uniform bond and to remove any air pockets. For tiles or planks, align them according to the planned layout, pressing each piece firmly into the adhesive.
Once the adhesive has cured according to the manufacturer's instructions, install baseboards and quarter-round molding to conceal the perimeter gap and to provide a finished look. Choose moisture-resistant materials for these trim pieces to prevent water damage. Caulk any gaps between the baseboards and the vinyl flooring to further prevent water from seeping behind the trim.
Finally, seal the perimeter of the flooring with a silicone-based caulk. This creates a waterproof barrier that prevents water from seeping under the vinyl and damaging the subfloor. Choose a caulk color that matches the vinyl flooring or the baseboards for a seamless appearance.
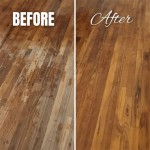
Following these steps carefully will allow for a successful installation of vinyl flooring in a bathroom, creating a durable, water-resistant, and aesthetically pleasing surface.

How To Install Vinyl Plank Flooring In A Bathroom Fixthisbuildthat

How To Lay Vinyl Floor In A Bathroom Dove Cottage

How To Install Vinyl Plank Flooring In A Bathroom

How To Install Vinyl Plank Flooring In A Bathroom Fixthisbuildthat

How To Install Sheet Vinyl Floor Decor Adventures

How To Install Vinyl Plank Floors In A Bathroom Over Tile

Installing Vinyl Plank Flooring Lifeproof Waterproof Rigid Core Sustain My Craft Habit

How To Install Vinyl Sheet Flooring A Erfly House

How To Install Sheet Vinyl Floor Decor Adventures

Dos And Don Ts For Installing Vinyl Plank Floors In The Bathroom Advice Homeowners
See Also