How to Effortlessly Install Vinyl Flooring on Ceramic Tile
Transforming your floors with the allure of vinyl flooring while preserving the integrity of your existing ceramic tiles is a rewarding home improvement project. Here's a comprehensive guide to help you successfully install vinyl flooring over ceramic tile, ensuring a seamless and durable upgrade for your space.
Essential Preparations:
1. Surface Assessment: Before embarking on the installation, meticulously inspect the ceramic tile surface for any imperfections. Loose or cracked tiles must be replaced, and uneven areas leveled using a self-leveling compound or floor patch.
2. Cleaning and Degreasing: Thoroughly clean the ceramic tiles with a heavy-duty cleaner to remove dirt, dust, and grease. Pay attention to the grout lines and use a degreaser to eliminate any remaining residue.
Materials and Tools Required:
Gather all the necessary materials and tools for a smooth installation process:
- Vinyl flooring planks or tiles
- Underlayment
- Adhesive specifically designed for vinyl flooring installation
- Spacers
- Utility knife
- Measuring tape
- Tapping block or rolling pin
Installation Procedure:
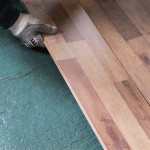
1. Underlayment Installation: Roll out the underlayment over the prepared ceramic tile surface, ensuring it is smooth and free of wrinkles. Secure the underlayment with tape or adhesive where necessary.
2. Vinyl Flooring Planking: Start laying the vinyl flooring planks or tiles in a straight line along one wall. Use spacers to maintain consistent spacing between planks and ensure a professional finish.
3. Adhesive Application: Apply the vinyl flooring adhesive to the back of each plank or tile according to the manufacturer's instructions. Use a notched trowel to spread the adhesive evenly, avoiding excessive application.
4. Plank Placement: Carefully place the vinyl flooring plank or tile onto the adhesive-covered surface. Press down firmly to secure it and tap it into place using a tapping block or rolling pin.
5. Continue Installation: Continue laying the vinyl flooring planks or tiles in the same manner, ensuring proper alignment and spacing. Trim any excess material around the edges as needed.
6. Final Touches: After completing the installation, remove the spacers and clean up any excess adhesive residue. Allow the flooring to cure for the recommended time before walking or placing furniture on it.
Tips for a Flawless Finish:
- Use a level to ensure that the vinyl flooring is installed evenly throughout.
- Avoid installing vinyl flooring in areas prone to excessive moisture or direct sunlight.
- If you encounter any difficulties during the installation process, do not hesitate to consult the manufacturer's instructions or seek professional assistance.
By following these detailed instructions and employing the right techniques, you can successfully install vinyl flooring over ceramic tile and enhance the aesthetic appeal of your home while preserving the existing flooring. Enjoy the transformed space and the satisfaction of a DIY project well done!
How To Install Ceramic Tile Over Vinyl Flooring

10 Tips For Installing Vinyl Over Tile

Should You Install Vinyl Floor Over Tile

Vinyl Tile Installation A Comprehensive Guide Gc Flooring Pros

Trafficmaster Ceramica 12 X 24 Vinyl Tile Floor Installation

How To Install Vinyl Plank Flooring As A Beginner Home Renovation

How To Lay Tile Over An Existing Vinyl Floor Today S Homeowner

Lvt Flooring Over Existing Tile The Easy Way Vinyl Floor Installation Diy

New Vinyl Plank Flooring Over Tile Table And Hearth

How To Install L And Stick Vinyl Plank Flooring The Nifty Nester
See Also


