How to Install Vinyl Flooring Over Tiles
Installing vinyl flooring over existing tile can be a cost-effective and time-saving way to refresh a room's appearance. Vinyl flooring offers several advantages, including durability, water resistance, and easy maintenance. However, the success of this project depends on proper preparation and installation techniques. This article outlines the steps involved in installing vinyl flooring over tiles, ensuring a smooth and long-lasting finish.
1. Preparing the Surface
The foundation for a successful vinyl flooring installation lies in a properly prepared subfloor. This step is crucial for ensuring that the vinyl flooring does not buckle or develop unevenness over time.
Assess Tile Condition: Begin by examining the existing tiles thoroughly. Look for loose or cracked tiles, significant grout gaps, and unevenness. Loose or damaged tiles must be repaired or replaced before proceeding.
Clean and Smooth the Surface: Once the tiles are sound, clean them thoroughly of debris, dirt, and any residues. Utilize a powerful cleaner designed for tile and grout, ensuring it dries completely. If the tiles are uneven, consider using a self-leveling compound to create a smooth surface. This ensures that the vinyl flooring lies flat and prevents potential buckling or unevenness.
Prime the Surface: Applying a primer to the tile surface enhances adhesion between the vinyl flooring and the existing tiles. Choose a primer specifically designed for vinyl flooring and apply it evenly, allowing it to dry completely before proceeding to the next step.
2. Choosing the Right Vinyl Flooring
The choice of vinyl flooring for your project is crucial and depends on various factors such as your budget, desired aesthetics, and the room's intended use.
Types of Vinyl Flooring: Vinyl flooring is available in several forms, each offering unique characteristics and benefits. Some common types include:
- Sheet Vinyl: Offers a seamless look, making it suitable for large areas. It is typically installed in one continuous piece, minimizing seams.
- Luxury Vinyl Tile (LVT): Composed of individual tiles, LVT provides a realistic wood or stone appearance. It offers greater flexibility in design and pattern selection.
- Luxury Vinyl Plank (LVP): Similar to LVT, LVP features planks simulating wood flooring. It is known for its durability and realistic wood grain patterns.
Thickness and Wear Layer: Consider the thickness and wear layer of the vinyl flooring. Thicker flooring provides better sound insulation and durability. A thicker wear layer protects the flooring from scratches and damage, making it ideal for high-traffic areas.
Underlayment: Underlayment serves as a cushioning layer beneath the vinyl flooring, providing added comfort and sound insulation. It also helps to absorb minor imperfections in the subfloor, minimizing the chances of unevenness or buckling.
3. Installation Techniques
Installing vinyl flooring over tiles requires specific methods to ensure a successful outcome. Depending on the type of vinyl flooring chosen, there are two primary installation methods:
3.1. Glue-Down Installation
This method is typically used for sheet vinyl and some LVT or LVP products. It involves applying a specialized adhesive to the prepared tile surface and then laying down the vinyl flooring.
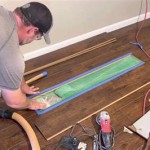
- Adhesive Application: Use a notched trowel to apply the adhesive evenly to the tile surface. The trowel's notch size should correspond to the type of vinyl flooring being installed.
- Laying the Vinyl: Carefully lay the vinyl flooring over the adhesive, ensuring it's fully adhered to the surface. Use a roller to press the flooring into the adhesive, eliminating any air pockets.
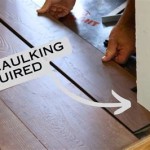
- Trimming and Seaming: Trim the flooring around the edges and corners, ensuring a clean and professional finish. For sheet vinyl, seams are typically joined with a welding process.
3.2. Floating Installation
This method is commonly used for LVT and LVP flooring. It involves laying the vinyl flooring over a pre-installed underlayment, without using any adhesive.
- Underlayment Installation: Install the chosen underlayment over the prepared tile surface. Ensure the underlayment lies flat and is securely joined at the seams.
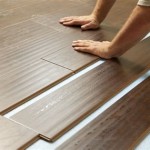
- Laying the Vinyl: Start laying the vinyl flooring planks or tiles from one corner of the room, working your way outwards. Ensure the planks or tiles are properly aligned and tightly interlocked at the seams.
- Trimming and Finishing: Trim the flooring around the edges and corners, ensuring a clean and professional finish. Use transition strips to create a smooth transition between the vinyl flooring and other floor coverings.
Regardless of the chosen installation method, following the manufacturer's instructions for the specific vinyl flooring product is crucial. Pay attention to recommended tools and techniques, and ensure the vinyl flooring installation is completed within the specified timeframe.

Can You Put Vinyl Flooring Over Tile Igloo Surfaces

How To Install Vinyl Plank Flooring As A Beginner Home Renovation

Vinyl Tile Installation A Comprehensive Guide Gc Flooring Pros

How To Install Vinyl Plank Flooring As A Beginner Home Renovation

How To Lay Tile Over An Existing Vinyl Floor Today S Homeowner

How To Install Vinyl Plank Floors In A Bathroom Over Tile

How I Installed Luxury Vinyl Flooring Over Existing Tile In My Kitchen Installation

How To Install Floating Vinyl Flooring Over Old Floors Simply2moms

How To Install Vinyl Plank Flooring In A Bathroom Fixthisbuildthat

How To Install Ceramic Tile Over Vinyl Flooring
See Also