How To Install Vinyl Plank Flooring Over Asbestos Tile
Installing new flooring can significantly enhance the aesthetic appeal and functionality of a living space. Many homeowners considering renovations face the challenge of existing asbestos-containing floor tiles. Removing these tiles can be costly and hazardous, requiring specialized abatement procedures. A viable alternative involves installing a new floor directly over the existing asbestos tile. This article provides a detailed guide on how to install vinyl plank flooring over asbestos tile, emphasizing safety, preparation, and proper installation techniques.
Prior to undertaking any work, it is imperative to understand the nature of asbestos-containing materials. Asbestos, a naturally occurring mineral fiber, was widely used in building materials before its health risks were fully understood. When asbestos fibers become airborne, they can be inhaled, potentially leading to serious respiratory illnesses such as asbestosis, lung cancer, and mesothelioma. Intact asbestos-containing floor tiles generally pose a minimal risk. The primary concern arises when these tiles are disturbed, broken, or sanded, releasing asbestos fibers into the air. The method described herein focuses on encapsulating the existing asbestos tile to minimize disturbance and exposure.
The decision to install vinyl plank flooring over asbestos tile should be carefully considered, weighing the risks and benefits alongside alternative options. If the existing tile is severely damaged, lifting, or crumbling, professional abatement might be the more appropriate course of action. Furthermore, local regulations may dictate specific requirements for handling asbestos-containing materials, including mandatory reporting and disposal procedures. Homeowners are strongly encouraged to consult with qualified asbestos professionals and local authorities to ensure compliance with all applicable regulations before commencing any work.
Key Point 1: Assessing the Existing Floor and Planning the Project
The first crucial step involves thoroughly assessing the condition of the existing asbestos tile floor. This assessment will inform the subsequent preparation and installation process. The floor's overall levelness, stability, and the presence of any damage are critical factors to consider.
Begin by visually inspecting the entire floor surface. Look for any signs of damage, such as cracks, chips, loose tiles, or areas where the tile is lifting. Pay close attention to areas near doorways, along walls, and in high-traffic zones. Document any damaged areas with photographs for future reference. A slightly uneven floor can often be corrected with leveling compounds, but severely damaged areas may require more extensive remediation before installing the vinyl plank flooring.
Next, assess the stability of the existing tiles. Walk across the floor, paying attention to any tiles that feel loose or unstable. Gently tap each tile with a rubber mallet or similar tool. Hollow sounds indicate that the tile is not properly adhered to the subfloor and may require additional attention. Loose tiles should be secured or removed and the area patched with a suitable patching compound specifically designed for use over asbestos-containing materials. Care must be taken during removal to minimize the release of fibers. Always wear appropriate personal protective equipment (PPE), including a respirator certified for asbestos removal, disposable coveralls, and gloves.
Evaluate the floor's levelness using a long level or a laser level. Significant variations in levelness can create problems during the vinyl plank installation, resulting in uneven surfaces and potential damage to the locking mechanisms of the planks. Minor imperfections can often be addressed with self-leveling compound. For more significant deviations, consider using shims or other leveling techniques to create a smooth and even surface.
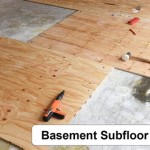
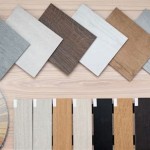
Once the assessment is complete, develop a detailed project plan. This plan should include a list of all necessary materials, tools, and safety equipment. Calculate the square footage of the floor to determine the amount of vinyl plank flooring needed, adding an extra 10% to account for waste and cuts. Identify the direction in which the planks will be installed and plan for any transitions or thresholds that may be required. A well-defined plan will help ensure a smooth and efficient installation process.
Key Point 2: Preparing the Floor Surface
Proper preparation is essential for a successful vinyl plank flooring installation over asbestos tile. This involves cleaning, leveling, and creating a suitable surface for the new flooring to adhere to. The goal is to encapsulate the asbestos tile, preventing the release of fibers and providing a stable base for the vinyl planks.
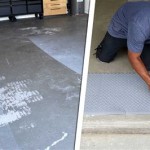
Begin by thoroughly cleaning the existing floor surface. Use a HEPA-filtered vacuum to remove all dust, debris, and loose particles. This is particularly important to prevent the vinyl plank adhesive from bonding to loose debris rather than the tile surface. Avoid sweeping, as this can stir up dust and potentially release asbestos fibers into the air. Wipe down the floor with a damp cloth to remove any remaining residue. Ensure the floor is completely dry before proceeding to the next step.
Address any imperfections in the floor surface. Fill cracks and holes with a patching compound specifically designed for use over asbestos-containing materials. Apply the compound according to the manufacturer's instructions, ensuring that it is properly bonded to the surrounding tile. Allow the patching compound to dry completely before proceeding.
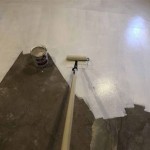
If the floor is uneven, apply a self-leveling compound to create a smooth and consistent surface. Follow the manufacturer's instructions carefully, paying close attention to the recommended mixing ratios and application techniques. Pour the self-leveling compound onto the floor and use a gauge rake or trowel to spread it evenly. Allow the compound to dry completely before proceeding. Multiple coats may be necessary to achieve the desired levelness.
Once the floor is clean, level, and dry, consider installing a layer of underlayment. Underlayment provides additional cushioning, sound insulation, and thermal insulation. It also helps to further encapsulate the asbestos tile, providing an extra layer of protection. Choose an underlayment that is compatible with vinyl plank flooring and suitable for use over asbestos-containing materials. Install the underlayment according to the manufacturer's instructions, ensuring that it is properly secured to the floor.
Key Point 3: Installing the Vinyl Plank Flooring
With the floor properly prepared, the final step is to install the vinyl plank flooring. Accurate measurements, proper cutting techniques, and careful installation are crucial for achieving a professional-looking and durable floor.
Begin by acclimating the vinyl plank flooring to the room temperature for at least 48 hours before installation. This allows the planks to expand and contract, reducing the risk of gaps or buckling after installation. Stack the planks in the room where they will be installed, ensuring that they are not exposed to direct sunlight or extreme temperatures.
Determine the direction in which the planks will be installed. In most cases, it is recommended to install the planks parallel to the longest wall in the room. This creates a more visually appealing and spacious appearance. Measure the room carefully and mark the starting point for the first row of planks. Use a chalk line to create a straight and accurate guideline.
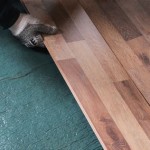
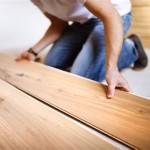
Install the first row of planks along the guideline, ensuring that they are properly aligned and tightly butted together. Most vinyl plank flooring features a click-lock system that allows the planks to easily snap together. Follow the manufacturer's instructions carefully when installing the planks, paying attention to the proper angle and pressure required to engage the locking mechanism. Use a tapping block and hammer to gently tap the planks together, ensuring a tight and secure fit.
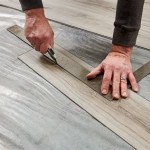
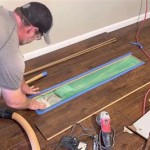
When cutting planks to fit around obstacles or along walls, use a utility knife or a flooring cutter. Measure the required length and mark the cutting line on the plank. Score the plank several times with the utility knife before snapping it along the scored line. For more complex cuts, use a jigsaw or a miter saw. Always wear safety glasses when cutting vinyl plank flooring.
Continue installing the planks row by row, staggering the seams to create a more natural and visually appealing appearance. Ensure that each plank is properly locked into place and that there are no gaps or overlaps. Use spacers along the walls to maintain a consistent expansion gap, allowing the floor to expand and contract without buckling. This gap is usually specified by the flooring manufacturer. Clean up any adhesive residue or debris as you go, using a damp cloth.
Once the entire floor is installed, remove the spacers and install baseboards or quarter-round molding along the walls to cover the expansion gap. Install transitions or thresholds where the vinyl plank flooring meets other types of flooring or doorways. These transitions provide a smooth and safe transition between different floor surfaces.
Finally, clean the newly installed vinyl plank floor with a damp cloth and a mild detergent. Avoid using harsh chemicals or abrasive cleaners, as these can damage the surface of the flooring. Follow the manufacturer's recommendations for cleaning and maintaining the vinyl plank flooring.
By following these detailed instructions and taking appropriate safety precautions, homeowners can successfully install vinyl plank flooring over existing asbestos tile, creating a beautiful and functional floor while minimizing the risk of asbestos exposure. Remember to consult with professionals and adhere to local regulations for handling asbestos-containing materials.

Installing Hardwood Over Asbestos Tiles Homeadvisor

What Flooring Should I Use Over Old Asbestos Tiles

Can I Put A New Floor Over Asbestos Tiles Branch Environmental

Flooring That Can Be Installed Over Asbestos Tile

The Truth About Asbestos In Vinyl Flooring

How To Waterproof A Basement

Average Cost Of Vinyl Flooring Installation In 2024 Forbes Home

A Beginner S Guide To Installing Vinyl Plank Flooring Dumpsters Com

How To Install Vinyl Plank Flooring The Home

Let S Play A Game Called Are These Asbestos Tiles That I Just Removed Addicted 2 Decorating
See Also