How To Install Vinyl Plank Flooring Over Existing Tile
Installing vinyl plank flooring over existing tile can be a cost-effective and relatively straightforward way to update a space without the significant demolition and disposal costs associated with removing the old tile. This process, however, requires careful preparation and specific techniques to ensure a successful and long-lasting installation. The key to a properly installed vinyl plank floor over tile lies in creating a smooth, level, and stable substrate that will prevent telegraphing (where the grout lines of the tile show through the vinyl) and ensure the vinyl planks adhere correctly or lock together securely.
Before beginning any installation, it is crucial to assess the existing tile floor's condition. Factors such as loose tiles, cracks, unevenness, and moisture issues can significantly impact the final result. Addressing these problems before laying the vinyl plank is imperative for a professional-looking and durable floor.
Assessing the Existing Tile Floor
The initial step in preparing for a vinyl plank installation over tile is a thorough inspection of the existing floor. Each tile should be checked for soundness. Any loose or broken tiles must be repaired or replaced. Tap each tile lightly with a rubber mallet or a similar tool. A hollow sound indicates that the tile is not properly adhered and needs attention.
If a cracked or broken tile is found, the debris should be carefully removed. Use a chisel and hammer to gently break apart the damaged tile, being cautious not to damage the surrounding tiles or the subfloor beneath. Once the broken tile is removed, clean the area thoroughly, removing any old adhesive or grout. A suitable tile adhesive, such as a thin-set mortar, should be used to re-adhere a replacement tile. Ensure the replacement tile is flush with the surrounding tiles and allow the adhesive to cure completely according to the manufacturer's instructions before proceeding.
The levelness of the existing tile floor is another critical factor. Significant variations in height between tiles can cause problems with the vinyl plank installation. A long level (at least 6 feet) should be used to check for any dips or high spots. If significant unevenness is detected, self-leveling compound will likely be required to create a smooth and even surface.
Moisture is an enemy of all flooring installations, and vinyl plank is no exception. Check for signs of moisture damage, such as efflorescence (a white, powdery substance) on the grout lines or discoloration of the tiles. Use a moisture meter to test the moisture content of the subfloor beneath the tile. High moisture levels can indicate a leak or inadequate waterproofing. Addressing any moisture issues is essential before installing the vinyl plank flooring. Moisture barriers may be needed to prevent future problems.
Preparing the Surface for Vinyl Plank Installation
Once the existing tile floor has been assessed and any necessary repairs have been made, the next step is to prepare the surface for the vinyl plank installation. This involves cleaning, leveling, and potentially applying an underlayment to create a suitable substrate.
Thorough cleaning is paramount. Use a stiff brush and a suitable cleaning solution to remove any dirt, grease, wax, or other contaminants from the tile surface. Rinse the floor thoroughly with clean water and allow it to dry completely. A degreasing cleaner may be necessary to remove stubborn residues. The goal is to provide a clean, sound surface to which the vinyl plank flooring can either adhere directly or rest upon securely.
Addressing unevenness is a crucial step in the preparation process. If the tile floor has minor imperfections, a patching compound can be used to fill in grout lines and small dips. Apply the patching compound according to the manufacturer's instructions, using a trowel to create a smooth and even surface. Allow the patching compound to dry completely before proceeding. For more significant unevenness, self-leveling compound is the preferred solution. Follow the manufacturer's instructions carefully when mixing and applying the self-leveling compound. It is important to ensure proper ventilation during this process. Allow the self-leveling compound to cure completely before moving on to the next step.
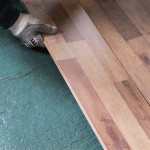
The decision to use an underlayment beneath the vinyl plank flooring depends on several factors, including the type of vinyl plank flooring being installed, the condition of the existing tile floor, and the desired level of comfort and sound insulation. Some vinyl plank flooring products have a pre-attached underlayment. If the vinyl plank flooring does not have a pre-attached underlayment, consider installing a separate underlayment to provide additional cushioning, sound absorption, and moisture protection. Choose an underlayment that is specifically designed for use with vinyl plank flooring. Install the underlayment according to the manufacturer's instructions, paying attention to proper seam sealing to prevent moisture from penetrating.
Installing the Vinyl Plank Flooring
With the subfloor properly prepared, the actual installation of the vinyl plank flooring can begin. This process involves careful planning, precise cutting, and proper installation techniques to ensure a professional and aesthetically pleasing finished floor.
Before starting the installation, it is essential to plan the layout of the vinyl plank flooring. Measure the room and determine the best direction for the planks to run. Typically, it is recommended to run the planks parallel to the longest wall of the room. This creates a more visually appealing and spacious look. Carefully consider the placement of the first row of planks, as this will serve as the foundation for the entire floor. Ensure that the first row is straight and square.
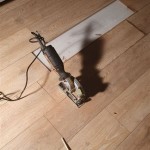
Cutting the vinyl plank flooring to fit the room's dimensions is a critical aspect of the installation process. Use a utility knife and a straightedge to score the plank along the desired cut line. Then, snap the plank along the score line. For more intricate cuts, such as those around door frames or pipes, a jigsaw or a vinyl plank cutter may be necessary. Always wear safety glasses and gloves when cutting vinyl plank flooring.
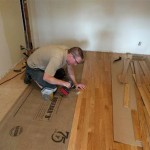
The installation method for vinyl plank flooring depends on the type of product being used. Some vinyl plank flooring products are designed to be glued down, while others feature a click-lock system that allows the planks to be easily snapped together. For glue-down vinyl plank flooring, apply a suitable adhesive to the subfloor according to the manufacturer's instructions. Position the planks carefully and press them firmly into the adhesive. Use a roller to ensure proper adhesion. For click-lock vinyl plank flooring, align the planks and engage the locking mechanism. Use a tapping block and a rubber mallet to gently tap the planks together, ensuring a tight and seamless fit.
Maintain a consistent expansion gap around the perimeter of the room. This allows the vinyl plank flooring to expand and contract with changes in temperature and humidity without buckling or warping. The manufacturer's instructions will specify the appropriate expansion gap, typically ¼ to ⅜ of an inch. Use spacers to maintain the expansion gap during installation. Once the installation is complete, the expansion gap can be covered with baseboards or quarter-round molding.
As you proceed with the installation, regularly check the alignment of the planks to ensure that they remain straight and square. Use a level to verify that the floor is even. Clean up any adhesive spills or debris immediately to prevent them from drying and becoming difficult to remove. Proper installation techniques will help to ensure the longevity and appearance of your vinyl plank flooring.
Once the vinyl plank flooring installation is complete, inspect the floor carefully for any imperfections or gaps. Address any issues promptly. Install baseboards or quarter-round molding to cover the expansion gap and provide a finished look. Clean the floor thoroughly with a damp mop and a suitable cleaning solution. Allow the adhesive to cure completely (if applicable) before placing furniture or heavy objects on the floor. With proper care and maintenance, your new vinyl plank floor will provide years of beauty and durability.

How To Install Vinyl Plank Floors In A Bathroom Over Tile

How To Lay Tile Over An Existing Vinyl Floor Today S Homeowner

How To Install Luxury Vinyl Plank Over Tile Flooring

How To Install L And Stick Vinyl Flooring Over Existing

New Vinyl Plank Flooring Over Tile Table And Hearth

New Vinyl Plank Flooring Over Tile Table And Hearth

Can I Install Vinyl Tiles Over Laminate Flooring Comprehensive Guide

Can You Install Vinyl Plank Over Tile Flooring America

How To Tile Over Vinyl Flooring 2024 Today S Homeowner

Lvt Flooring Over Existing Tile The Easy Way Vinyl Floor Installation Diy
See Also