How To Install Vinyl Plank Flooring Over Existing Tile Floor
Installing vinyl plank flooring over existing tile flooring is a cost-effective and relatively straightforward way to update a space without the significant undertaking of tile removal. This method can save time, reduce mess, and minimize disruption to the household. However, proper preparation is crucial for a successful and long-lasting installation. This article will provide a comprehensive guide on how to install vinyl plank flooring over existing tile, covering essential steps, necessary tools, and potential challenges.
Before embarking on this project, it is essential to consider several factors. First, assess the condition of the existing tile floor. Any severely damaged, loose, or uneven tiles must be addressed before proceeding. The stability and levelness of the substrate directly impact the performance and appearance of the new vinyl plank flooring. Second, understand the type of vinyl plank flooring being installed. Different types, such as click-lock, glue-down, and loose-lay, have varying installation requirements. Third, consider the potential impact on door clearances and transitions to adjacent flooring. The added thickness of the vinyl plank flooring may necessitate adjustments to doors and thresholds.
Preparing the Existing Tile Floor
The preparation stage is arguably the most critical aspect of installing vinyl plank over tile. A poorly prepared surface can lead to problems such as unevenness, telegraphing of grout lines, and premature wear of the vinyl plank flooring. Thorough cleaning and leveling are paramount.
Begin by thoroughly cleaning the existing tile floor. Remove all dirt, debris, and old wax or sealant. Use a suitable floor cleaner and scrub the surface vigorously. Pay particular attention to grout lines, which tend to accumulate dirt and grime. Rinse the floor thoroughly with clean water and allow it to dry completely. This step ensures proper adhesion of any leveling compounds or underlayment.
Next, inspect the tile floor for any loose, cracked, or damaged tiles. Loose tiles must be re-secured or removed and the resulting voids filled with a patching compound. Cracked tiles should be repaired with epoxy or replaced. Any significant damage to the existing tile can compromise the integrity of the new floor.
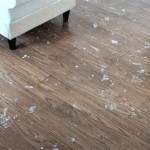
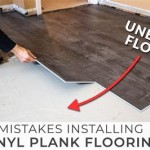
Unevenness is a major concern when installing vinyl plank over tile. The grout lines create inherent valleys that, if not addressed, will telegraph through the vinyl plank, resulting in an unsightly and uncomfortable surface. To mitigate this, use a self-leveling compound to fill the grout lines and create a smooth, even surface. Select a self-leveling compound specifically designed for use over tile, and follow the manufacturer's instructions carefully. Apply the compound in thin, even layers, allowing each layer to dry completely before applying the next. Depending on the depth of the grout lines, multiple applications may be necessary.
Once the self-leveling compound has dried completely, sand the surface to ensure it is perfectly smooth and free of any imperfections. Use a fine-grit sandpaper and a sanding block or orbital sander to achieve a consistent finish. Vacuum the floor thoroughly to remove all dust and debris. A clean, smooth, and level surface is essential for a successful vinyl plank installation.
Alternatively, instead of a self-leveling compound, a thin underlayment can be used. This provides a smoother surface over the existing tile and can also provide some cushioning and sound dampening. When selecting an underlayment, ensure it is compatible with both the existing tile and the vinyl plank flooring. Install the underlayment according to the manufacturer's instructions, paying attention to seam placement and proper adhesion.
Selecting and Acclimating Vinyl Plank Flooring
Choosing the right vinyl plank flooring is crucial for achieving the desired aesthetic and performance. Consider factors such as the intended use of the space, the level of foot traffic, and the desired style. Vinyl plank flooring comes in a wide variety of colors, patterns, and textures, allowing for customization to suit any decor.
The thickness of the wear layer is a key indicator of the flooring's durability. A thicker wear layer provides greater resistance to scratches, dents, and stains, making it suitable for high-traffic areas. For residential applications, a wear layer of at least 12 mils is recommended. For commercial applications, a thicker wear layer of 20 mils or more is advisable.
The type of vinyl plank flooring also influences the installation process. Click-lock vinyl plank flooring is the most common type, as it is relatively easy to install without the need for adhesives. Glue-down vinyl plank flooring requires the application of adhesive and is typically used in commercial settings or areas with high moisture levels. Loose-lay vinyl plank flooring is a newer option that does not require adhesive or click-lock mechanisms, relying instead on friction to stay in place.
Acclimation is an important step that is often overlooked. Vinyl plank flooring needs to acclimate to the room's temperature and humidity for at least 48 to 72 hours before installation. This allows the material to expand or contract, minimizing the risk of buckling or gapping after installation. Store the vinyl plank flooring in the room where it will be installed, ensuring that the boxes are arranged to allow for proper air circulation. Follow the manufacturer's recommendations for acclimation temperature and humidity levels.
Installing the Vinyl Plank Flooring
With the surface properly prepared and the vinyl plank flooring acclimated, the installation process can begin. The specific installation method will vary depending on the type of vinyl plank flooring being used, but the fundamental principles remain the same.
Before starting, plan the layout of the flooring. Determine the direction in which the planks will be installed, considering the room's shape, the direction of natural light, and the desired aesthetic. It is generally recommended to install the planks parallel to the longest wall of the room, as this can make the space appear larger.
Begin by laying out a row of planks without attaching them, to ensure a proper fit and to identify any potential issues. Use spacers along the walls to maintain a consistent expansion gap. This gap is necessary to allow the flooring to expand and contract with temperature and humidity changes, preventing buckling or warping. The size of the expansion gap will vary depending on the manufacturer's recommendations, but it is typically around ¼ inch.
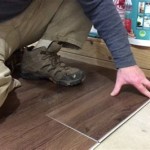
For click-lock vinyl plank flooring, engage the planks at an angle and then rotate them down to lock them into place. Use a tapping block and a rubber mallet to ensure a tight and secure fit. Avoid hitting the planks directly with the mallet, as this can damage the edges. Work your way across the room, row by row, ensuring that the planks are properly aligned and that the seams are tight. Stagger the end joints of the planks to create a more visually appealing and structurally sound floor.
For glue-down vinyl plank flooring, apply adhesive to the subfloor using a notched trowel. Follow the adhesive manufacturer's instructions regarding the type of trowel to use and the amount of adhesive to apply. Place the planks into the adhesive, pressing them firmly into place. Use a roller to ensure full contact between the plank and the adhesive. Work in small sections to prevent the adhesive from drying out before the planks are installed.
When cutting planks to fit around obstacles such as pipes or doorways, use a utility knife or a jigsaw. Measure carefully and make precise cuts to ensure a clean and professional finish. Use a T-square to guide the cuts and to ensure that they are straight. For complex shapes, create a template using cardboard or paper, and then transfer the template to the plank.
Once the entire floor is installed, remove the spacers along the walls. Install baseboards or quarter-round molding to cover the expansion gap and to create a finished look. Use a nail gun or construction adhesive to secure the baseboards or molding to the wall. Be careful not to nail or glue the baseboards or molding to the vinyl plank flooring, as this will prevent it from expanding and contracting properly.
Clean the floor thoroughly to remove any dust or debris. Use a damp mop and a mild detergent to clean the surface. Avoid using harsh chemicals or abrasive cleaners, as these can damage the vinyl plank flooring. With proper installation and maintenance, the new vinyl plank floor will provide years of beauty and durability.

Installing Luxury Vinyl Over Existing Tiles Choices Flooring

How To Install Vinyl Plank Floors In A Bathroom Over Tile

How To Install Vinyl Flooring Over Tiles Linoleum Thrift Diving

How To Install Vinyl Or Laminate Flooring Over Existing Ceramic Tile

New Vinyl Plank Flooring Over Tile Table And Hearth

Can You Put Vinyl Flooring Over Tile A Complete Guide Teka

Vinyl Floor Installation How To Install A Floating Together

Vinyl Plank Flooring Over Tile Should I Do This

Dos And Don Ts For Installing Vinyl Plank Floors In The Bathroom Advice Homeowners

Can You Install Vinyl Plank Over Tile Flooring America
See Also