How to Install Vinyl Plank Flooring Over Wood Subfloor
Installing vinyl plank flooring over a wood subfloor is a popular choice for homeowners due to its durability, water resistance, and ease of installation. When implemented correctly, this flooring solution can transform the aesthetic of a room while providing long-lasting performance. The success of the installation hinges on proper preparation, understanding the intricacies of vinyl plank flooring, and adhering to recommended techniques. This article outlines the step-by-step process for installing vinyl plank flooring over a wood subfloor, emphasizing critical considerations to ensure a professional and lasting result.
Before commencing any flooring project, comprehensive planning is essential. Accurately measure the room to determine the quantity of vinyl plank flooring required. It is advisable to purchase at least 10% extra material to account for waste from cuts and potential miscalculations. Consider the direction in which the planks will be laid, as this can affect the perceived size and shape of the room. Typically, running the planks lengthwise visually elongates the space. Gather all necessary tools and materials before starting to avoid interruptions during the installation process. This includes not only the flooring itself, but also underlayment (if required), measuring tape, a utility knife or scoring tool, a straight edge, a tapping block, a rubber mallet, spacers, and safety glasses.
Acclimation is a vital, and often overlooked, step. Vinyl plank flooring expands and contracts with changes in temperature and humidity. Allowing the planks to acclimate to the room's environment for at least 48 to 72 hours before installation will minimize the risk of buckling or gapping after installation. Store the unopened boxes of flooring in the room where they will be installed, ensuring they are laid flat. This allows the planks to adjust to the ambient conditions, leading to a more stable and visually appealing finished floor.
Preparing the Wood Subfloor
Proper preparation of the wood subfloor is paramount for a successful vinyl plank flooring installation. The subfloor must be clean, level, and structurally sound. A failure to adequately prepare the subfloor can lead to problems such as unevenness, squeaking, and premature wear of the vinyl planks.
Begin by thoroughly cleaning the subfloor. Remove all debris, including dust, dirt, nails, staples, and any adhesive residue. A vacuum cleaner is effective for removing loose particles, while a scraper or putty knife can be used to eliminate stubborn residue. Pay particular attention to corners and edges where debris tends to accumulate.
Inspect the subfloor for any signs of damage, such as loose boards, protruding nails, or areas of rot or water damage. Repair any damaged areas before proceeding. Replace any rotted or water-damaged sections of the subfloor with new wood. Secure loose boards by driving screws into the joists below. Countersink any protruding nails or staples to ensure a smooth, level surface. Ignoring these issues can result in an uneven floor and potential damage to the vinyl planks.
Assess the levelness of the subfloor using a long, straight edge and a level. Any variations greater than 3/16 inch over a 10-foot span should be addressed. High spots can be sanded down using a floor sander or hand planer. Low spots can be filled with a self-leveling compound. Follow the manufacturer's instructions carefully when using self-leveling compound to ensure proper application and curing. Allow the compound to dry completely before proceeding with the installation.
Ensure the subfloor is adequately dry before installing the vinyl plank flooring. Moisture can lead to mold growth and adhesive failure. Use a moisture meter to measure the moisture content of the wood subfloor. The acceptable moisture level will vary depending on the type of vinyl plank flooring and the manufacturer's recommendations, but generally, it should be below 12%. If the moisture level is too high, take steps to reduce it, such as using a dehumidifier or allowing the subfloor to dry naturally.
Consider the use of an underlayment. While some vinyl plank flooring products come with a pre-attached underlayment, others may require a separate underlayment. An underlayment provides additional cushioning, sound insulation, and moisture protection. Choose an underlayment that is specifically designed for use with vinyl plank flooring and that is compatible with the subfloor. Follow the manufacturer's instructions for installing the underlayment, ensuring it is properly adhered to the subfloor.
Laying Out the Vinyl Plank Flooring
Planning the layout of the vinyl plank flooring is crucial for achieving a visually appealing and structurally sound result. A well-planned layout minimizes waste, ensures consistent spacing, and avoids narrow slivers of flooring at walls, which can detract from the overall appearance.
Determine the direction of the plank installation. As mentioned earlier, running the planks lengthwise generally elongates the room, while running them widthwise can make the room appear wider. Consider the natural light source and the flow of traffic when deciding on the direction. In many cases, it is best to run the planks parallel to the longest wall.
Measure the width of the room and divide it by the width of a single plank. This will give you an estimate of the number of planks needed to cover the width of the room. If the result is a fraction, this indicates that you will need to cut the last row of planks. Aim for a minimum width of at least half a plank for the last row. If the calculated width of the last row is less than half a plank, adjust the starting row by cutting the first row of planks. This will ensure that the last row is wider and more visually appealing.
Create a dry layout of the first few rows of planks to visualize the pattern and spacing. This allows you to make any necessary adjustments before permanently installing the flooring. Use spacers along the walls to maintain a consistent expansion gap. The size of the expansion gap will vary depending on the manufacturer's recommendations, but it is typically around ¼ inch to ⅜ inch. This gap allows the flooring to expand and contract without buckling or damaging the walls.
Stagger the end joints of the planks in each row to create a more visually appealing and structurally sound floor. A common practice is to stagger the joints by at least 6 inches, but the specific recommendation may vary from manufacturer to manufacturer. Avoid creating H-joints, where the end joints of adjacent rows line up. This can weaken the floor and make it more prone to separation.
Installing the Vinyl Plank Flooring
The actual installation process of vinyl plank flooring is relatively straightforward, but attention to detail is essential for achieving a professional-looking result. Adhering to the manufacturer's instructions and using the correct tools and techniques will ensure a durable and aesthetically pleasing floor.
Begin by installing the first row of planks along the longest straight wall. Place the planks with the tongue side facing the wall, leaving the appropriate expansion gap. Use spacers to maintain the gap. Ensure the first row is perfectly straight, as this will serve as a guide for the rest of the installation. Use a level to check the alignment of the first row.
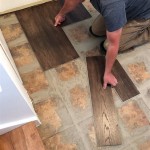
Most vinyl plank flooring products use a click-lock system. Align the tongue of the plank with the groove of the adjacent plank at a slight angle. Gently press the planks together until they click into place. Use a tapping block and a rubber mallet to ensure a tight and secure fit. Avoid using excessive force, as this can damage the planks.
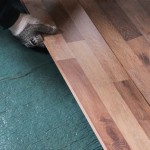
When cutting planks to fit around obstacles or at the end of a row, use a utility knife or scoring tool and a straight edge. Score the plank along the cutting line several times until you can snap it cleanly. Alternatively, a jigsaw or circular saw can be used for more complex cuts. Always wear safety glasses when cutting vinyl plank flooring.
As you progress through the installation, continuously check the alignment and spacing of the planks. Use a level to ensure the floor is flat and even. If you encounter any problems, such as gaps or unevenness, address them immediately. It is easier to fix minor issues as you go than to correct them later.
For planks that require adhesive, apply a thin, even layer of adhesive to the subfloor using a notched trowel. Follow the manufacturer's instructions for the type of adhesive to use and the drying time. Press the planks firmly into the adhesive, ensuring full contact with the subfloor. Use a roller to further secure the planks and remove any air pockets.
Once the flooring is installed, remove the spacers and install baseboards or quarter round molding to cover the expansion gaps. This will give the floor a finished look and protect the edges of the planks. Secure the baseboards or molding to the wall, not to the flooring, to allow for expansion and contraction.

How To Install Vinyl Plank Flooring As A Beginner Home Renovation

How To Install Vinyl Plank Flooring On Plywood Floor

How To Prep Wood Subfloor For Luxury Vinyl Plank Flooring Beginners Fix High And Low Spots

A Beginner S Guide To Installing Vinyl Plank Flooring Dumpsters Com

How To Prep Your Sub Floor For Luxury Vinyl Flooring

Installing Vinyl Floors A Do It Yourself Guide The Honeycomb Home

Installing Luxury Vinyl Floors Over Engineered Hardwood Honey Built Home

Installing Luxury Vinyl Floors Over Engineered Hardwood Honey Built Home

How To Install Glue Down Luxury Vinyl Plank Flooring On Osb Sub Floor

Installing Vinyl Plank Flooring For Beginners Anika S Diy Life
See Also