How to Install Vinyl Plank Flooring with Pressure Sensitive Adhesive
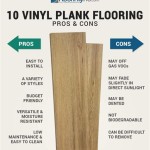
Vinyl plank flooring has gained considerable popularity due to its durability, aesthetic appeal, and relative ease of installation. Within the realm of vinyl plank flooring options, pressure sensitive adhesive (PSA) planks offer a straightforward installation process, often appealing to both DIY enthusiasts and professional installers. This article provides a comprehensive guide on how to install vinyl plank flooring utilizing pressure sensitive adhesive.
Pressure sensitive adhesive, commonly referred to as PSA, is a type of adhesive that forms a bond with a surface under the application of light pressure. With vinyl plank flooring, this adhesive is pre-applied to the back of the planks, eliminating the need for separate adhesive application. This simplifies the installation process, reducing both time and material costs. However, proper preparation and technique are still crucial for a successful and long-lasting installation.
Key Point 1: Preparing the Subfloor for PSA Vinyl Plank Flooring
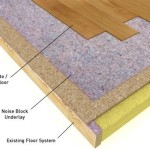
The success of any flooring installation hinges heavily on the condition of the subfloor. With pressure sensitive adhesive vinyl plank, this preparation is even more critical. The subfloor must be clean, level, dry, and structurally sound. Any imperfections will telegraph through the thin vinyl plank, creating an uneven and potentially unstable surface. Failure to properly prepare the subfloor is a common cause of installation failure, leading to issues such as adhesive failure, plank movement, and premature wear.
The first step in subfloor preparation is thorough cleaning. Sweep, vacuum, and if necessary, scrub the subfloor to remove all dirt, dust, debris, and any existing adhesive residue. Even small particles can impede the adhesive bond. For concrete subfloors, consider using a concrete grinder to remove any stubborn residue or high spots. For wood subfloors, ensure there are no loose nails or screws, and reinforce any weak areas.
Leveling the subfloor is equally important. Use a long level (at least 6 feet) to identify any high or low spots. For concrete subfloors, a self-leveling compound can be used to fill in low areas and create a perfectly flat surface. Follow the manufacturer's instructions carefully when applying self-leveling compound. For wood subfloors, use a patching compound designed for wood to fill in any gaps or depressions. Sand down high spots as needed.
Moisture content is a critical factor, particularly for concrete subfloors. Excessive moisture can compromise the adhesive bond and lead to mold growth. Use a moisture meter to test the moisture content of the subfloor. The acceptable moisture level will vary depending on the specific vinyl plank product, so consult the manufacturer's guidelines. If the moisture level is too high, corrective measures must be taken, such as installing a moisture barrier or allowing the subfloor to dry completely.
Finally, inspect the subfloor for any structural issues. Repair any cracks, loose boards, or other damage before proceeding. A damaged subfloor will compromise the stability of the vinyl plank flooring and can lead to premature failure.
Key Point 2: Installation Techniques for PSA Vinyl Plank
Once the subfloor is properly prepared, the installation of the pressure sensitive adhesive vinyl plank can begin. Careful planning and attention to detail are essential for a professional-looking and durable installation. Start by acclimating the vinyl plank to the room for at least 48 hours prior to installation. This allows the planks to adjust to the temperature and humidity of the environment, minimizing expansion and contraction after installation.
Before starting, plan the layout of the planks. Determine the starting point and the direction in which the planks will be installed. It is generally recommended to start along a straight wall and work outwards. Consider the aesthetic impact of the layout, ensuring that the pattern is visually appealing and that there are no short pieces at the edges of the room. If necessary, adjust the starting point to achieve a more balanced and aesthetically pleasing layout.
When applying the planks, peel back the protective film from the adhesive backing and carefully position the plank on the subfloor. Ensure that the plank is properly aligned and that the edges are butted tightly against the adjacent planks. Apply firm, even pressure to the entire surface of the plank to ensure a strong bond with the subfloor. A flooring roller can be used to apply even pressure and improve the adhesion. Work in small sections, installing a few rows of planks at a time, to maintain accuracy and prevent the adhesive from drying out.
Cutting the planks to fit around obstacles or along the edges of the room requires precision. Use a utility knife and a straight edge to score the plank, then snap it along the score line. A jigsaw can also be used for more complex cuts. Always wear safety glasses when cutting vinyl plank flooring. Ensure that the cut edges are clean and straight to prevent gaps or unevenness.
As the installation progresses, regularly check for any gaps or misalignments. Correct any errors immediately to prevent them from compounding. Use a tapping block and a hammer to gently nudge the planks into place if necessary. Be careful not to damage the planks during this process.
Properly staggering the end joints of the planks is crucial for both aesthetic appeal and structural integrity. Avoid creating a "H" pattern where the end joints of adjacent rows align. A minimum offset of 6 inches is generally recommended. This helps to distribute the load and prevent the flooring from shifting or separating.
Key Point 3: Post-Installation Care and Maintenance
After the installation is complete, proper care and maintenance are essential for preserving the appearance and extending the lifespan of the vinyl plank flooring. While vinyl plank is known for its durability, it is still susceptible to damage from scratches, stains, and heavy traffic. Implementing a few simple maintenance practices can help keep the flooring looking its best for years to come.
Protecting the flooring from scratches is a primary concern. Place felt pads under the legs of furniture to prevent scratches and gouges. Avoid dragging heavy objects across the floor, and use a floor mat at entrances to trap dirt and debris. Regularly sweep or vacuum the floor to remove loose particles that can scratch the surface.
Cleaning vinyl plank flooring is relatively simple. Use a damp mop and a mild detergent specifically designed for vinyl flooring. Avoid using harsh chemicals, abrasive cleaners, or steam mops, as these can damage the surface. Wipe up spills immediately to prevent staining. For stubborn stains, use a non-abrasive cleaner and a soft cloth.
Avoid excessive moisture exposure. While vinyl plank is water-resistant, it is not waterproof. Standing water can seep into the seams and cause damage to the subfloor. Wipe up spills promptly and avoid using excessive amounts of water when cleaning. For areas prone to moisture, such as bathrooms and kitchens, consider using a waterproof sealant along the edges of the room.
Sunlight can cause fading over time. Use curtains or blinds to protect the flooring from direct sunlight, especially in areas with large windows. Rotate rugs periodically to prevent uneven fading.
Regular inspection is also important. Periodically inspect the flooring for any signs of damage, such as scratches, dents, or loose planks. Address any issues promptly to prevent them from escalating. Replacing individual planks is relatively easy with pressure sensitive adhesive flooring. Simply lift the damaged plank and replace it with a new one.
By following these guidelines, installers can successfully install pressure sensitive adhesive vinyl plank flooring and ensure its longevity and aesthetic appeal. Proper subfloor preparation, careful installation techniques, and diligent post-installation care are all essential for maximizing the value and lifespan of this popular flooring option.

Laying Vinyl Planks The Right Way Expert Guide By Fantastic Handyman

Ivc Lvt Igrip Glue Down Installation With Trowel Full

Choosing The Best Glue For Vinyl Plank Flooring Secret Tips

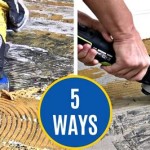
Adhesive Vinyl Flooring 4 Ways To Install Planeo

How To Install Vinyl Plank Flooring The Home

Deco S Take Home Sample Reggae Aged Wood Waterproof Colors Glue Down 6 In X Luxury Vinyl Plank Scms5 The

Glue Down Vinyl Plank Flooring A Buyer S Guide

Choosing The Best Glue For Vinyl Plank Flooring Secret Tips

How To Install Glue Down Vinyl Plank

Step By Guide To Installing Vinyl Plank Flooring Alittlebitofall
See Also