How To Lay Tile Over OSB Subfloor in a Bathroom
Laying tile in a bathroom can significantly enhance its aesthetic appeal and functionality. While concrete or cement board subfloors are typically preferred for their rigidity and water resistance, it is possible to install tile over an Oriented Strand Board (OSB) subfloor. However, this requires careful preparation and the implementation of specific techniques to mitigate potential issues such as deflection, moisture absorption, and tile cracking. This article provides a comprehensive guide on how to successfully lay tile over an OSB subfloor in a bathroom.
Before embarking on the project, it is crucial to understand the characteristics of OSB and the challenges it presents as a tiling substrate. OSB is an engineered wood product formed by layering strands of wood oriented in specific directions and bonded together with adhesives. While it offers structural strength and cost-effectiveness, OSB is more susceptible to moisture damage and deflection compared to cement board or concrete. Therefore, proper preparation and waterproofing are paramount.
The success of tiling over OSB hinges on mitigating the risks of deflection, moisture penetration, and adhesive failure. Ignoring these factors can lead to cracked tiles, loose grout, and ultimately, a failed tile installation. The following steps outline the necessary procedures for achieving a durable and long-lasting tile floor over OSB in a bathroom environment.
Assessing the OSB Subfloor
The initial step involves a thorough assessment of the existing OSB subfloor. This assessment is critical for identifying any weaknesses or issues that need to be addressed before proceeding with the tiling process. The key considerations are:
Thickness and Spacing of Joists: The thickness of the OSB subfloor and the spacing of the floor joists are crucial factors in determining the overall rigidity of the flooring system. A minimum OSB thickness of ¾ inch is generally recommended, but a thicker subfloor (1 inch or greater) is preferable, especially if the joists are spaced further apart. Refer to local building codes for specific requirements regarding subfloor thickness and joist spacing. Inspect the joists for any signs of rot, insect damage, or other structural problems. Addressing these issues is essential to prevent future problems with the tile installation.
Deflection: Deflection refers to the amount the subfloor bends or flexes when weight is applied. Excessive deflection is a primary cause of tile cracking. To assess deflection, walk across the subfloor and observe any noticeable movement or bounce. A simple test involves placing a level on the floor and having someone walk nearby. If the level indicates significant movement, the subfloor is likely deflecting excessively. If deflection is significant, consider adding a layer of plywood or OSB over the existing subfloor to stiffen it. Alternatively, sistering the joists (attaching additional joists alongside the existing ones) can provide added support and reduce deflection.
Moisture Content: OSB is susceptible to moisture absorption, which can lead to swelling, warping, and eventual decay. Use a moisture meter to measure the moisture content of the OSB. The ideal moisture content should be within the range specified by the tile adhesive manufacturer. If the moisture content is too high, allow the OSB to dry thoroughly before proceeding. Ensure the bathroom is adequately ventilated to facilitate drying. Identifying and addressing sources of moisture, such as leaky pipes or inadequate ventilation, is crucial to prevent future problems.
Surface Condition: Inspect the surface of the OSB for any imperfections, such as unevenness, bumps, or splinters. Remove any protruding nails or screws and ensure the surface is clean and free of debris. Sand down any uneven areas to create a smooth, level surface. A clean, smooth surface is essential for proper adhesion of the underlayment and tile adhesive.
Preparing the OSB Subfloor for Tiling
Once the OSB subfloor has been thoroughly assessed, the next step involves preparing it to receive the tile underlayment. This preparation process is critical for ensuring proper adhesion, waterproofing, and overall stability of the tile installation.
Cleaning and Leveling: Begin by thoroughly cleaning the OSB subfloor. Sweep or vacuum the surface to remove any dust, dirt, and debris. Use a damp cloth or sponge to wipe down the surface, ensuring it is free of any oily residues. Address any unevenness or imperfections in the subfloor by using a self-leveling compound. Follow the manufacturer's instructions carefully when applying the self-leveling compound. Allow the compound to dry completely before proceeding to the next step.
Applying a Crack Isolation Membrane: A crack isolation membrane is a thin, flexible material that helps to prevent cracks in the subfloor from transferring to the tile. This is particularly important when tiling over OSB, as OSB is more prone to movement and cracking than other subfloor materials. There are two main types of crack isolation membranes: liquid-applied and sheet membranes. Liquid-applied membranes are brushed or rolled onto the subfloor, while sheet membranes are glued down. Choose a crack isolation membrane that is specifically designed for use over OSB. Follow the manufacturer's instructions for application, ensuring that the entire surface is covered and that the membrane is properly bonded to the subfloor.
Waterproofing: Bathrooms are inherently wet environments, so waterproofing the subfloor is essential to prevent moisture damage. Apply a waterproof membrane over the crack isolation membrane. This can be a liquid-applied membrane or a sheet membrane designed for waterproofing. Pay particular attention to seams and corners, as these are the most vulnerable areas for water penetration. Use a sealant or waterproofing tape to reinforce these areas. Ensure that the membrane extends up the walls a few inches to create a waterproof barrier.
Installing Tile Over the Prepared OSB Subfloor
With the OSB subfloor properly prepared, the final step is to install the tile. This process requires careful planning, precise execution, and the use of appropriate materials to ensure a successful and long-lasting tile installation.
Choosing the Right Tile Adhesive: Selecting the correct tile adhesive is crucial for ensuring a strong and durable bond between the tile and the subfloor. Use a modified thin-set mortar specifically designed for use over wood subfloors. Modified thin-set mortars contain polymers that enhance their adhesion and flexibility, making them better suited for accommodating the movement of OSB. Follow the manufacturer's instructions for mixing and application. Use a notched trowel of the appropriate size to ensure proper coverage of the mortar.
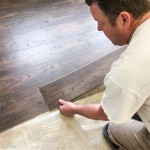
Laying the Tile: Begin by laying out the tiles in a dry run to determine the best layout and tile placement. Consider the placement of grout lines and ensure that the tiles are evenly spaced. Use tile spacers to maintain consistent grout lines. Apply the thin-set mortar to a small area of the subfloor, using a notched trowel to create ridges. Press the tiles firmly into the mortar, using a slight twisting motion to ensure good contact. Work in small sections, ensuring that the mortar does not dry out before the tiles are laid. Periodically check the tiles with a level to ensure they are even and aligned. Use a rubber mallet to gently tap the tiles into place if necessary.
Grouting and Sealing: After the thin-set mortar has cured completely (typically 24-48 hours), remove the tile spacers and prepare to grout the tiles. Choose a grout that is appropriate for use in wet environments. Mix the grout according to the manufacturer's instructions. Apply the grout to the tile joints, using a grout float to force the grout into the spaces. Remove excess grout with a damp sponge, wiping diagonally across the tile surface. Allow the grout to dry for the recommended time, then buff the tiles with a clean cloth to remove any remaining grout haze. After the grout has fully cured, seal the grout lines with a grout sealer. This will help to protect the grout from staining and water damage.
Addressing Potential Issues: Despite careful preparation, potential issues may arise during the tiling process. If tiles crack after installation, it is typically due to excessive deflection in the subfloor. In this case, it may be necessary to reinforce the subfloor or replace the OSB with a more rigid material. If grout cracks or crumbles, it may be due to inadequate mixing or application of the grout. In this case, the grout may need to be removed and replaced. Regular maintenance, including cleaning and sealing the grout lines, is essential for prolonging the life of the tile floor.
In summary, tiling over OSB subfloor in a bathroom is a challenging but achievable project. Careful assessment, thorough preparation, and the use of appropriate materials are crucial for success. By following the steps outlined in this article, homeowners can create a beautiful and durable tile floor that will enhance the functionality and aesthetic appeal of their bathroom.

Diy Schluter Ditra Install Over Osb Wood Subfloor Tile Underlayment Mudroom Bathroom Episode 1

How To Prepare A Subfloor For Tile Installation The Home

How To Prepare A Subfloor For Tile Installation The Home

Tile Underlayment The Complete Guide For Beginners Diytileguy

Tile Underlayment The Complete Guide For Beginners Diytileguy

How To Install Cement Board On A Floor Diy Family Handyman

Tile Over Concrete Subfloor An Easy Diy Tutorial

How To Prepare A Subfloor For Tile Installation The Home

Best Subfloor For Ceramic Tile

Tile Subfloor Deflection Thickness Common Substrates
See Also