How To Lay Tile Over OSB Subfloor In Bathroom Floors
Laying tile over an OSB (Oriented Strand Board) subfloor in a bathroom presents unique challenges compared to concrete or plywood subfloors. OSB is more susceptible to moisture damage and deflection, both of which can compromise the integrity of the tile installation. Successful tile installation over OSB requires careful preparation, the use of appropriate materials, and adherence to specific techniques.
This article outlines the process of installing tile over an OSB subfloor in a bathroom, addressing key considerations and best practices to ensure a long-lasting and aesthetically pleasing result. The primary focus is on mitigating the inherent weaknesses of OSB while creating a stable and waterproof base for the tile.
Assessing the Subfloor and Addressing Deflection
Before beginning any tile installation, a thorough assessment of the existing OSB subfloor is critical. The subfloor's condition dictates the subsequent steps required for adequate preparation. Key factors to evaluate include the OSB's thickness, span, and the presence of any existing damage or moisture.
The minimum recommended thickness for an OSB subfloor under tile in a bathroom is typically ¾ inch, with thicker options preferred for added stability. Consult local building codes and tile manufacturer recommendations for specific requirements. The span refers to the distance between the floor joists that support the subfloor. Excessive span can lead to deflection, which is the bending or flexing of the floor under weight. This movement can cause tiles to crack or grout to crumble over time. A deflection rating of L/360 or better is generally recommended for tile installations. This means that the floor should not deflect more than 1/360th of its span under a specified load.
If the OSB subfloor exhibits excessive deflection or feels spongy when walked upon, reinforcement is necessary. This can be achieved by adding additional layers of plywood or OSB, ensuring the new layer is securely fastened to the existing subfloor and joists using construction adhesive and screws. The screws should be long enough to penetrate the joists adequately. Staggering the seams of the additional layer relative to the existing subfloor enhances structural integrity.
Inspect the OSB for signs of water damage, such as swelling, discoloration, or delamination. Any damaged sections should be replaced entirely before proceeding. Use OSB specifically rated for flooring applications, as it is designed to withstand higher moisture levels and structural loads. Ensure the replacement OSB is of the same thickness as the existing subfloor.
Before applying any underlayment or setting material, clean the OSB subfloor thoroughly. Remove any dust, debris, or contaminants that could interfere with adhesion. Vacuuming is generally effective, followed by wiping the surface with a damp cloth to remove any remaining residue. Allow the subfloor to dry completely before proceeding.
Installing a Waterproofing Membrane
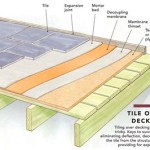
Bathrooms are inherently wet environments, making waterproofing a critical aspect of tile installation, especially over moisture-sensitive OSB. A waterproofing membrane acts as a barrier, preventing water from penetrating the tile and grout and reaching the subfloor. Several types of waterproofing membranes are available, each with its own application techniques and advantages.
Sheet membranes, often made of modified rubber or polyethylene, are applied in large sheets that are adhered to the subfloor using thin-set mortar. These membranes are highly effective at preventing water penetration but require careful installation to ensure complete coverage and proper sealing of seams. Typically, thin-set mortar is applied to the subfloor with a notched trowel, and the membrane is then pressed firmly into the mortar, ensuring full contact. Seams between sheets are sealed using a specialized sealant or tape, depending on the manufacturer's recommendations. Corners and transitions between walls and the floor require careful attention and may necessitate the use of pre-formed or custom-cut pieces of membrane to ensure a watertight seal.
Liquid membranes are applied using a brush, roller, or sprayer, forming a seamless, waterproof coating over the subfloor. These membranes are generally easier to install than sheet membranes, particularly in areas with complex shapes or obstructions. Multiple coats are typically required to achieve the desired thickness and waterproofing performance. Liquid membranes typically cure to form a flexible, rubber-like barrier. Adherence to the manufacturer's recommended application thickness is crucial for optimal performance. Some liquid membranes also incorporate reinforcing fabrics in areas prone to movement or stress, such as corners and transitions.
Regardless of the type of waterproofing membrane chosen, proper surface preparation is essential. The OSB subfloor must be clean, dry, and free of any contaminants that could interfere with adhesion. Any imperfections or cracks in the subfloor should be filled and leveled before applying the membrane. Follow the manufacturer's instructions carefully, paying close attention to recommended application methods, drying times, and seam sealing procedures. Overlap seams adequately to prevent water penetration. Allow the membrane to cure completely before proceeding with tile installation.
Properly integrating the waterproofing membrane with the shower or tub surround is also crucial. The membrane should extend up the walls of the shower or tub to create a continuous waterproof barrier. Use sealant specifically designed for wet areas to seal any gaps or seams between the membrane and the plumbing fixtures.
Selecting and Applying Thin-Set Mortar and Tile
Choosing the right thin-set mortar is critical for a successful tile installation over OSB. Modified thin-set mortars, which contain polymers that enhance adhesion and flexibility, are recommended for use over OSB subfloors. These mortars can accommodate slight movements in the subfloor without cracking the tile or grout. Look for thin-set mortars specifically formulated for use over wood substrates.
Unmodified thin-set mortars are generally not recommended for use over OSB because they are less flexible and may not bond adequately to the OSB surface. Always consult the thin-set mortar manufacturer's recommendations for specific applications and substrate compatibility.
When selecting tile for a bathroom floor over an OSB subfloor, consider the size and weight of the tile. Larger tiles can be more prone to cracking if the subfloor is not perfectly rigid. Smaller tiles provide more grout lines, which can help to distribute stress and accommodate slight movements in the subfloor. Porcelain tile is a durable and water-resistant option, making it suitable for bathroom floors.
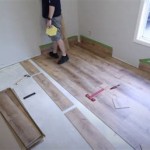
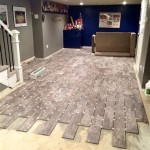
Before applying the thin-set mortar, dry-lay the tiles to plan the layout and ensure proper spacing. This allows for adjustments to avoid awkward cuts or small sliver tiles in prominent areas. Use tile spacers to maintain consistent grout lines. Mix the thin-set mortar according to the manufacturer's instructions, ensuring a smooth, lump-free consistency. Allow the mortar to slake for the recommended time before using it.
Apply the thin-set mortar to the subfloor using a notched trowel. The size of the notches should be appropriate for the size of the tile being installed. Hold the trowel at a 45-degree angle and create uniform ridges of mortar. Press the tiles firmly into the mortar with a slight twisting motion to ensure good contact. Remove any excess mortar from the tile surface immediately.
Periodically check the tiles for levelness using a level or straight edge. Make adjustments as needed to ensure a flat and even surface. Allow the thin-set mortar to cure completely according to the manufacturer's instructions before grouting.
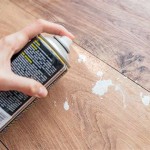
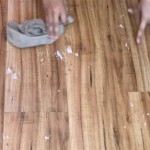
After the thin-set mortar has cured, remove the tile spacers and clean the grout lines. Select a grout that is suitable for wet environments and that matches the color of the tile. Mix the grout according to the manufacturer's instructions. Apply the grout to the tile surface using a grout float, working it into the grout lines. Remove any excess grout from the tile surface using a damp sponge. Allow the grout to cure completely according to the manufacturer's instructions. Seal the grout with a grout sealer to protect it from moisture and stains. The sealer creates a barrier, preventing water from penetrating the grout lines and potentially damaging the subfloor.
Finally, apply caulk to the perimeter of the room where the tile meets the walls, as well as around any plumbing fixtures. Use a high-quality, mildew-resistant caulk that is designed for wet environments. The caulk provides a flexible, waterproof seal that prevents water from seeping behind the tile. Inspect the installation regularly for any signs of damage or leaks. Address any issues promptly to prevent further damage to the subfloor.

Diy Schluter Ditra Install Over Osb Wood Subfloor Tile Underlayment Mudroom Bathroom Episode 1

How To Prepare A Subfloor For Tile Installation The Home

How To Prepare Subfloor For Tile The Home

Tile Underlayment The Complete Guide For Beginners Diytileguy

How To Install Cement Board On A Floor Diy Family Handyman

Diy Installing Tile Floor Large Format Over Schluter Ditra Mudroom Bathroom Episode 3

How To Prepare A Subfloor For Tile Installation The Home

How To Lay Tile Over Plywood

Tile Over Concrete Subfloor An Easy Diy Tutorial

Tile Underlayment The Complete Guide For Beginners Diytileguy
See Also